Using Power BI Field Parameters to translate Data and Values

When building an enterprise reporting solution with Power BI, a question that always comes up is how to handle translations. Large enterprises operate in various countries where people also speak different languages. So a report should be available in all frequently used languages. Ideally, you just create a report once and then a user can decide (or it is decided for him) in which language the report is displayed.

Power BI only partially supports this scenario and the closest we could get *before field parameters* were introduced is already very well described by Chris Webb’s blog post on Implementing Data (As Well As Metadata) Translations In Power BI – a must-read if you need to deal with translations in Power BI. Another good read on the topic is the blog post Multilingual Reports in Power BI from PBI Guy.

As you will quickly realize, the translation of metadata is already pretty easy as it is baked into the engine. Unfortunately this is not the case when you need to translate actual data values (e.g. product names, …). In the multidimensional version of Analysis Services this just worked like a charm as it was also a native feature but this feature never made it to Analysis Services Tabular Models, Azure Analysis Services or Power BI.

The current approaches when it comes to data and value translations are more workarounds than actual solutions. They probably work fine for small data models and very specific use-cases but usually fall short in performance, usability or maintainability when implemented on a larger scale enterprise models.

The recently introduced Field Parameters in Power BI give us a bit more flexibility here and another potential solution to implement data and value translations in Power BI.

Here is what we want to achieve:

  • create a single report only
  • support for multiple languages – metadata and column data
  • only minor changes to the existing data model

How can Field Parameters help here?

Field Parameters allow you to select the columns you want to display in your report/visual on-the-fly. Based on the selection, the reporting engine decides which physical column(s) it needs to use in the query it generates and sends to the data model.
So we can create a Field Parameter for the different columns that hold the translated data values and already easily switch the language by changing the selection of our Field Parameter. This is how our Filed Parameter would be defined:

I did this for all the fields for which translated values are actually provided. Usually this is just a very small subset of all the available columns!

As you can see, Field Parameters allow you to translate the metadata (first value) and also to define the column to use for the data values (second value, using NAMEOF() function).

To change all field parameters at once I introduced an additional 4th column that holds the culture/language of the current row which is then linked to another static DAX table that is defined as follows:

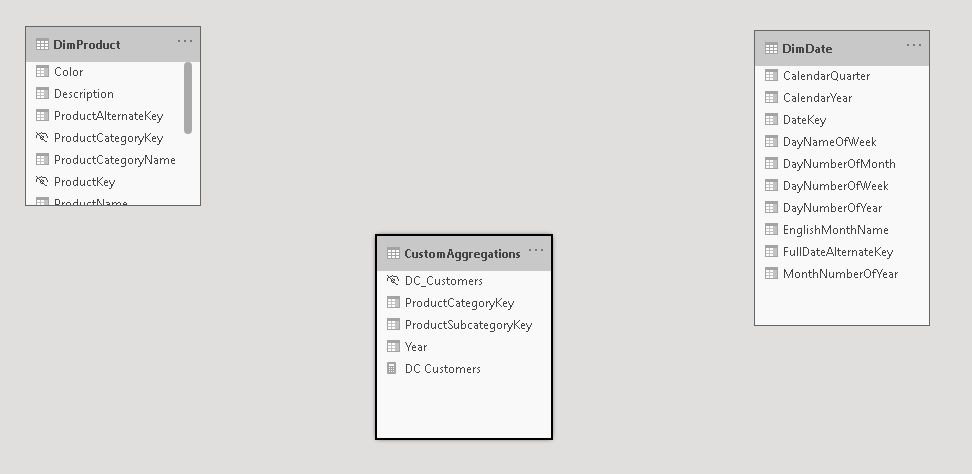
Then relationships are set up between these tables:

In your report you can now simply use the column from the field parameters and add a slicer for the Language table to control which language is displayed. Note: this must be a single-select slicer as otherwise Power BI will build a hierarchy of the different languages!

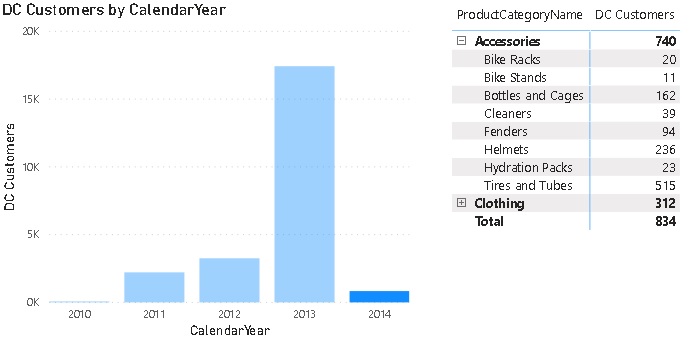
Here is the final result:

(please use Full Screen mode from bottom right corner)

As you can see, we just created a single report that supports multiple languages for both, metadata and data values, allows you to easily switch between them and provides similar performance as if you would have built the report for a single language only!

There are still some open questions when it comes to translating all the labels used on the whole report which is already partially covered in the other blog posts referenced above but this approach brings us another step further to a fully translatable report.

Another nice feature of this approach is that you can also put security on top of the Language/Culture table so a user only sees exactly one row – the one with the language/culture of his choice or country. So a user would not even need to select the language but it would be selected for him automatically!
Ideally you could even use the USERCULTURE() DAX function but unfortunately this is currently not supported in the PBI service. There is already an open idea for which you can vote if this is important to you.
USERCULTUER() DAX function is now finally general available also in the service: https://powerbi.microsoft.com/en-us/blog/userculture-dax-function-now-supported-in-power-bi-premium/

The .pbix file can be downloaded here: PBI_Translations.pbix

Automating the Extraction of BIM metadata from PBIX Files using CI/CD pipelines

The latest updates can always be found in the

PowerBI.CICD repository

In the past I have been working on a lot of different Power BI projects and it has always been (and still is) a pain when it comes to the deployment of changes across multiple tiers(e.g. Dev/Test/Prod). The main problem here being that a file generated in Power BI desktop (.pbix) is basically a binary file and the metadata of the actual data model (BIM) cannot be easily extracted or derived. This causes a lot of problems upstream when you want to automate the deployment using CI/CD pipelines. Here are some common approaches to tackle these issues:

  • Use of Power BI deployment pipelines
    The most native solution, however quite inflexible when it comes to custom and conditional deployments to multiple stages
  • Creation a Power BI Template (.pbit) in addition to your .pbix file and check in both
    This works because the .pbit file basically contains the BIM file but its creation is also a manual step
  • Extraction of the BIM file while PBI desktop is still running (e.g. using Tabular Editor)
    With the support of external tools this is quite easy, but is still a manual step and requires a 3rd party tool
  • Development outside of PBI desktop (e.g. using Tabular Editor)
    Probably the best solution but unfortunately not really suited for business users and for the data model only but not for the Power Queries

As you can see, there are indeed some options, but none of them is really ideal, especially not for a regular business user (not talking about IT pros). So I made up my mind and came up with the following list of things that I would want to see for proper CI/CD with Power BI files:

  • Users should be able to work with their tool of choice (usually PBI desktop, optional with Tabular Editor or any other 3rd party tool)
  • Automatically extracting the metadata whenever the data model changes
  • Persisting the metadata (BIM) in git to allow easy tracking of changes
  • Using the persisted BIM file for further automation (CD)

Solution

The core idea of the solution is to use CI/CD pipelines that automatically extracts the metadata of a .pbix file as soon as it is pushed to the Git repository. To do this, the .pbix file is automatically uploaded to a Power BI Premium workspace using the Power BI REST API and the free version of Tabular Editor 2 then extracts the BIM file via the XMLA endpoint and push it back to the repository.

I packaged this logic into ready-to-use YAML pipelines for Github Actions and Azure DevOps Pipelines being the two most common choices to use with Power BI. You can just copy the YAML files from the PowerBI.CICD repository to your own repo. Then simply provide the necessary information to authentication against the Power BI service and that’s it. As soon as everything is set up correctly. the pipeline will automatically create a .database.json for every PBIX file that you upload (assuming it contains a data model) and track it in your git repository!

All further details can be found directly in the repository which is also updated frequently!

Reading Delta Lake Tables natively in PowerBI

I also contributed the connector described in this post to the official delta.io Connectors page and repo (link). You will find the most recent updates in my personal repo which are then merged to the official repo once it has been tested thoroughly!

Working with analytical data platforms and big data on a daily basis, I was quite happy when Microsoft finally announced a connector for Parquet files back in November 2020. The Parquet file format is developed by the Apache foundation as an open-source project and has become a fundamental part of most data lake systems nowadays.

“Apache Parquet is a columnar storage format available to any project in the Hadoop ecosystem, regardless of the choice of data processing framework, data model or programming language.”

However, Parquet is just a file format and does not really support you when it comes to data management. Common data manipulation operations (DML)  like updates and deletes still need to be handled manually by the data pipeline. This was one of the reasons why Delta Lake (delta.io) was developed besides a lot of other features like ACID transactions, proper meta data handling and a lot more. If you are interested in the details, please follow the link above.

So what is a Delta Lake table and how is it related to Parquet? Basically a Delta Lake table is a folder in your Data Lake (or wherever you store your data) and consists of two parts:

  1. Delta log files (in the sub-folder _delta_log)
  2. Data files (Parquet files in the root folder or sub-folders if partitioning is used)

The Delta log persists all transactions that modified the data or meta data in the table. For example, if you execute an INSERT statement, a new transaction is created in the Delta log and a new file is added to the data files which is referenced by the Delta log. If a DELETE statement is executed, a particular set of data files is (logically) removed from the Delta log but the data file still resides in the folder for a certain time. So we cannot just simply read all Parquet files in the root folder but need to process the Delta log first so we know which Parquet files are valid for the latest state of the table.

These logs are usually stored as JSON files (actually JSONL files to be more precise). After 10 transactions, a so-called checkpoint-file is created which is in Parquet format and stores all transactions up to that point in time. The relevant logs for the final table are then the combination of the last checkpoint-file and the JSON files that were created afterwards. If you are interested in all the details on how the Delta Log works, here is the full Delta Log protocol specification.

From those logs we get the information which Parquet files in the main folder must be processed to obtain the final table. The content of those Parquet files can then simply be combined and loaded into PowerBI.

I encapsulated all this logic into a custom Power Query function which takes the folder listing of the Delta table folder as input and returns the content of the Delta table. The folder listing can either come from an Azure Data Lake Store, a local folder, or an Azure Blob Storage. The mandatory fields/columns are [Content], [Name] and [Folder Path]. There is also an optional parameter which allows you the specify further options for reading the Delta table like the Version  if you want to use time-travel. However, this is still experimental and if you want to get the latest state of the table, you can simply omit it.

The most current M-code for the function can be found in my Github repository for PowerBI: fn_ReadDeltaTable.pq and will also be constantly updated there if I find any improvement.
The repository also contains an PowerBI desktop file (.pbix) where you can see the single steps that make up for the final function.

Once you have added the function to your PowerBI / Power Query environment you can call it like this:

I would further recommend to nest your queries and separate the access to the storage (e.g. Azure Data Lake Store) and the reading of the table (execution of the function). If you are reading for an ADLS, it is mandatory to also specify [HierarchicalNavigation = false] !
If you are reading from a blob storage, the standard folder listing is slightly different and needs to be changed.

Right now the connector/function is still experimental and performance is not yet optimal. But I hope to get this fixed in the near future to have a native way to read and finally visualize Delta lake tables in PowerBI.

After some thorough testing the connector/function finally reached a state where it can be used without any major blocking issues, however there are still some known limitations:

  • Partitioned tables
    • currently columns used for partitioning will always have the value NULL FIXED!
    • values for partitioning columns are not stored as part of the parquet file but need to be derived from the folder path FIXED!
  • Performance
    • is currently not great but this is mainly related to the Parquet connector as it seems
    • very much depends on your data – please test on your own!
  • Time Travel
    • currently only supports “VERSION AS OF”
    • need to add “TIMESTAMP AS OF”
  • Predicate Pushdown / Partition Elimination
    • currently not supported – it always reads the whole table FIXED!

Any feedback is welcome!

Special thanks also goes to Imke Feldmann (@TheBIccountant, blog) and Chris Webb (@cwebb_bi, blog) who helped me writing and tuning the PQ function!

Downloads: fn_ReadDeltaTable.pq (M-code)

PowerBI & Big Data – Using pre-calculated Aggregations of Semi- and Non-Additive Measures

Calculating and visualizing semi- and non-additive measures like distinct count in Power BI is usually not a big deal. However, things can become challenging if your data volume grows and exceeds the limits of Power BI!

In one of my recent projects we wanted to visualize data from the customers analytical platform based on Azure Databricks in Power BI. The connection between those two tools works pretty flawless which I also described in my previous post but the challenge was the use-case and the calculations. We wanted to display the distinct customers across various aggregations levels over a billion rows fact table. We came up with different potential solutions all having their pros and cons:

  1. load all data into Power BI (import mode) and do the aggregations there
  2. use Power BI with direct query and let the back-end do the heavy lifting
  3. load only necessary pre-aggregated data into Power BI (import mode)

Please keep in mind that we are dealing with a distinct count measure here. Semi- and Non-additive measure like this cannot easily be aggregated from lower levels to higher levels without having all the detail data available!

Option 1. has the obvious drawback that data model would be huge in size as we were dealing with billions of transactions. This would have exceeded our current size limits for Power BI data models.

Option 2. would usually work fine, but again, for the amount of data we were dealing with the back-end was just no able to provide sub-second latency that was required.

So we went for Option 3. and did the various aggregations on the different levels in Azure Databricks and loaded only the final results to Power BI. First we wanted to use Power BI Aggregations and Composite Models. Unfortunately, this did not work out for us as we were not in control which aggregation table (we had multiple for the different aggregation levels) was used by the engine which potentially resulted in wrong results when additional aggregation was done in Power BI. Also, when slicing for random aggregation levels, Power BI was querying the details in direct query mode causing very poor query performance.

After some further thinking we came up with a new solution which was also based on pre-calculated aggregations but not realized using built-in aggregation tables but having a combined table for all aggregations and some very straight-forward DAX to select the row we wanted! In the end the whole solution consisted of one SQL view using COUNT(DISTINCT xxx) aggregation and GROUP BY GROUPING SETS (T-SQL, Databricks, … supported in all major SQL engines) and a very simple DAX measure!

Here is a little example that illustrates the approach. Assume you want to calculate the distinct customers that bought certain products in a subcategory/category by year. The first step is to create a view that provides this information:

Please note that when we have a natural relationship between hierarchy levels (= only 1:n relationships) we need to specify the current level and also all upper levels to allow a proper drill-down later on! E.g. ProductCategory (1 -> n) ProductSubcategory

This calculates all the different aggregation levels we need. Columns with NULL mean they were not filtered/grouped by when calculating the aggregation.
Rows 80-84 contain the aggregations grouped by Year only whereas rows 77-79 contain only aggregates by ProductCategoryKey. The rows 75-76 were aggregated by Year AND ProductCategoryKey.
Depending on your final report layout, you may not need all of them and you should consider removing those that are not needed!

This table is then loaded into Power BI. You can either use a custom SQL query like above in Power BI directly or create a view in the back-end system which would be my preferred solution. Alternatively you can also create all these grouping sets using Power Query/M. The incredible Imke Feldmann (t, b) came up with a solution that allows you to specify the grouping sets in a similar way as in SQL and do all this magic within Power BI directly! I hope she will blog about it pretty soon!
(The sample workbook at the end of this post also contains a little preview of this M-magic.)

Now that we have all the data we need in Power BI, we need to display the right values for the selections in the report which of course can be dynamic. That’s a bit tricky but once you understand the concept, it is pretty straight forward. First of all, the table containing the aggregations must not be related to any other table as we build them on the fly within our DAX measure. The table itself can also be hidden.

And this is the final DAX for our measure:

The first part is to get all the selected values of the lookup/dimension tables the user selects on the report. These are all the _sel_XXX variables. SELECTEDVALUE() returns the selected value if only one item is in the current filter context and BLANK()/NULL otherwise. We then use TREATAS() to apply those filters (either a single item or NULL) to our aggregations table. This should usually only return a table with a single row so we can use MAXX() to get our actual value from that one row. I also added a check in case multiple rows are returned which can potentially happen if you use multi-selects in your filters and instead of showing wrong values I’d rather indicate that there is something wrong with the calculation.

The measure can then be sliced and diced by our pre-defined aggregation levels as if it would be a regular measure but instead of having to process those expensive calculations on the fly we use the pre-calculated aggregates!

One thing to be aware of is that it will produce wrong results if multiple items for any of the aggregation levels are selected so it is highly recommended to set all slicers/filters to single select only or ensure that the filtered aggregation levels are also used in the chart. In this case only the grand total will show wrong values or NULL then.
This could also be fixed in the DAX measure by checking how many rows are actually selected for each level and throw an error in case it is used in a filter and the count of values is > 1.

I did some further thinking and this approach could probably also be used to mimic custom roll-ups and unary operators we know from Analysis Services Multidimensional cubes. If I find some proper examples and this turns out to be feasibly I will write another blog post about it!

Download: Custom_Aggregations_NonAdditive_Measure.pbix

Storing Images in a PowerBI/Analysis Services Data Models

As some of you probably remember, when PowerPivot was still only available in Excel and Power Query did not yet exist, it was possible to load images from a database (binary column) directly into the data model and display them in PowerView. Unfortunately, this feature did not work anymore in PowerBI Desktop and the only way to display images in a visual was to provide the URL of the image which is public accessible. The visual would then grab the image on-the-fly from the URL and render it. This of course has various drawbacks:

  • The image needs to be available via a public URL (e.g. upload it first to an Azure Blob Store)
  • The image cannot be displayed when you are offline
  • The link may break in the future or point to a different image as initially when the model was built

There is also a  feedback items about this issue which I encourage you to vote for: https://ideas.powerbi.com/forums/265200-power-bi-ideas/suggestions/7340150-data-model-image-binary-support-in-reports

Until today I was sure that we have to live with this limitation but then I came across this blog post from Jason Thomas aka SqlJason. He shows a workaround to store images directly in the PowerBI data model and display them in the report as if they were regular images loaded from an URL. This is pretty awesome and I have to dedicate at least 99.9% of this blog post to Jason and his solution!

However, with this blog post I would like to take Jasons’ approach a step further. He creates the Base64 string externally and hardcodes it in the model using DAX. This has some advantages (static image, no external dependency anymore, …) but also a lot of disadvantages (externally create the Base64 string, manually copy&paste the Base64 string for each image, hard to maintain, cannot dynamically add images …). For scenarios where you have a local folder with images, a set of [private] URLs pointing to images or images stored in a SQL table (as binary) which you want to load into your PowerBI data model, this whole process should be automated and ideally done within PowerBI.

PowerBI_Images_Stored_Sample

Fortunately, this turns out to be quite simple! Power Query provides a native function to convert any binary to a Base64 encoded string: Binary.ToText() . The important part to point out here is to use the second parameter which allows you to set the encoding of the resulting text. It supports two values: BinaryEncoding.Base64 (default) and BinaryEncoding.Hex. Once we have the Base64 string, we simply need to prefix it with the following meta data: “data:image/jpeg;base64, “

To make it easy, I wrote to two custom PowerQuery functions which convert and URL or a binary image to the appropriate string which can be used by PowerBI:

If your images reside in a local folder, you can simply load them using the “Folder” data source. This will give you a list of all images and and their binary content as separate column. Next add a new Custom Column where you call the above function to convert the binary to a prefixed Base64 string which can then be displayed in PowerBI (or Analysis Services) as a regular image. Just make sure to also set the Data Category of the column to “Image URL”:PowerBI_Image_URL_Base64

And that’s it, now your visual will display the image stored in the data model without having to access any external resources!

Caution: As Jason also mentions at the end of his blog post, there is an internal limitation about the size of a text column. So this may cause issues when you try to load high-resolution images! In this case, simply lower the size/quality of the images before you load them.
UPDATE May 2019: Chris Webb provides much more information and a solution(!) to this issue in his blog post: https://blog.crossjoin.co.uk/2019/05/19/storing-large-images-in-power-bi-datasets

Download: StoreImageInPbiModel.pbix
This PowerBI Desktop model contains all samples from above including the PowerQuery functions!

Processing Azure Analysis Services with OAuth Sources (like Azure Data Lake Store)

As you probably know from my last blog post, I am currently upgrading the PowerBI reporting platform of one of my customer from a PowerBI backend (dataset hosted in PowerBI service) to an Azure Analysis Services backend. The upgrade/import of the dataset into Azure Analysis Services itself worked pretty flawless and after switching the connection of the reports everything worked as expected and everyone was happy. However, things got a bit tricky when it came to automatically refreshing the Azure Analysis Services database which was based on an Azure Data Lake Store. For the original PowerBI dataset, this was pretty straight forward as a scheduled refresh from an Azure Data Lake store data source works out of the box. For Azure Analysis Services this is a bit different.

When you build and deploy your data model from Visual Studio, your are prompted for the credentials to access ADLS which are then stored in the data source object of AAS. As you probably know, AAS uses OAuth authentication to access data from ADLS. And this also causes a lot of problems. OAuth is based on tokens and those tokens are only valid for a limited time, by default this is 2 hours. This basically means, that you can process your database for the next 2 hours and it will fail later on with an error message saying that the token expired. (The above applies to all OAuth sources!)
This problem is usually solved by using an Azure Service Principal instead of a regular user account where the token does not expire. Unfortunately, this is not supported at the moment for ADLS data sources and you have to work around this issue.


IMPORTANT NOTE: NONE OF THE FOLLOWING IS OFFICIALLY SUPPORTED BY MICROSOFT !!!


So the current situation that we need to solve is as follows:

  • we can only use regular user accounts to connect AAS to ADLS as service principals are not supported yet
  • the token expires after 2 hours
  • the database has to be processed on a regular basis (daily, hourly, …) without any manual interaction
  • manually updating the token is (of course) not an option

Before you continue here, make sure that you read this blog post first: https://blogs.msdn.microsoft.com/dataaccesstechnologies/2017/09/01/automating-azure-analysis-service-processing-using-azure-automation-account/
It describes the general approach of using Azure Automation to process an Azure Analysis Services model and most of the code in this blog post if based on this!
Also this older blog post will be a good read as some concepts and code snippets are reused here.

Back to our example – as we were already using Azure Automation for some other tasks, we decided to also use it here. Also, PowerShell integrates very well with other Azure components and was the language of choice for us. To accomplish our goal we had to implement 3 steps:

  1. acquire a new OAuth token
  2. update the ADLS data source with the new token
  3. run our processing script

I could copy the code for the first step more or less from one of my older blog post (here) where I used PowerShell to acquire an OAuth token to trigger a refresh in PowerBI.

The second step is to update ADLS data source of our Azure Analysis Services model. To get started, the easiest thing to do is to simply open the AAS database in SQL Server Management Studio and let it script the existing datasource for you: AAS_Script_OAuth_DataSource
The resulting JSON will look similar to this one:

Update ADLS DataSource
{
“createOrReplace”: {
“object”: {
“database”: “Channel Analytics”,
“dataSource”: “DS_ADLS”
},
“dataSource”: {
“type”: “structured”,
“name”: “DS_ADLS”,
“connectionDetails”: {
“protocol”: “data-lake-store”,
“address”: {
“url”: “https://mydatalake.azuredatalakestore.net”
}
},
“credential”: {
“AuthenticationKind”: “OAuth2”,
“token_type”: “********”,
“scope”: “********”,
“expires_in”: “********”,
“ext_expires_in”: “********”,
“expires_on”: “********”,
“not_before”: “********”,
“resource”: “********”,
“id_token”: “********”,
“kind”: “DataLake”,
“path”: “https://mydatalake.azuredatalakestore.net/”,
“RefreshToken”: “********”,
“AccessToken”: “********”
}
}
}
}

The important part for us is the “credential” field. It contains all the information necessary to authenticate against our ADLS store. However, most of this information is sensitive so only asterisks are displayed in the script. The rest of the JSON (except for the “credential” field) is currently hardcoded in the PowerShell cmdlet so if you want to use it, you need to change this manually!
The PowerShell cmdlet then combines the hardcoded part with an updated “credential”-field which is obtained by invoking a REST request to retrieve a new OAuth token. The returned object is modified a bit in order to match the required JSON for the datasource.
Once we have our final JSON created, we can send it to our Azure Analysis Services instance by calling the Invoke-ASCmd cmdlet from the SqlServer module.
Again, please see the original blog post mentioned above for the details of this approach.

After we have updated our datasource, we can simply call our regular processing commands which will then be executed using the newly updated credentials.
The script I wrote allows you to specify which objects to process in different ways:

  • whole database (by leaving AASTableName and AASPartitionName empty)
  • a single or multiple table and all its partitions (by leaving only AASPartitionName empty)
  • or multiple partitions of a single table (by specifying exactly one AASTableName and multiple AASPartitionNames

If multiple tables or partitions are specified, the elements are separated by commas (“,”)

So to make the Runbook work in your environment, follow all the initial steps as described in the original blog post from Microsoft. In addition, you also need to create an Application (Type = “Native”) in your Azure Active Directory to obtain the OAuth token programmatically. This application needs the “Sign in and read user profile” permission from the API “Windows Azure Active Directory (Microsoft.Azure.ActiveDirectory)”:
AAD_App_Permissions
Also remember the ApplicationID, it will be used as a parameter for the final PowerShell Runbook (=parameter “ClientID”!
When it comes to writing the PowerShell code, simply use the code from the download at the end of this blog post.

For the actual credential that you are using, make sure that it has the following permissions:

  • to update the AAS datasource (can be set in the AAS model or for the whole server)
  • has access to the required ADLS files/folders which are processed (can be set e.g. via ADLS Data Explorer)
  • (if you previously used your own account to do all the AAS and ADLS development, this should work just fine)

In general, a similar approach should work for all kinds of datasources that require OAuth authentication but so far I have only tested it with Azure Data Lake Store!

Download: AAS_Process_OAuth_Runbook.ps1

Visualizing SSAS Calculation Dependencies using PowerBI


UPDATE: This does not work for Tabular Models in Compatibility Level 120 or above as they do not expose the calculation dependencies anymore!


One of my best practices when designing bigger SQL Server Analysis Services (SSAS) Tabular models is to nest calculations whenever possible. The reasons for this should be quite obvious:

  • no duplication of logics
  • easier to develop and maintain
  • (caching)

However, this also comes with a slight drawback: after having created multiple layers of nested calculations it can be quite hart to tell on which measures a top-level calculations actually depends on. Fortunately the SSAS engine exposes this calculation dependencies in one of its DMVs – DISCOVER_CALC_DEPENDENCY.
This DMV basically contains information about all calculations in the model:

  • Calculated Measures
  • Calculated Columns
  • Relationships
  • Dependencies to Tables/Columns

Chris Webb already blogged about this DMV some time ago and showed some basic (tabular) visualization within an Excel Pivot table (here). My post focuses on PowerBI and how can make the content of this DMV much more appealing and visualize it in a way that is very easy to understand.
As the DMV is built up like a parent-child hierarchy, I had to use a recursive M-function to resolve this self-referencing table which actually was the hardest part to do. Each row contains a link to a dependent object, which can have other dependencies again. In order to visualize this properly and let the user select a Calculation of his choice to see a calculation tree, I needed to expand each row with all of its dependencies, keeping their link to the root-node:

Here is a little example:

Object Referenced_Object
A B
B C

The table above is resolved to this table:

Root Object Referenced_Object
A A B
A B C
B B C

The Root-column is then used to filter and get all dependent calculations.
The PowerBI file also contains some other M-functions but those are mainly for ease-of-use and to keep the queries simple.

Once all the data was loaded into the model, I could use one of PowerBI’s custom visuals from the PowerBI Gallery – the Sankey Chart with Labels
SSAS_Visualizing_Tabular_Calc_Dependencies

Here is also an interactive version using the Publishing Feature of Power BI:


You can use the Slicers to filter on the Table, the Calculation Type and the Calculation itself and the visual shows all the dependencies down to the physical objects being Tables and Columns. This makes it a lot easier to understand your model and the dependencies that you built up over time.
I attached the sample-PowerBI-file below. You simply need to change the connectionstring to your SSAS Tabular Server and refresh the data connections.

The PowerBI-file (*.pbix) can be downloaded here: SSAS_CalcDependencies.pbix

Open Analysis Services Tabular Database Online

Those of you who have been working with SSAS Multidimensional in the past probably know that you can connect online to their SSAS database via Visual Studio / Data Tools.
Open_SSAS_DB_Visual_Studio

Any change you make (and save) online, will be directly deployed to the server and is the visible to the end-user immediately. This can be very convenient if you want to quickly check something or do some hot-fixes (e.g. changing the MDX script).  But be aware, structural changes might require you to process the changed and dependent objects so be sure about what you are changing online, especially if you are connecting to a productive environment!

I am quite sure that everyone who works with SSAS Tabular has also tried this feature for his Tabular database and ended up with the following error message:
”You are trying to connect to <servername> server running in tabular mode using the Tabular Model Designer. The option to open an Analysis Services Database is supported for servers running multidimensional mode only.”
Open_SSAS_DB_Visual_Studio_Tabular

So this simply does not work out of the box. However, there is a neat workaround which allows you to connect to your online SSAS Tabular database and do any changes you want. The idea behind this is to use the online database as our workspace database.

The first thing to do is to open Visual Studio / Data Tools and import the existing database into a new Project:
Visual_Studio_Import_SSAS_DB_Tabular

Then you need to select your workspace server. If there is no pop-up asking your for a workspace server, then you have already configured a default one which will be used in this case. As we are going to change this in the next step again, it does not really matter which workspace server you choose.

Now you are asked for the database which you want to import – choose the one that you want to connect to online. Once the import process is finished, Visual Studio already creates a workspace database for you and names it as follows: “<VS ProjectName>_<NT-Username>_<random GUID>” – in my case it was “TabularProject1_gbrueckl_b44f11de-21f4-4d18-bf67-0c25652fceba”. Any change you make in Visual Studio will be deployed directly to this database. Closing Visual Studio will unload the workspace database from memory by default.

Having all this information you probably can imagine where all this is leading to. The workspace database name and server can be configured and are persisted in the user-specific “Model.bim_<user>.settings”-file located in your project folder:

Model.bim_gbrueckl.settings
<?xml version=1.0 encoding=utf-8?>
<ModelUserSettings xmlns:xsi=http://www.w3.org/2001/XMLSchema-instance xmlns:xsd=http://www.w3.org/2001/XMLSchema>
  <ServerName>localhost\TAB2014</ServerName>
  <DatabaseName>AdventureWorksDW2012_Online_gbrueckl_b44f11de-21f4-4d18-bf67-0c25652fceba</DatabaseName>
  <DbRetention>OnDisk</DbRetention>
  <SnapshotBackup>DoNotKeepBackup</SnapshotBackup>
  <Annotations />
  <IsRecalcRequired>false</IsRecalcRequired>
  <IsImpersonationModified>false</IsImpersonationModified>
  <CheckForImpersonationWarning>false</CheckForImpersonationWarning>
  <RequirePastedTablesUpgrade>false</RequirePastedTablesUpgrade>
  <TruncatedTables />
  <IsPowerPivotMetadataScriptExecuted>false</IsPowerPivotMetadataScriptExecuted>
  <IsASImport>false</IsASImport>
  <IsPowerPivotImport>false</IsPowerPivotImport>
  <SelectedCompatibilityLevel>300</SelectedCompatibilityLevel>
</ModelUserSettings>

The settings you need to change here should be obvious – <ServerName> and <DatabaseName>. Change them to match your online SSAS Tabular server and database – the one you previously imported the project from.
But be sure to also change the <DbRetention>! Leaving the default “OnDisk” here would unload your database once you close Visual Studio what is definitely not what you want! You need to set this setting to “InMemory” to keep the database in memory – remember, we want to connect online but keep the database accessible once we are done.

Before you do all this changes you should close your Visual Studio solution completely to ensure there is nothing cached internally. Then simply open the .settings-file, do the changes described above and re-open your solution. If you have done everything correctly you should already see data for all of your tables:
Visual_Studio_SSAS_Tabular_with_Data
This is already the live-data that resides in your online database!

Congratulations! You are now connected online to your SSAS Tabular Database!

This approach can also be very useful if you are working with a backup of a SSAS Tabular database as it allows you to make online changes to the restored database and see all the data that exists in the database. Importing only the database project without this little hack would leave you with an empty database project which is very hard to work with if you need to create new calculations. Further, this also does not require you to reprocess the whole database which might not even be possible if you have no connection the the data sources underneath!

But before you get too much excited about this, there are some more things to keep in mind:

  • This is not officially supported by Microsoft
  • This was just experimental but proved (for me) to be very handy in some scenarios
  • Opening a SSAS Tabular Solution in Visual Studio sends and ALTER statement to the workspace database (in this case this is your productive database!) and updates the server with the metadata defined in your local .bim-file. If your server database changes frequently, this is probably not what you want as you would overwrite changes done by someone else recently. To work around this issue you would need to re-create/import your SSAS project every time before making any online changes to make sure you are always re-deploying the current state of the database when opening your local SSAS project.
  • I am not responsible for any data loss, damage or whatsoever!

If you want to use this approach to deploy hot-fixes and this happens frequently, you may also consider using a more professional approach for this – for example the BISM Normalizer Visual Studio Add-In which allows you to select the changes that you want to deploy to a target server, similar to schema compare for SQL Server.

Calculating Pearson Correlation Coefficient using DAX

The original request for this calculation came from one of my blog readers who dropped me a mail asking if it possible to calculated the Pearson Correlation Coefficient (PCC or PPMCC) in his PowerPivot model. In case you wonder what the Pearson Correlation Coefficient is and how it can be calculated – as I did in the beginning –  these links What is PCC, How to calculate PCC are very helpful and also offer some examples and videos explaining everything you need to know about it. I highly recommend to read the articles before you proceed here as I will not go into the mathematical details of the calculation again in this blog which is dedicated to the DAX implementation of the PCC.

UPDATE 2017-06-04:
Daniil Maslyuk posted an updated version of the final calculation using DAX 2.0 which is much more readable as it is using variables instead of separate measures for every intermediate step. His blog post can be found at https://xxlbi.com/blog/pearson-correlation-coefficient-in-dax/

Anyway, as I know your time is precious, I will try to sum up its purpose for you: “The Pearson Correlation Coefficient calculates the correlation between two variables over a given set of items. The result is a number between -1 and 1. A value higher than 0.5 (or lower than –0.5) indicate a strong relationship whereas numbers towards 0 imply weak to no relationship.”

The two values we want to correlate are our axes, whereas the single dots represent our set of items. The PCC calculates the trend within this chart represented as an arrow above.

The mathematical formula that defines the Pearson Correlation Coefficient is the following:

The PCC can be used to calculate the correlation between two measures which can be associated with the same customer. A measure can be anything here, the age of a customer, it’s sales, the number of visits, etc. but also things like sales with red products vs. sales with blue products. As you can imagine, this can be a very powerful statistical KPI for any analytical data model. To demonstrate the calculation we will try to correlate the order quantity of a customer with it’s sales amount. The order quantity will be our [MeasureX] and the sales will be our [MeasureY], and the set that we will calculate the PCC over are our customers. To make the whole calculation more I split it up into separate measures:

  1. MeasureX := SUM(‘Internet Sales’[Order Quantity])
  2. MeasureY := SUM(‘Internet Sales’[Sales Amount])

Based on these measures we can define further measures which are necessary for the calculation of our PCC. The calculations are tied to a set if items, in our case the single customers:

  1. Sum_XY := SUMX(VALUES(Customer[Customer Id]), [MeasureX] * [MeasureY])
  2. Sum_X2 := SUMX(VALUES(Customer[Customer Id]), [MeasureX] * [MeasureX])
  3. Sum_Y2 := SUMX(VALUES(Customer[Customer Id]), [MeasureY] * [MeasureY])
  4. Count_Items := DISTINCTCOUNT(Customer[Customer Id])

Now that we have calculated the various summations over our base measures, it is time to create the numerator and denominator for our final calculation:

  1. Pearson_Numerator :=
  2.     ([Count_Items] * [Sum_XY]) – ([MeasureX] * [MeasureY])
  3. Pearson_Denominator_X :=
  4.     ([Count_Items] * [Sum_X2]) – ([MeasureX] * [MeasureX])
  5. Pearson_Denominator_Y :=
  6.     ([Count_Items] * [Sum_Y2]) – ([MeasureY] * [MeasureY])
  7. Pearson_Denominator :=
  8.     SQRT([Pearson_Denominator_X] * [Pearson_Denominator_Y])

Having these helper-measures in place the final calculation for our PCC is straight forward:

  1. Pearson := DIVIDE([Pearson_Numerator], [Pearson_Denominator])

This [Pearson]-measure can then be used together with any attribute in our model – e.g. the Calendar Year in order to track the changes of the Pearson Correlation Coefficient over years:

Pearson by Year

For those of you who are familiar with the Adventure Works sample DB, this numbers should not be surprising. In 2005 and 2006 the Adventure Works company only sold bikes and usually a customer only buys one bike – so we have a pretty strong correlation here. However, in 2007 they also started selling Clothing and Accessories which are in general cheaper than Bikes but are sold more often.

Pearson by Year and Category

This has impact on our Pearson-value which is very obvious in the screenshots above.

As you probably also realized, the Grand Total of our Pearson calculation cannot be directly related to the single years and may also be the complete opposite of the single values. This effect is called Simpson’s Paradox and is the expected behavior here.

[MeasuresX] and [MeasureY] can be exchanged by any other DAX measures which makes this calculation really powerful. Also, the set of items over which we want to calculated the correlation can be exchanged quite easily. Below you can download the sample Excel workbook but also a DAX query which could be used in Reporting Services or any other tool that allows execution of DAX queries.

Sample Workbook (Excel 2013): Pearson.xlsx
DAX Query: Pearson_SSRS.dax

Upcoming Events I am speaking at in June 2015

I am very glad that I got selected as a speaker for two upcoming SQL Saturdays in June. First there is the SQL Saturday #409 in Rheinland, Germany  on June 13 and the week after the SQL Saturday #419 in Bratislava, Slovakia on June 20.

For those of you who are new to the concept of PASS SQL Saturdays, this is a series of free-of-charge events all around the globe where experienced speakers talk about all topics around the Microsoft SQL Server platform and beyond. As I said, its free, you just need to register in time in order to get a ticked so better be fast before all slots are taken!

SQLSaturday_409_Rheinland_Germany

I will do a session together with my colleague Markus Begerow (b, t) on “Power BI on SAP HANA” – two technologies I got to work a lot with recently. We are going to share our experience on how to use Power BI to extract data from SAP HANA, the different interfaces you can use and the advantages and drawbacks of each. Even tough it is considered a general sessions, we will also do a lot of hands on and elaborate on some of the technical details you need to be aware of, for both, the Power BI side and also for SAP HANA.


SQLSaturday_419_Bratislava_Slovakia

In Bratislava I will speak about Lessons Learned: SSAS Tabular in the real world where I will present the technical and non-technical findings I made in the past when implementing SSAS Tabular models at larger scales for various customers. I will cover the whole process from choosing SSAS Tabular as your engine (or not choosing it), things to consider during implementation and also shed some light on the administrative challenges once the solution is in production.

I think both are really interesting sessions and I would be happy to see a lot of you there and have some interesting discussions!