Automating the Extraction of BIM metadata from PBIX Files using CI/CD pipelines

The latest updates can always be found in the

PowerBI.CICD repository

In the past I have been working on a lot of different Power BI projects and it has always been (and still is) a pain when it comes to the deployment of changes across multiple tiers(e.g. Dev/Test/Prod). The main problem here being that a file generated in Power BI desktop (

</mark>.pbix<mark style="background-color:#ffffff" class="has-inline-color has-black-color">
</mark>.pbix<mark style="background-color:#ffffff" class="has-inline-color has-black-color">) is basically a binary file and the metadata of the actual data model (BIM) cannot be easily extracted or derived. This causes a lot of problems upstream when you want to automate the deployment using CI/CD pipelines. Here are some common approaches to tackle these issues:

  • Use of Power BI deployment pipelines
    The most native solution, however quite inflexible when it comes to custom and conditional deployments to multiple stages
  • Creation a Power BI Template (
    .pbit
    .pbit) in addition to your
    .pbix<mark style="background-color:#ffffff" class="has-inline-color has-black-color">
    .pbix<mark style="background-color:#ffffff" class="has-inline-color has-black-color"> file and check in both
    This works because the
    </mark></mark><mark style="background-color:#ffffff" class="has-inline-color">.pbit</mark><mark style="background-color:#ffffff" class="has-inline-color has-black-color"><mark style="background-color:#ffffff" class="has-inline-color has-black-color">
    </mark></mark><mark style="background-color:#ffffff" class="has-inline-color">.pbit</mark><mark style="background-color:#ffffff" class="has-inline-color has-black-color"><mark style="background-color:#ffffff" class="has-inline-color has-black-color">
    file basically contains the BIM file but its creation is also a manual step
  • Extraction of the BIM file while PBI desktop is still running (e.g. using Tabular Editor)
    With the support of external tools this is quite easy, but is still a manual step and requires a 3rd party tool
  • Development outside of PBI desktop (e.g. using Tabular Editor)
    Probably the best solution but unfortunately not really suited for business users and for the data model only but not for the Power Queries

As you can see, there are indeed some options, but none of them is really ideal, especially not for a regular business user (not talking about IT pros). So I made up my mind and came up with the following list of things that I would want to see for proper CI/CD with Power BI files:

  • Users should be able to work with their tool of choice (usually PBI desktop, optional with Tabular Editor or any other 3rd party tool)
  • Automatically extracting the metadata whenever the data model changes
  • Persisting the metadata (BIM) in git to allow easy tracking of changes
  • Using the persisted BIM file for further automation (CD)

Solution
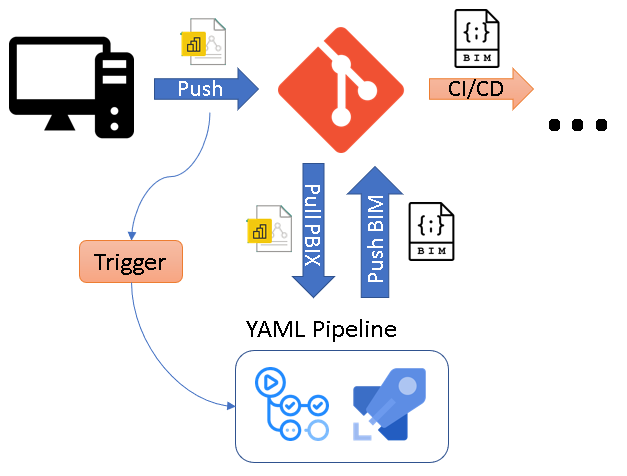
The core idea of the solution is to use CI/CD pipelines that automatically extracts the metadata of a

.pbix
.pbix file as soon as it is pushed to the Git repository. To do this, the
.pbix
.pbix file is automatically uploaded to a Power BI Premium workspace using the Power BI REST API and the free version of Tabular Editor 2 then extracts the BIM file via the XMLA endpoint and push it back to the repository.

I packaged this logic into ready-to-use YAML pipelines for Github Actions and Azure DevOps Pipelines being the two most common choices to use with Power BI. You can just copy the YAML files from the PowerBI.CICD repository to your own repo. Then simply provide the necessary information to authentication against the Power BI service and that’s it. As soon as everything is set up correctly. the pipeline will automatically create a

.database.json
.database.json for every PBIX file that you upload (assuming it contains a data model) and track it in your git repository!

All further details can be found directly in the repository which is also updated frequently!

DatabricksPS and Azure AD Authentication

Avaiilable via PowerShell Gallery: DatabricksPS

Databricks recently announced that it is now also supporting Azure Active Directory Authentication for the REST API which is now in public preview. This may not sound super exciting but is actually a very important feature when it comes to Continuous Integration/Continuous Delivery pipelines in Azure DevOps or any other CI/CD tool. Previously, whenever you wanted to deploy content to a new Databricks workspace, you first needed to manually create a user-bound API access token. As you can imagine, manual steps are also bad for otherwise automated processes like a CI/CD pipeline. With Databricks REST API finally supporting Azure Active Directory Authentication of regular users and service principals, this last manual step is finally also gone!

As I had this issue at many of my customers where we had already fully automated the deployment of our data platform based on Azure and Databricks, I also wanted to use this new feature there. The deployment of regular Databricks objects (clusters, notebooks, jobs, …) was already implemented in the CI/CD pipeline using my PowerShell module DatabricksPS and of course I did not want to rewrite any of those steps. So, I simply extend the module’s authentication methods to also support Azure Active Directory Authentication. The only thing that actually changed was the call to Set-DatabricksEnvironment which now supports additional parameter sets and parameters:

The first thing you will realize is that it is now necessary to specify the Databricks Workspace explicitly either using SubscriptionID/ResourceGroupName/WorkspaceName to uniquely identify the Databricks workspace within Azure or using the OrganizationID that you see displayed in the URL of your Databricks Workspace. For the actual authentication the parameters -ClientID, -TenantID, -Credential and the switch -ServicePrincipal are used.

Regardless of whether you use regular username/password authentication with an AAD user or an AAD service principal, the first thing you need to do in both cases is to create an AAD Application as described in the official docs from Databricks:
Using Azure Active Directory Authentication Library
Using a service principal

Once you have ensured all prerequisites exist, you can use the samples below to authenticate with your AAD username/password with DatabricksPS:

$username = 'myuser@mydomain.com'
$password = 'Pass@word1!'
$securePassword = ConvertTo-SecureString $password -AsPlainText -Force
$credential = New-Object System.Management.Automation.PSCredential($username, $securePassword)

$apiUrl = "https://westeurope.azuredatabricks.net"
$tenantId = "15970f38-6789-6789-6789-6e44bf2f5d11"
$clientId = "d73905f5-aaaa-bbbb-cccc-ecff76ba959c"
$subscriptionId = "69389949-1234-1234-1234-e499fac64209"
$resourceGroupName = "myResourceGroup"
$workspaceName = "myDatabricksWorkspace"

# Setup connection to Databricks using AAD Authentication
Set-DatabricksEnvironment -ApiRootUrl $apiUrl -Credential $credential 
  -ClientID $clientId -TenantID $tenantId 
  -SubscriptionID $subscriptionId -ResourceGroupName $resourceGroupName 
  -WorkspaceName $workspaceName

# Stop all existing clusters
Get-DatabricksCluster | Stop-DatabricksCluster

Here is another sample using a regular service principal authentication and the OrganizationID with DatabricksPS:

$clientId = '12345678-6789-6789-6789-6e44bf2f5d11' # = Application ID
$clientSecret = 'tN4Lrez.=5.Il]IAgRx6w6kJ@6C.ap7Y'
$secureClientSecret = ConvertTo-SecureString $clientSecret -AsPlainText -Force
$credential = New-Object System.Management.Automation.PSCredential($clientId, $secureClientSecret)

$apiUrl = "https://westeurope.azuredatabricks.net"
$tenantId = "15970f38-6789-6789-6789-6e44bf2f5d11"
$orgId = "1234535501392586"

# Setup connection to Databricks using AAD Authentication
Set-DatabricksEnvironment -ApiRootUrl $apiUrl -Credential $credential 
  -ClientID $clientId -TenantID $tenantId 
  -OrgID $orgId -ServicePrincipal

# Export all notebooks of the Databricks Workspace to a local folder
Export-DatabricksEnvironment -LocalPath "C:\db_export" 
 -Artifacts "Workspace" -WorkspaceRootPath "/" 

As you can see, once the environment is set up using the new authentication methods, the rest of the script stays the same and there is not much more you need to do fully automate your CI/CD pipeline with DatabricksPS!

I have not yet fully tested all cmdlets of the module so if you experience any issues, please contact me or open a ticket in the GIT repository.

How-To: Migrating Databricks workspaces

Foreword:
The approach described in this blog post only uses the Databricks REST API and therefore should work with both, Azure Databricks and also Databricks on AWS!

It recently had to migrate an existing Databricks workspace to a new Azure subscription causing as little interruption as possible and not loosing any valuable content. So I thought a simple Move of the Azure resource would be the easiest thing to do in this case. Unfortunately it turns out that moving an Azure Databricks Service (=workspace) is not supported:

Resource move is not supported for resource types ‘Microsoft.Databricks/workspaces’. (Code: ResourceMoveNotSupported)

I do not know what is/was the problem here but I did not have time to investigate but instead needed to come up with a proper solution in time. So I had a look what needs to be done for a manual export. Basically there are 5 types of content within a Databricks workspace:

  • Workspace items (notebooks and folders)
  • Clusters
  • Jobs
  • Secrets
  • Security (users and groups)

For all of them an appropriate REST API is provided by Databricks to manage and also exports and imports. This was fantastic news for me as I knew I could use my existing PowerShell module DatabricksPS to do all the stuff without having to re-invent the wheel again.
So I basically extended the module and added new Import and Export functions which automatically process all the different content types:

  • Export-DatabricksEnvironment
  • Import-DatabricksEnvironment

They can be further parameterized to only import/export certain artifacts and how to deal with updates to already existing items. The actual output of the export looks like this and of course you can also modify it manually to your needs – all files are in JSON except for the notebooks which are exported as .DBC file by default:

A very simple sample code doing and export and an import into a different environment could look like this:

Set-DatabricksEnvironment -AccessToken $accessTokenExport -ApiRootUrl "https://westeurope.azuredatabricks.net"
Export-DatabricksEnvironment -LocalPath 'D:\Desktop\MyExport' -CleanLocalPath

Set-DatabricksEnvironment -AccessToken $accessTokenImpport -ApiRootUrl "https://westeurope.azuredatabricks.net"
Import-DatabricksEnvironment -LocalPath 'D:\Desktop\MyExport' 

Having those scripts made the whole migration a very easy task.
In addition, these new cmdlets can also be used in your Continuous Integration/Continuous Delivery (CI/CD) pipelines in Azure DevOps or any other CI/CD tool!

So just download the latest version from the PowerShell gallery and give it a try!

PowerShell module for Databricks on Azure and AWS

Avaiilable via PowerShell Gallery: DatabricksPS

Over the last year I worked a lot with Databricks on Azure and I have to say that I was (and still am) very impressed how well it works and how it integrates with other services of the Microsoft Azure Data Platform like Data Lake Store, Data Factory, etc.

Some of the projects I worked on also included CI/CD like pipelines using Azure DevOps where Databricks did not really shine so bright in the beginning. There are no native tasks for it or anything. But this is OK as for those scenarios, where you need to automate/script something, Databricks offers a REST API (Azure, AWS).

As most of our deployments use PowerShell I wrote some cmdlets to easily work with the Databricks API in my scripts. These included managing clusters (create, start, stop, …), deploying content/notebooks, adding secrets, executing jobs/notebooks, etc. After some time I ended up having 20+ single scripts which was not really maintainable any more. So I packed them into a PowerShell module and also published it to the PowerShell Gallery (https://www.powershellgallery.com/packages/DatabricksPS) for everyone to use!

The module works for Databricks on Azure and also if you run Databricks on AWS – fortunately the API endpoints are almost identical.
The usage is quite simple as for any other PowerShell module:

  1. Install it using Install-Module cmdlet
  2. Setup the Databricks environment using API key and endpoint URL
  3. run the actual cmdlets (e.g. to start a cluster)


Here is the same code for you to copy&paste:

Install-Module -Name DatabricksPS
$accessToken = "dapi123456789be672c4007052d4694a7c51"
$apiUrl = "https://westeurope.azuredatabricks.net"
Set-DatabricksEnvironment -AccessToken $accessToken -ApiRootUrl $apiUrl
Start-DatabricksCluster -ClusterID "1202-211320-brick1"

At the moment, the module supports the following APIs:

These APIs are not yet implemented but will be added in the near future:

All the cmdlets are documented and contain links to official documentation of the Rest API call used by the cmdlet. Some API endpoints support different variations of parameters – this was implemented using different parameter sets in PowerShell. There are still some ongoing tests (especially on AWS) and improvements but I general all cmdlets work as expected. I hope this helps anyone else who also has to deal with the Databricks APIs frequently or has to integrate it in a CI/CD pipeline.

The whole source code is also available from my Git-repository (https://github.com/gbrueckl/Databricks.API.PowerShell). If you want to provide any feedback, please use the Git-repository to do so.

Processing Azure Analysis Services with OAuth Sources (like Azure Data Lake Store)

As you probably know from my last blog post, I am currently upgrading the PowerBI reporting platform of one of my customer from a PowerBI backend (dataset hosted in PowerBI service) to an Azure Analysis Services backend. The upgrade/import of the dataset into Azure Analysis Services itself worked pretty flawless and after switching the connection of the reports everything worked as expected and everyone was happy. However, things got a bit tricky when it came to automatically refreshing the Azure Analysis Services database which was based on an Azure Data Lake Store. For the original PowerBI dataset, this was pretty straight forward as a scheduled refresh from an Azure Data Lake store data source works out of the box. For Azure Analysis Services this is a bit different.

When you build and deploy your data model from Visual Studio, your are prompted for the credentials to access ADLS which are then stored in the data source object of AAS. As you probably know, AAS uses OAuth authentication to access data from ADLS. And this also causes a lot of problems. OAuth is based on tokens and those tokens are only valid for a limited time, by default this is 2 hours. This basically means, that you can process your database for the next 2 hours and it will fail later on with an error message saying that the token expired. (The above applies to all OAuth sources!)
This problem is usually solved by using an Azure Service Principal instead of a regular user account where the token does not expire. Unfortunately, this is not supported at the moment for ADLS data sources and you have to work around this issue.


IMPORTANT NOTE: NONE OF THE FOLLOWING IS OFFICIALLY SUPPORTED BY MICROSOFT !!!


So the current situation that we need to solve is as follows:

  • we can only use regular user accounts to connect AAS to ADLS as service principals are not supported yet
  • the token expires after 2 hours
  • the database has to be processed on a regular basis (daily, hourly, …) without any manual interaction
  • manually updating the token is (of course) not an option

Before you continue here, make sure that you read this blog post first: https://blogs.msdn.microsoft.com/dataaccesstechnologies/2017/09/01/automating-azure-analysis-service-processing-using-azure-automation-account/
It describes the general approach of using Azure Automation to process an Azure Analysis Services model and most of the code in this blog post if based on this!
Also this older blog post will be a good read as some concepts and code snippets are reused here.

Back to our example – as we were already using Azure Automation for some other tasks, we decided to also use it here. Also, PowerShell integrates very well with other Azure components and was the language of choice for us. To accomplish our goal we had to implement 3 steps:

  1. acquire a new OAuth token
  2. update the ADLS data source with the new token
  3. run our processing script

I could copy the code for the first step more or less from one of my older blog post (here) where I used PowerShell to acquire an OAuth token to trigger a refresh in PowerBI.

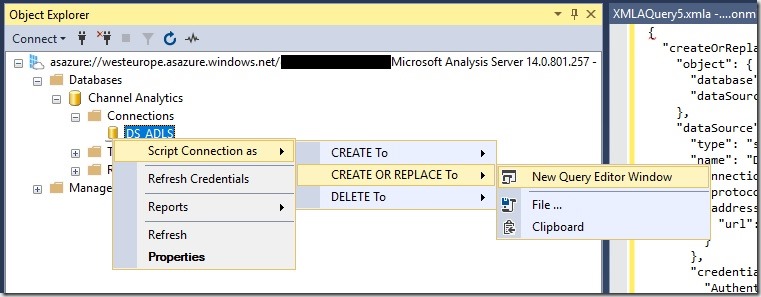
The second step is to update ADLS data source of our Azure Analysis Services model. To get started, the easiest thing to do is to simply open the AAS database in SQL Server Management Studio and let it script the existing datasource for you: AAS_Script_OAuth_DataSource
The resulting JSON will look similar to this one:

Update ADLS DataSource
{
“createOrReplace”: {
“object”: {
“database”: “Channel Analytics”,
“dataSource”: “DS_ADLS”
},
“dataSource”: {
“type”: “structured”,
“name”: “DS_ADLS”,
“connectionDetails”: {
“protocol”: “data-lake-store”,
“address”: {
“url”: “https://mydatalake.azuredatalakestore.net”
}
},
“credential”: {
“AuthenticationKind”: “OAuth2”,
“token_type”: “********”,
“scope”: “********”,
“expires_in”: “********”,
“ext_expires_in”: “********”,
“expires_on”: “********”,
“not_before”: “********”,
“resource”: “********”,
“id_token”: “********”,
“kind”: “DataLake”,
“path”: “https://mydatalake.azuredatalakestore.net/”,
“RefreshToken”: “********”,
“AccessToken”: “********”
}
}
}
}

The important part for us is the “credential” field. It contains all the information necessary to authenticate against our ADLS store. However, most of this information is sensitive so only asterisks are displayed in the script. The rest of the JSON (except for the “credential” field) is currently hardcoded in the PowerShell cmdlet so if you want to use it, you need to change this manually!
The PowerShell cmdlet then combines the hardcoded part with an updated “credential”-field which is obtained by invoking a REST request to retrieve a new OAuth token. The returned object is modified a bit in order to match the required JSON for the datasource.
Once we have our final JSON created, we can send it to our Azure Analysis Services instance by calling the Invoke-ASCmd cmdlet from the SqlServer module.
Again, please see the original blog post mentioned above for the details of this approach.

After we have updated our datasource, we can simply call our regular processing commands which will then be executed using the newly updated credentials.
The script I wrote allows you to specify which objects to process in different ways:

  • whole database (by leaving AASTableName and AASPartitionName empty)
  • a single or multiple table and all its partitions (by leaving only AASPartitionName empty)
  • or multiple partitions of a single table (by specifying exactly one AASTableName and multiple AASPartitionNames

If multiple tables or partitions are specified, the elements are separated by commas (“,”)

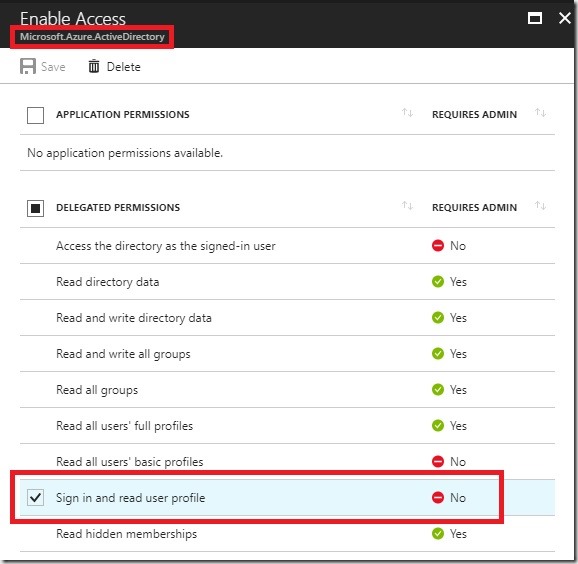
So to make the Runbook work in your environment, follow all the initial steps as described in the original blog post from Microsoft. In addition, you also need to create an Application (Type = “Native”) in your Azure Active Directory to obtain the OAuth token programmatically. This application needs the “Sign in and read user profile” permission from the API “Windows Azure Active Directory (Microsoft.Azure.ActiveDirectory)”:
AAD_App_Permissions
Also remember the ApplicationID, it will be used as a parameter for the final PowerShell Runbook (=parameter “ClientID”!
When it comes to writing the PowerShell code, simply use the code from the download at the end of this blog post.

For the actual credential that you are using, make sure that it has the following permissions:

  • to update the AAS datasource (can be set in the AAS model or for the whole server)
  • has access to the required ADLS files/folders which are processed (can be set e.g. via ADLS Data Explorer)
  • (if you previously used your own account to do all the AAS and ADLS development, this should work just fine)

In general, a similar approach should work for all kinds of datasources that require OAuth authentication but so far I have only tested it with Azure Data Lake Store!

Download: AAS_Process_OAuth_Runbook.ps1

Refresh PowerBI Datasets using PowerShell and Azure Runbooks

In June 2017, Microsoft announced a new set of API function to manage data refreshes in PowerBI. The new API basically allows you to trigger a refresh or retrieve the history of previously executed refreshes. The full specification can be found in the official MSDN documentation, or using this direct links: Refresh dataset and Get dataset refresh history

So besides the scheduled and manual refreshes from within the PowerBI service directly, we now have a third option to trigger refreshes but this time also from an external caller! This itself is already pretty awesome and some people already did some cool stuff leveraging the new API functions:

Charles Sterling: Running the Power BI Refresh API’s Headless
Sirui Sun: Git-Repository powerbi-powershell

The basic idea is to use object from pre-built Azure Management DLLs to generate the OAuth Access token that is necessary to use the API. This works very well locally but cannot be used in the cloud – e.g. in combination with Azure Automation Runbooks or Azure Functions where you cannot install or reference any custom DLLs.

In this blog post I will show you how you can accomplish exactly this  – create an Azure Automation Runbook to refresh your PowerBI dataset!
But first of all there are some things that you need to keep in mind:

  1. There are no service accounts in PowerBI so we will always use a “real” user
  2. you need to supply the credentials of a “real” user
  3. The user needs to have appropriate access to the dataset in order to refresh it
  4. the dataset refresh must succeed if you do it manually in PowerBI
  5. you are still limited to 8 refreshes/day through the API

OK, so lets get started. First of all we need an Azure Application which has permissions in PowerBI. The easiest way to do this is to use the navigate to https://dev.powerbi.com/apps, log in with your account and simply follow the steps on the screen. The only import thing is to select the App Type “Native app”. At the end, you will receive a ClientID and a ClientSecret – Please remember the ClientID for later use!

Next step is to create the Azure Runbook. There are plenty of tutorials out there on how to do this: My first PowerShell workflow runbook or Creating or importing a runbook in Azure Automation so I will no go into much more detail here. Besides the runbook itself you also need to create an Automation Credential to store the username and password in a secure way – here is a tutorial for this: Credential Assets in Azure Automation

Now lets take a look at the PowerShell code. Instead of using any pre-built DLLs I removed all unnecessary code and do all the communication using Invoke-RestMethod. This is a very low-level function and is part of the standard PowerShell modules so there is no need to install anything! The tricky part is to acquire an Authentication Token using username/password as it is nowhere documented (at least I could not find it) what the REST call has to look like. So I used Fiddler to track the REST calls that the pre-built DLLs use and rebuilt them using Invoke-RestMethod. This is what I came up with:

$authUrl = "https://login.windows.net/common/oauth2/token/"
$body = @{
"resource" = "https://analysis.windows.net/powerbi/api";
"client_id" = $clientId;
"grant_type" = "password";
"username" = $pbiUsername;
"password" = $pbiPassword;
"scope" = "openid"
}
$authResponse = Invoke-RestMethod -Uri $authUrl –Method POST -Body $body

$clientId is the ClientID of the Azure AD Application
$pbiUsername is the email address of the PowerBI user.
$pbiPassword is the password of the PowerBI user.
The $authRepsonse then contains our Authentication token which we can use to make our subsequent calls:

$restURL = "https://api.powerbi.com/v1.0/myorg/datasets/$pbiDatasetId/refreshes"
$headers = @{
"Content-Type" = "application/json";
"Authorization" = $authResponse.token_type + " " + $authResponse.access_token
}
$restResponse = Invoke-RestMethod -Uri $restURL –Method POST -Headers $headers

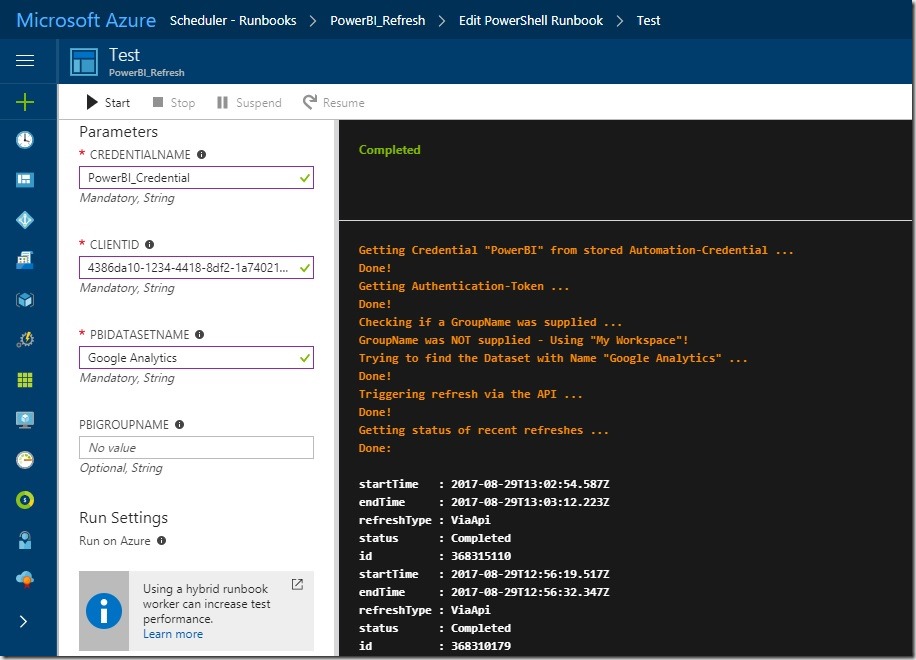
And that’s all you need. I wrapped everything into a PowerShell function that can be used as an Azure Runbook. The username/password is derived from an Azure Automation Credential.

The final runbook can be found here: PowerBI_Refresh_Runbook.ps1

Refresh_PowerBI_Dataset_Azure_Runbook

It takes 4 Parameters:

  1. CredentialName – the name of the Azure Automation credential that you created and which stores the PowerBI username and password
  2. ClientID – the ID of your Azure Active Directory Application which you created in the first step
  3. PBIDatasetName – the name of the PowerBI dataset that you want to refresh
  4. PBIGroupName – (optional) the name of the group/workspace in which the PowerBI dataset from 3) resides

When everything is working as expected, you can create custom schedules or even create webhooks to trigger the script and refresh you PowerBI dataset! As you probably know, this is really powerful as you can now make the refresh of the PowerBI dataset part of your daily ETL job!

Configure HTTP access to Analysis Services using PowerShell

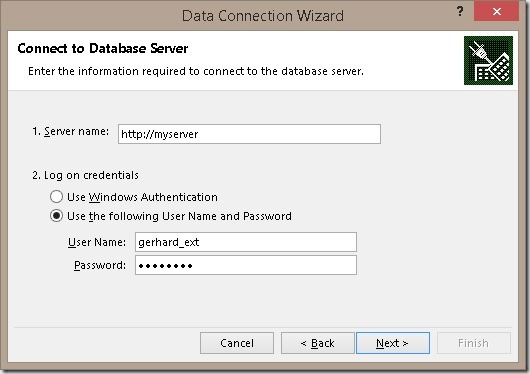
Recently I had to setup an Analysis Services cube and expose it to external users. This is usually done by using Internet Information Server (IIS) and creating a new WebSite which hosts msmdpump.dll. This DLL more or less wraps XMLA commands inside HTTP thus allowing external users to access the cube via HTTP. Besides Windows Authentication this setup also allows Basic Authentication and so external users can simply connect by specifying Username and Password in e.g. Excel when connecting to the cube:
ExcelConnectionDialog

There are already a lot of whitepapers out there which describe how to set things up correctly. Here are just some examples:
– MSDN: http://msdn.microsoft.com/en-us/library/gg492140.aspx
– MSBI Academy (great video!): http://msbiacademy.com/?p=5711 by Rob Kerr

They provide very useful information and you should be familiar with the general setup before proceeding here or using the final PowerShell script.

The PowerShell script basically performs the following steps:

  1. Create a local folder as base for your WebSite in IIS
  2. Copy SSAS ISAPI files (incl. msmdpump.dll) to the folder
  3. Create and Configure an IIS AppPool
  4. Create and Configure a IIS WebSite
  5. Add and enable an ISAPI entry for msmdpump.dll
  6. Configure Authentication
  7. Configure Default Document
  8. Update connection information to SSAS server

I tested it successfully with a clean installation of IIS 8.0 (using applicationhost.config.clean.install). In case you already have other WebSites running you may still consider doing the steps manually or adopting the script if necessary. The script is written not to overwrite any existing Folders, WebSites, etc. but you never know.

So here is my final script:

  1. #Import Modules
  2. Import-Module WebAdministration
  3.  
  4. # change these settings
  5. $iisSiteName = "OLAP"
  6. $iisPort = "8000"
  7. $olapServerName = "server\instance"
  8.  
  9. # optionally also change these settings
  10. $isapiFiles = "c:\Program Files\Microsoft SQL Server\MSAS11.MSSQLSERVER\OLAP\bin\isapi\*"
  11. $iisAbsolutePath = "C:\inetpub\wwwroot\" + $iisSiteName
  12. $iisAppPoolName = $iisSiteName + "_AppPool"
  13. $iisAppPoolUser = "" #default is ApplicationPoolIdentity
  14. $iisAppPoolPassword = ""
  15. $iisAuthAnonymousEnabled = $false
  16. $iisAuthWindowsEnabled = $true
  17. $iisAuthBasicEnabled = $true
  18. $olapSessionTimeout = "3600" #default
  19. $olapConnectionPoolSize = "100" #default
  20.  
  21. if(!(Test-Path $iisAbsolutePath -pathType container))
  22. {
  23.     #Creating Directory
  24.     mkdir $iisAbsolutePath  | Out-Null
  25.  
  26.     #Copying Files
  27.     Write-Host -NoNewline "Copying ISAPI files to IIS Folder … "
  28.     Copy -Path $isapiFiles -Destination $iisAbsolutePath -Recurse
  29.     Write-Host " Done!" -ForegroundColor Green
  30. }
  31. else
  32. {
  33.     Write-Host "Path $iisAbsolutePath already exists! Please delete manually if you want to proceed!" -ForegroundColor Red
  34.     Exit
  35. }
  36.  
  37. #Check if AppPool already exists
  38. if(!(Test-Path $("IIS:\\AppPools\" + $iisAppPoolName) -pathType container))
  39. {
  40.     #Creating AppPool
  41.     Write-Host -NoNewline "Creating ApplicationPool $iisAppPoolName if it does not exist yet … "
  42.     $appPool = New-WebAppPool -Name $iisAppPoolName
  43.     $appPool.managedRuntimeVersion = "v2.0"
  44.     $appPool.managedPipelineMode = "Classic"
  45.  
  46.     $appPool.processModel.identityType = 4 #0=LocalSystem, 1=LocalService, 2=NetworkService, 3=SpecificUser, 4=ApplicationPoolIdentity
  47.     #For details see http://www.iis.net/configreference/system.applicationhost/applicationpools/add/processmodel
  48.  
  49.     if ($iisAppPoolUser -ne "" -AND $iisAppPoolPassword -ne "") {
  50.         Write-Host
  51.         Write-Host "Setting AppPool Identity to $iisAppPoolUser"
  52.         $appPool.processmodel.identityType = 3
  53.         $appPool.processmodel.username = $iisAppPoolUser
  54.         $appPool.processmodel.password = $iisAppPoolPassword
  55.     }
  56.     $appPool | Set-Item
  57.     Write-Host " Done!" -ForegroundColor Green
  58. }
  59. else
  60. {
  61.     Write-Host "AppPool $iisAppPoolName already exists! Please delete manually if you want to proceed!" -ForegroundColor Red
  62.     Exit
  63. }
  64.  
  65. #Check if WebSite already exists
  66. $iisSite = Get-Website $iisSiteName
  67. if ($iisSite -eq $null)
  68. {
  69.     #Creating WebSite
  70.     Write-Host -NoNewline "Creating WebSite $iisSiteName if it does not exist yet … "
  71.     $iisSite = New-WebSite -Name $iisSiteName -PhysicalPath $iisAbsolutePath -ApplicationPool $iisAppPoolName -Port $iisPort
  72.     Write-Host " Done!" -ForegroundColor Green
  73. }
  74. else
  75. {
  76.     Write-Host "WebSite $iisSiteName already exists! Please delete manually if you want to proceed!" -ForegroundColor Red
  77.     Exit
  78. }
  79.  
  80. #Ensuring ISAPI CGI Restriction entry exists for msmdpump.dll
  81. if ((Get-WebConfiguration "/system.webServer/security/isapiCgiRestriction/add[@path='$iisAbsolutePath\msmdpump.dll']") -eq $null)
  82. {
  83.     Write-Host -NoNewline "Adding ISAPI CGI Restriction for $iisAbsolutePath\msmdpump.dll … "
  84.     Add-WebConfiguration "/system.webServer/security/isapiCgiRestriction" -PSPath:IIS:\\  -Value @{path="$iisAbsolutePath\msmdpump.dll"}
  85.     Write-Host " Done!" -ForegroundColor Green
  86. }
  87. #Enabling ISAPI CGI Restriction for msmdpump.dll
  88. Write-Host -NoNewline "Updating existing ISAPI CGI Restriction … "
  89. Set-WebConfiguration "/system.webServer/security/isapiCgiRestriction/add[@path='$iisAbsolutePath\msmdpump.dll']/@allowed" -PSPath:IIS:\\ -Value "True"
  90. Set-WebConfiguration "/system.webServer/security/isapiCgiRestriction/add[@path='$iisAbsolutePath\msmdpump.dll']/@description" -PSPath:IIS:\\ -Value "msmdpump.dll for SSAS"
  91. Write-Host " Done!" -ForegroundColor Green
  92.  
  93.  
  94. #Adding ISAPI Handler to WebSite
  95. Write-Host -NoNewline "Adding ISAPI Handler … "
  96. Add-WebConfiguration /system.webServer/handlers -PSPath $iisSite.PSPath -Value @{name="msmdpump"; path="*.dll"; verb="*"; modules="IsapiModule"; scriptProcessor="$iisAbsolutePath\msmdpump.dll"; resourceType="File"; preCondition="bitness64"}
  97. Write-Host " Done!" -ForegroundColor Green
  98.  
  99. #enable Windows and Basic Authentication
  100. Write-Host -NoNewline "Setting Authentication Providers … "
  101. #need to Unlock sections first
  102. Set-WebConfiguration /system.webServer/security/authentication/anonymousAuthentication  MACHINE/WEBROOT/APPHOST -Metadata overrideMode -Value Allow
  103. Set-WebConfiguration /system.webServer/security/authentication/windowsAuthentication  MACHINE/WEBROOT/APPHOST -Metadata overrideMode -Value Allow
  104. Set-WebConfiguration /system.webServer/security/authentication/basicAuthentication  MACHINE/WEBROOT/APPHOST -Metadata overrideMode -Value Allow
  105.  
  106. Set-WebConfiguration /system.webServer/security/authentication/anonymousAuthentication -PSPath $iisSite.PSPath -Value @{enabled=$iisAuthAnonymousEnabled}
  107. Set-WebConfiguration /system.webServer/security/authentication/windowsAuthentication -PSPath $iisSite.PSPath -Value @{enabled=$iisAuthWindowsEnabled}
  108. Set-WebConfiguration /system.webServer/security/authentication/basicAuthentication -PSPath $iisSite.PSPath -Value @{enabled=$iisAuthBasicEnabled}
  109. Write-Host " Done!" -ForegroundColor Green
  110.  
  111. #Adding Default Document
  112. Write-Host -NoNewline "Adding Default Document msmdpump.dll … "
  113. Add-WebConfiguration /system.webServer/defaultDocument/files -PSPath $iisSite.PSPath -atIndex 0 -Value @{value="msmdpump.dll"}
  114. Write-Host " Done!" -ForegroundColor Green
  115.  
  116. #Updating OLAP Server Settings
  117. Write-Host -NoNewline "Updating OLAP Server Settings … "
  118. [xml]$msmdpump = Get-Content "$iisAbsolutePath\msmdpump.ini"
  119. $msmdpump.ConfigurationSettings.ServerName = $olapServerName
  120. $msmdpump.ConfigurationSettings.SessionTimeout = $olapSessionTimeout
  121. $msmdpump.ConfigurationSettings.ConnectionPoolSize = $olapConnectionPoolSize
  122. $msmdpump.Save("$iisAbsolutePath\msmdpump.ini")
  123. Write-Host " Done!" -ForegroundColor Green
  124.  
  125. Write-Host "Everything done! "
  126. Write-Host "The SSAS server can now be accessed via http://$env:computername`:$iisPort"


The script can also be downloaded here.

The process of setting up HTTP connectivity is the same for Analysis Services Multidimensional and Tabular so the script works for both scenarios, just change the server name accordingly.

Restoring a SSAS Tabular Model to Power Pivot

It is a very common scenario to create a SSAS Tabular Model out of an Power Pivot Model contained in an Excel workbook. Microsoft even created an wizard (or actually a separate Visual Studio project) that supports you doing this. Even further, this process is also a major part of Microsoft’s strategy to cover Personal BI, Team BI and Corporate BI within one technology being xVelocity. This all works just fine but there may also be scenarios where you need to do it the other way round – converting a Tabular model to Power Pivot. Several use-cases come into my mind but I am sure that the most important one is to making data available offline for e.g. sales people to take it with them on their every day work. And in this blog post I will show how this can be done!

But before taking a closer look into how this can be accomplished, lets first see how the import from Power Pivot to SSAS Tabular works. To do this start SQL Server Profiler and connect to your tabular instance. Then create a new Tabular project in Visual Studio based on an existing Power Pivot workbook. At this point you will notice a lot of events happening on our SSAS Tabular server. The most important event for us is “Command End” with the EventSubclass “9 – restore”:
RestoreFromPowerPivot

SSAS actually restores a backup from a “Model.abf” backup file which is located in our project directory that we just created:
BackupExtractedFromPowerPivot

So far so good – but where does this file come from?

Well, the origin of the file has to be our Excel workbook that we imported. Knowing that all new office formats ending with “x” (.xlsx, .docx, …) are basically ZIP files, we can inspect our original Excel workbook by simply rename it to “.zip”. This allows us to browse the Excel file structure:
ExcelUnzipped

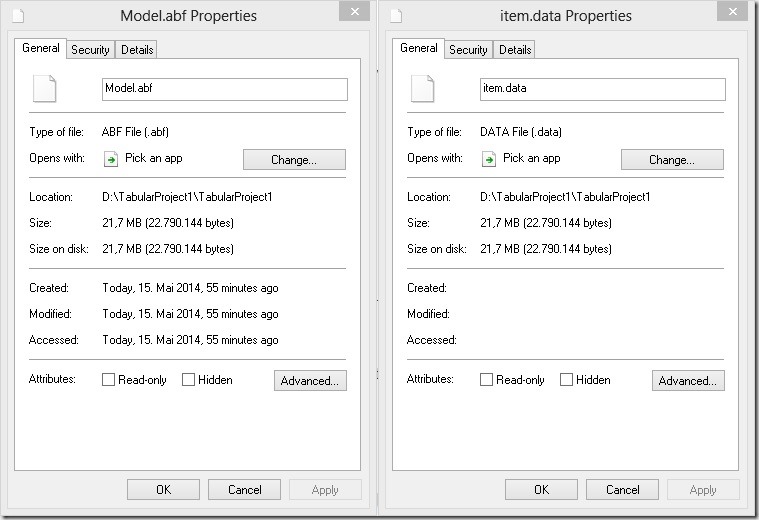
We will find a folder called “xl” which contains a sub-folder called “model”. This folder contains one item called “item.data”. If you take a closer look at the file size you may realize that both, the “Model.abf” file that we restored and the “item.data” file from our Excel workbook have the exact same size:
FileProperties

A Coincidence? Not really!

What happens behind the scenes when you import a Power Pivot model into SSAS Tabular is that this “item.data” file gets copied into your project directory and is renamed to “Model.abf” and then restored to the SSAS Tabular workspace instance by using an standard database restore.

Having this information probably makes you think: If it works in one direction, why wouldn’t it also work the other way round? And it does!

So here are the steps that you need to do in order to restore your SSAS Tabular backup into an Excel Power Pivot workbook:

  1. Create a backup of your SSAS Tabular database and rename it to “item.data”
  2. Create an empty Excel workbook and add a simple linked table to the Excel data model (which is actually Power Pivot).
    This is necessary to tell Excel that the workbook contains a Power Pivot model which has to be loaded once the file is opened.
  3. Close the Excel workbook and rename it from “MyFile.xlsx” to “MyFile.xlsx.zip”
  4. Open the .zip-file in Windows Explorer and locate the “\xl\model\”-folder
  5. Replace the “item.data” file with the file that you created in step 1.
  6. Rename the .zip-file back to “MyFile.xlsx”
  7. Open the Excel Workbook
  8. Voilá! You can now work with the data model as with any other Power Pivot model!

I tested this with a SSAS Tabular backup from SQL Server 2012 SP1 being restored to the streamed version of Excel from Office 365 with the latest version of Power Pivot. I assume that it also works with older versions but have not tested all combinations yet.

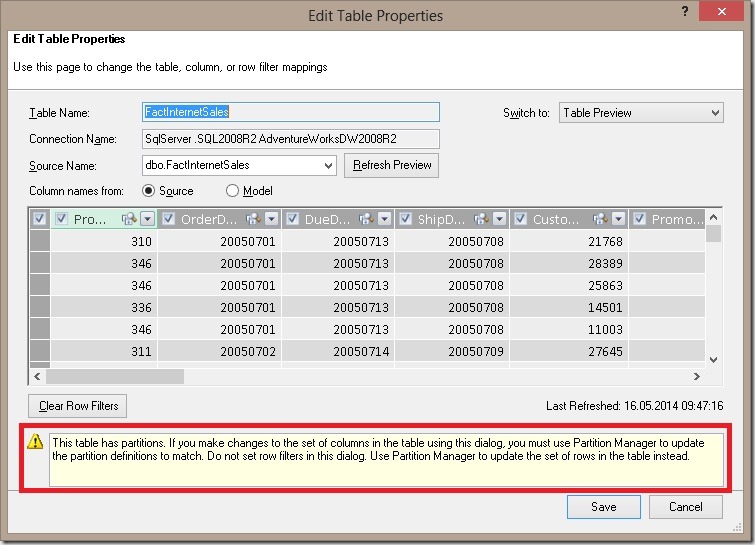
There are also some features that will not work, for example roles. If your Tabular database contains roles you will not be able to use this approach. Excel will complain that the Power Pivot model is broken. However, other Tabular features like partitions actually work with the little limitation that you cannot change them later on in the Power Pivot model or process them separately:
PowerPivotPartitions
Another thing to note here is that only up to 3 partitions are allowed, otherwise you will get the same error as for roles. I think this is related to the limitation of 3 partitions for SQL Server Analysis Services Standard Edition as Chris Webb described here.

Besides these obvious features there are also some other cool things that you can do in Tabular which are not possible in Power Pivot. Most (or actually all) of them are accessible only by using BIDS Helper – a great THANK YOU to the developers of BIDS Helper at this point!
BIDS Helper enables you to add classical multidimensional features also to Tabular models which is not possible using standard Visual Studio only. Those include:

  • DisplayFolders
  • Translations (metadata only)
  • Actions

I tested it for DisplayFolders and Actions and both are working also in Power Pivot after the backup was restored and I further assume that all the other things will also work just fine.
Simply keep in mind that Power Pivot is basically a fully featured Analysis Services instance running within Excel!

For my (and your) convenience I also created a little PowerShell script that does all the work:

  1. # Load the assembly with the ZipFile class
  2. [System.Reflection.Assembly]::LoadWithPartialName("System.IO.Compression.FileSystem") | Out-Null
  3. # Load the assembly to access Analysis Services
  4. [System.Reflection.Assembly]::LoadWithPartialName("Microsoft.AnalysisServices") | Out-Null
  5. # Also install "Analysis Services PowerShell" according to http://technet.microsoft.com/en-us/library/hh213141.aspx
  6.  
  7. # INPUT-Variables, change these to match your environment
  8. $rootFolder = "D:\Test_PowerShell\"
  9. $emptyExcelFile = $rootFolder + "EmptyExcel.xlsx"
  10. $ssasServerName = "localhost\TAB2012"
  11. $ssasDatabaseName = "AdventureWorks"
  12.  
  13. # internal variables
  14. $newExcelFile = $rootFolder + $ssasDatabaseName + ".xlsx"
  15. $newExcelFileZip = $newExcelFile + ".zip"
  16. $unzipFolder = $rootFolder + "TEMP_ExcelUnzipped"
  17. $backupFile = $rootFolder + $ssasDatabaseName + ".abf"
  18. $itemDestination = $unzipFolder + "\xl\model\item.data"
  19.  
  20. # Copy the empty Excel file and rename it to ".zip"
  21. Copy-Item -Path $emptyExcelFile -Destination $newExcelFileZip
  22.  
  23. # Unzip the file using the ZipFile class
  24. [System.IO.Compression.ZipFile]::ExtractToDirectory($newExcelFileZip, $unzipFolder)
  25.  
  26. # Create a backup of the SSAS Tabular database
  27. Backup-ASDatabase -Server $ssasServerName -Name $ssasDatabaseName -BackupFile $backupFile -AllowOverwrite -ApplyCompression
  28.  
  29. # Copy the backup-file to our extracted Excel folder structure
  30. Copy-Item -Path $backupFile -Destination $itemDestination -Force
  31.  
  32. # Check if the target file exists and delete it
  33. if (Test-Path -Path $newExcelFile) { Remove-Item -Path $newExcelFile }
  34.  
  35. # Zip the folder-structure again using the ZipFile class and rename it to ".xlsx"
  36. [System.IO.Compression.ZipFile]::CreateFromDirectory($unzipFolder, $newExcelFile)
  37.  
  38. # Cleanup the unecessary files
  39. Remove-Item -Path $unzipFolder -Recurse
  40. Remove-Item -Path $backupFile
  41. Remove-Item -Path $newExcelFileZip

The last thing to mention here is that I don’t know if this is officially supported in any way by Microsoft – actually I am pretty sure it is not – so watch out what you are doing and don’t complain if something is not working as expected.