Due to the great feedback I have received for the first version of my VSCode extension to mange Power BI objects from within VSCode I decided to continue working on it and am finally happy to share that I am releasing a new version – v2.0!
If you already had the previous version installed in VSCode, you do not have to do anything as it will update automatically. If you are a new user, you can install it from the gallery or search for “Power BI Studio” in the VSCode extensions tab.
Besides adding some new features I also changed the name to “Power BI Studio” to make it more accessible and ease communication. While it is technically still a VSCode extension and still requires VSCode (desktop client or vscode.dev) to run, I think “Power BI Studio” is a much better term and also refers to other established Power BI tools like DAX Studio and SQL Server Management Studio which a lot of users are already familiar with.
But there are also a lot of new features – here are the most important ones:
- Integration with External Tools in Power BI Desktop
- Show Memory Statistics for Power BI Datasets
- new config
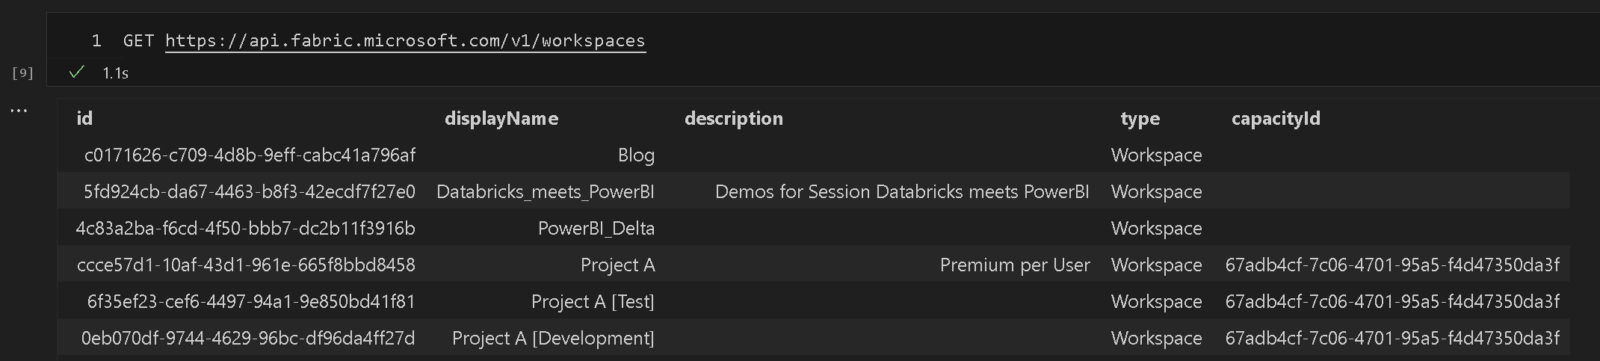
powerbi.workspaceFilterto filter workspaces - support for Fabric APIs in Power BI notebooks
- a lot of bug fixes and minor improvements on existing features
Integration with External Tools in Power BI Desktop
You can now start any of your External Tools you have configured for Power BI Desktop directly from VSCode to automatically connect to an online dataset. (Seriously, how often did you have to search for the proper connection string when you wanted to used DAX Studio or Tabular Editor?!)

Besides the direct integration with Power BI Desktop External Tools you can also simply copy the connectionstring from the context menu of a dataset!
Show Memory Statistics for Power BI Datasets
When analyzing the performance of a Power BI Datasets it is very crucial to understand the memory footprint of your model. To support admins and developers alike to investigate in memory issues, I integrated the DAX queries from my fellow Microsoft Data Platform MVP Hariharan Rajendran that exposes the memory consumption into a pre-defined notebook which can easily be opened from the context menu of the dataset:
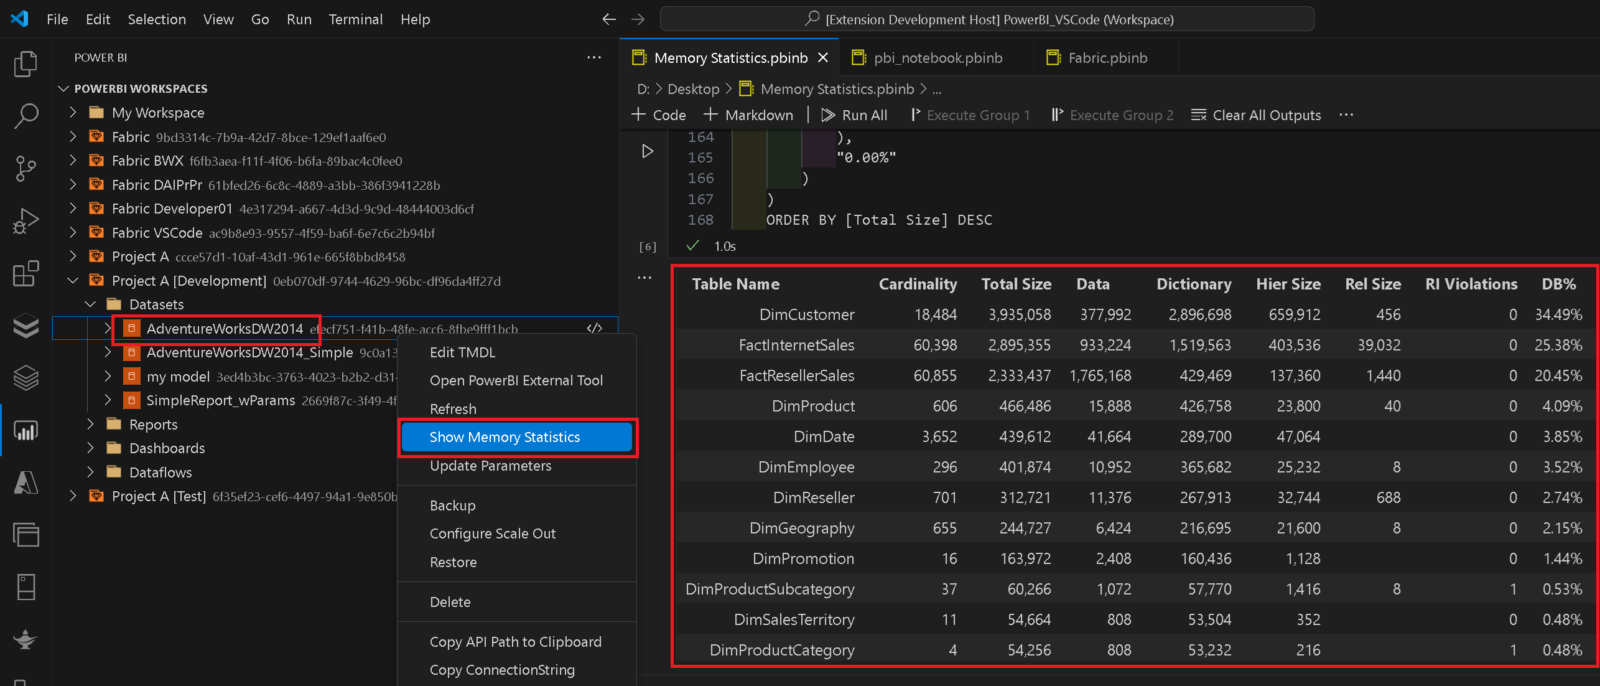
The scripts/DAX queries will be updated constantly whenever new functionality becomes available. If you have any ideas/queries you want to have included, please reach out to me!
Other features
The new config setting powerbi.workspaceFilter allows you to use a Regular Expression (RegEx) to filter the workspaces you want to be shown in the UI. This can be very useful if you are working in a large enterprise with many workspaces and you only want to work with a small subset of them. As it is a RegEx, it allows very fine-grained and also very modular filters and you can use | (=RegEx OR) to chain different conditions. To filter for all workspaces that contain Finance or are production workspaces (suffix [PROD]) you could use “Finance|\[PROD\]”
Using Power BI notebooks you can now also query Fabric REST API endpoints.as they are using the very same authentication in the background. To do so, you need to specify the full URL of the Fabric API you want to call or use the command SET API_PATH = https://api.fabric.microsoft.com upfront. As of now the Fabric API does not come with autocompletion so you need to know which endpoints you want to call. Please refer to the official Fabric REST API documentation for more details.
GET https://api.fabric.microsoft.com/v1/workspaces
There will be some more integration with Fabric in the very near future so please stay tuned!
For all other changes/bugfixes/improvements please refer to the official documentation and changelog.
Power BI Studio will still be developed as Open-Source Software (OSS) and contributors are very welcome. Also if you have any other feedback, feature requests or simply found a bug, please file a ticket in the repository.