Automating the Extraction of BIM metadata from PBIX Files using CI/CD pipelines

The latest updates can always be found in the

PowerBI.CICD repository

In the past I have been working on a lot of different Power BI projects and it has always been (and still is) a pain when it comes to the deployment of changes across multiple tiers(e.g. Dev/Test/Prod). The main problem here being that a file generated in Power BI desktop (.pbix) is basically a binary file and the metadata of the actual data model (BIM) cannot be easily extracted or derived. This causes a lot of problems upstream when you want to automate the deployment using CI/CD pipelines. Here are some common approaches to tackle these issues:

  • Use of Power BI deployment pipelines
    The most native solution, however quite inflexible when it comes to custom and conditional deployments to multiple stages
  • Creation a Power BI Template (.pbit) in addition to your .pbix file and check in both
    This works because the .pbit file basically contains the BIM file but its creation is also a manual step
  • Extraction of the BIM file while PBI desktop is still running (e.g. using Tabular Editor)
    With the support of external tools this is quite easy, but is still a manual step and requires a 3rd party tool
  • Development outside of PBI desktop (e.g. using Tabular Editor)
    Probably the best solution but unfortunately not really suited for business users and for the data model only but not for the Power Queries

As you can see, there are indeed some options, but none of them is really ideal, especially not for a regular business user (not talking about IT pros). So I made up my mind and came up with the following list of things that I would want to see for proper CI/CD with Power BI files:

  • Users should be able to work with their tool of choice (usually PBI desktop, optional with Tabular Editor or any other 3rd party tool)
  • Automatically extracting the metadata whenever the data model changes
  • Persisting the metadata (BIM) in git to allow easy tracking of changes
  • Using the persisted BIM file for further automation (CD)

Solution

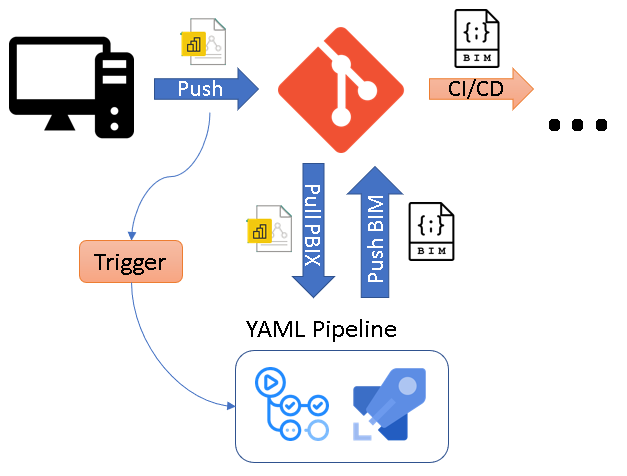
The core idea of the solution is to use CI/CD pipelines that automatically extracts the metadata of a .pbix file as soon as it is pushed to the Git repository. To do this, the .pbix file is automatically uploaded to a Power BI Premium workspace using the Power BI REST API and the free version of Tabular Editor 2 then extracts the BIM file via the XMLA endpoint and push it back to the repository.

I packaged this logic into ready-to-use YAML pipelines for Github Actions and Azure DevOps Pipelines being the two most common choices to use with Power BI. You can just copy the YAML files from the PowerBI.CICD repository to your own repo. Then simply provide the necessary information to authentication against the Power BI service and that’s it. As soon as everything is set up correctly. the pipeline will automatically create a .database.json for every PBIX file that you upload (assuming it contains a data model) and track it in your git repository!

All further details can be found directly in the repository which is also updated frequently!

DatabricksPS and Azure AD Authentication

Avaiilable via PowerShell Gallery: DatabricksPS

Databricks recently announced that it is now also supporting Azure Active Directory Authentication for the REST API which is now in public preview. This may not sound super exciting but is actually a very important feature when it comes to Continuous Integration/Continuous Delivery pipelines in Azure DevOps or any other CI/CD tool. Previously, whenever you wanted to deploy content to a new Databricks workspace, you first needed to manually create a user-bound API access token. As you can imagine, manual steps are also bad for otherwise automated processes like a CI/CD pipeline. With Databricks REST API finally supporting Azure Active Directory Authentication of regular users and service principals, this last manual step is finally also gone!

As I had this issue at many of my customers where we had already fully automated the deployment of our data platform based on Azure and Databricks, I also wanted to use this new feature there. The deployment of regular Databricks objects (clusters, notebooks, jobs, …) was already implemented in the CI/CD pipeline using my PowerShell module DatabricksPS and of course I did not want to rewrite any of those steps. So, I simply extend the module’s authentication methods to also support Azure Active Directory Authentication. The only thing that actually changed was the call to Set-DatabricksEnvironment which now supports additional parameter sets and parameters:

The first thing you will realize is that it is now necessary to specify the Databricks Workspace explicitly either using SubscriptionID/ResourceGroupName/WorkspaceName to uniquely identify the Databricks workspace within Azure or using the OrganizationID that you see displayed in the URL of your Databricks Workspace. For the actual authentication the parameters -ClientID, -TenantID, -Credential and the switch -ServicePrincipal are used.

Regardless of whether you use regular username/password authentication with an AAD user or an AAD service principal, the first thing you need to do in both cases is to create an AAD Application as described in the official docs from Databricks:
Using Azure Active Directory Authentication Library
Using a service principal

Once you have ensured all prerequisites exist, you can use the samples below to authenticate with your AAD username/password with DatabricksPS:

Here is another sample using a regular service principal authentication and the OrganizationID with DatabricksPS:

As you can see, once the environment is set up using the new authentication methods, the rest of the script stays the same and there is not much more you need to do fully automate your CI/CD pipeline with DatabricksPS!

I have not yet fully tested all cmdlets of the module so if you experience any issues, please contact me or open a ticket in the GIT repository.

How-To: Migrating Databricks workspaces

Foreword:
The approach described in this blog post only uses the Databricks REST API and therefore should work with both, Azure Databricks and also Databricks on AWS!

It recently had to migrate an existing Databricks workspace to a new Azure subscription causing as little interruption as possible and not loosing any valuable content. So I thought a simple Move of the Azure resource would be the easiest thing to do in this case. Unfortunately it turns out that moving an Azure Databricks Service (=workspace) is not supported:

Resource move is not supported for resource types ‘Microsoft.Databricks/workspaces’. (Code: ResourceMoveNotSupported)

I do not know what is/was the problem here but I did not have time to investigate but instead needed to come up with a proper solution in time. So I had a look what needs to be done for a manual export. Basically there are 5 types of content within a Databricks workspace:

  • Workspace items (notebooks and folders)
  • Clusters
  • Jobs
  • Secrets
  • Security (users and groups)

For all of them an appropriate REST API is provided by Databricks to manage and also exports and imports. This was fantastic news for me as I knew I could use my existing PowerShell module DatabricksPS to do all the stuff without having to re-invent the wheel again.
So I basically extended the module and added new Import and Export functions which automatically process all the different content types:

  • Export-DatabricksEnvironment
  • Import-DatabricksEnvironment

They can be further parameterized to only import/export certain artifacts and how to deal with updates to already existing items. The actual output of the export looks like this and of course you can also modify it manually to your needs – all files are in JSON except for the notebooks which are exported as .DBC file by default:

A very simple sample code doing and export and an import into a different environment could look like this:

Having those scripts made the whole migration a very easy task.
In addition, these new cmdlets can also be used in your Continuous Integration/Continuous Delivery (CI/CD) pipelines in Azure DevOps or any other CI/CD tool!

So just download the latest version from the PowerShell gallery and give it a try!