DatabricksPS and Azure AD Authentication

Avaiilable via PowerShell Gallery: DatabricksPS

Databricks recently announced that it is now also supporting Azure Active Directory Authentication for the REST API which is now in public preview. This may not sound super exciting but is actually a very important feature when it comes to Continuous Integration/Continuous Delivery pipelines in Azure DevOps or any other CI/CD tool. Previously, whenever you wanted to deploy content to a new Databricks workspace, you first needed to manually create a user-bound API access token. As you can imagine, manual steps are also bad for otherwise automated processes like a CI/CD pipeline. With Databricks REST API finally supporting Azure Active Directory Authentication of regular users and service principals, this last manual step is finally also gone!

As I had this issue at many of my customers where we had already fully automated the deployment of our data platform based on Azure and Databricks, I also wanted to use this new feature there. The deployment of regular Databricks objects (clusters, notebooks, jobs, …) was already implemented in the CI/CD pipeline using my PowerShell module DatabricksPS and of course I did not want to rewrite any of those steps. So, I simply extend the module’s authentication methods to also support Azure Active Directory Authentication. The only thing that actually changed was the call to Set-DatabricksEnvironment which now supports additional parameter sets and parameters:

The first thing you will realize is that it is now necessary to specify the Databricks Workspace explicitly either using SubscriptionID/ResourceGroupName/WorkspaceName to uniquely identify the Databricks workspace within Azure or using the OrganizationID that you see displayed in the URL of your Databricks Workspace. For the actual authentication the parameters -ClientID, -TenantID, -Credential and the switch -ServicePrincipal are used.

Regardless of whether you use regular username/password authentication with an AAD user or an AAD service principal, the first thing you need to do in both cases is to create an AAD Application as described in the official docs from Databricks:
Using Azure Active Directory Authentication Library
Using a service principal

Once you have ensured all prerequisites exist, you can use the samples below to authenticate with your AAD username/password with DatabricksPS:

$username = 'myuser@mydomain.com'
$password = 'Pass@word1!'
$securePassword = ConvertTo-SecureString $password -AsPlainText -Force
$credential = New-Object System.Management.Automation.PSCredential($username, $securePassword)

$apiUrl = "https://westeurope.azuredatabricks.net"
$tenantId = "15970f38-6789-6789-6789-6e44bf2f5d11"
$clientId = "d73905f5-aaaa-bbbb-cccc-ecff76ba959c"
$subscriptionId = "69389949-1234-1234-1234-e499fac64209"
$resourceGroupName = "myResourceGroup"
$workspaceName = "myDatabricksWorkspace"

# Setup connection to Databricks using AAD Authentication
Set-DatabricksEnvironment -ApiRootUrl $apiUrl -Credential $credential 
  -ClientID $clientId -TenantID $tenantId 
  -SubscriptionID $subscriptionId -ResourceGroupName $resourceGroupName 
  -WorkspaceName $workspaceName

# Stop all existing clusters
Get-DatabricksCluster | Stop-DatabricksCluster

Here is another sample using a regular service principal authentication and the OrganizationID with DatabricksPS:

$clientId = '12345678-6789-6789-6789-6e44bf2f5d11' # = Application ID
$clientSecret = 'tN4Lrez.=5.Il]IAgRx6w6kJ@6C.ap7Y'
$secureClientSecret = ConvertTo-SecureString $clientSecret -AsPlainText -Force
$credential = New-Object System.Management.Automation.PSCredential($clientId, $secureClientSecret)

$apiUrl = "https://westeurope.azuredatabricks.net"
$tenantId = "15970f38-6789-6789-6789-6e44bf2f5d11"
$orgId = "1234535501392586"

# Setup connection to Databricks using AAD Authentication
Set-DatabricksEnvironment -ApiRootUrl $apiUrl -Credential $credential 
  -ClientID $clientId -TenantID $tenantId 
  -OrgID $orgId -ServicePrincipal

# Export all notebooks of the Databricks Workspace to a local folder
Export-DatabricksEnvironment -LocalPath "C:\db_export" 
 -Artifacts "Workspace" -WorkspaceRootPath "/" 

As you can see, once the environment is set up using the new authentication methods, the rest of the script stays the same and there is not much more you need to do fully automate your CI/CD pipeline with DatabricksPS!

I have not yet fully tested all cmdlets of the module so if you experience any issues, please contact me or open a ticket in the GIT repository.
Processing Azure Analysis Services with OAuth Sources (like Azure Data Lake Store)

As you probably know from my last blog post, I am currently upgrading the PowerBI reporting platform of one of my customer from a PowerBI backend (dataset hosted in PowerBI service) to an Azure Analysis Services backend. The upgrade/import of the dataset into Azure Analysis Services itself worked pretty flawless and after switching the connection of the reports everything worked as expected and everyone was happy. However, things got a bit tricky when it came to automatically refreshing the Azure Analysis Services database which was based on an Azure Data Lake Store. For the original PowerBI dataset, this was pretty straight forward as a scheduled refresh from an Azure Data Lake store data source works out of the box. For Azure Analysis Services this is a bit different.

When you build and deploy your data model from Visual Studio, your are prompted for the credentials to access ADLS which are then stored in the data source object of AAS. As you probably know, AAS uses OAuth authentication to access data from ADLS. And this also causes a lot of problems. OAuth is based on tokens and those tokens are only valid for a limited time, by default this is 2 hours. This basically means, that you can process your database for the next 2 hours and it will fail later on with an error message saying that the token expired. (The above applies to all OAuth sources!)
This problem is usually solved by using an Azure Service Principal instead of a regular user account where the token does not expire. Unfortunately, this is not supported at the moment for ADLS data sources and you have to work around this issue.


IMPORTANT NOTE: NONE OF THE FOLLOWING IS OFFICIALLY SUPPORTED BY MICROSOFT !!!


So the current situation that we need to solve is as follows:

  • we can only use regular user accounts to connect AAS to ADLS as service principals are not supported yet
  • the token expires after 2 hours
  • the database has to be processed on a regular basis (daily, hourly, …) without any manual interaction
  • manually updating the token is (of course) not an option

Before you continue here, make sure that you read this blog post first: https://blogs.msdn.microsoft.com/dataaccesstechnologies/2017/09/01/automating-azure-analysis-service-processing-using-azure-automation-account/
It describes the general approach of using Azure Automation to process an Azure Analysis Services model and most of the code in this blog post if based on this!
Also this older blog post will be a good read as some concepts and code snippets are reused here.

Back to our example – as we were already using Azure Automation for some other tasks, we decided to also use it here. Also, PowerShell integrates very well with other Azure components and was the language of choice for us. To accomplish our goal we had to implement 3 steps:

  1. acquire a new OAuth token
  2. update the ADLS data source with the new token
  3. run our processing script

I could copy the code for the first step more or less from one of my older blog post (here) where I used PowerShell to acquire an OAuth token to trigger a refresh in PowerBI.

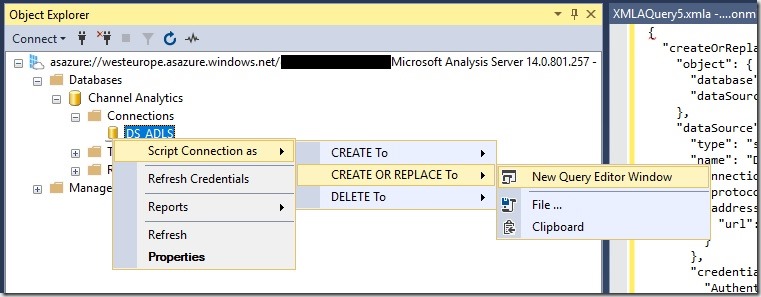
The second step is to update ADLS data source of our Azure Analysis Services model. To get started, the easiest thing to do is to simply open the AAS database in SQL Server Management Studio and let it script the existing datasource for you: AAS_Script_OAuth_DataSource
The resulting JSON will look similar to this one:

Update ADLS DataSource
{
“createOrReplace”: {
“object”: {
“database”: “Channel Analytics”,
“dataSource”: “DS_ADLS”
},
“dataSource”: {
“type”: “structured”,
“name”: “DS_ADLS”,
“connectionDetails”: {
“protocol”: “data-lake-store”,
“address”: {
“url”: “https://mydatalake.azuredatalakestore.net”
}
},
“credential”: {
“AuthenticationKind”: “OAuth2”,
“token_type”: “********”,
“scope”: “********”,
“expires_in”: “********”,
“ext_expires_in”: “********”,
“expires_on”: “********”,
“not_before”: “********”,
“resource”: “********”,
“id_token”: “********”,
“kind”: “DataLake”,
“path”: “https://mydatalake.azuredatalakestore.net/”,
“RefreshToken”: “********”,
“AccessToken”: “********”
}
}
}
}

The important part for us is the “credential” field. It contains all the information necessary to authenticate against our ADLS store. However, most of this information is sensitive so only asterisks are displayed in the script. The rest of the JSON (except for the “credential” field) is currently hardcoded in the PowerShell cmdlet so if you want to use it, you need to change this manually!
The PowerShell cmdlet then combines the hardcoded part with an updated “credential”-field which is obtained by invoking a REST request to retrieve a new OAuth token. The returned object is modified a bit in order to match the required JSON for the datasource.
Once we have our final JSON created, we can send it to our Azure Analysis Services instance by calling the Invoke-ASCmd cmdlet from the SqlServer module.
Again, please see the original blog post mentioned above for the details of this approach.

After we have updated our datasource, we can simply call our regular processing commands which will then be executed using the newly updated credentials.
The script I wrote allows you to specify which objects to process in different ways:

  • whole database (by leaving AASTableName and AASPartitionName empty)
  • a single or multiple table and all its partitions (by leaving only AASPartitionName empty)
  • or multiple partitions of a single table (by specifying exactly one AASTableName and multiple AASPartitionNames

If multiple tables or partitions are specified, the elements are separated by commas (“,”)

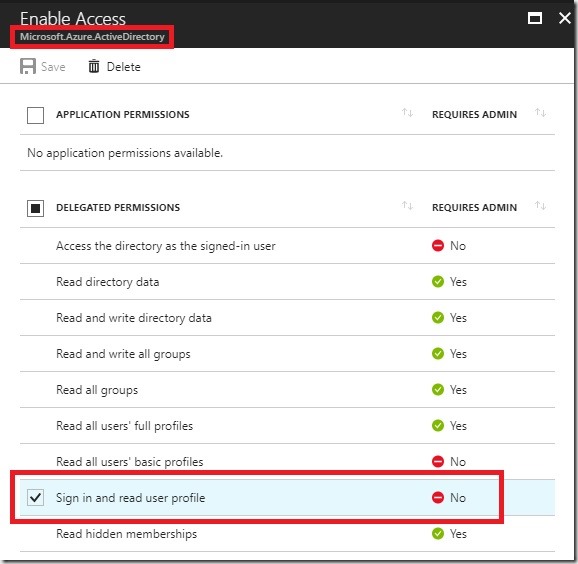
So to make the Runbook work in your environment, follow all the initial steps as described in the original blog post from Microsoft. In addition, you also need to create an Application (Type = “Native”) in your Azure Active Directory to obtain the OAuth token programmatically. This application needs the “Sign in and read user profile” permission from the API “Windows Azure Active Directory (Microsoft.Azure.ActiveDirectory)”:
AAD_App_Permissions
Also remember the ApplicationID, it will be used as a parameter for the final PowerShell Runbook (=parameter “ClientID”!
When it comes to writing the PowerShell code, simply use the code from the download at the end of this blog post.

For the actual credential that you are using, make sure that it has the following permissions:

  • to update the AAS datasource (can be set in the AAS model or for the whole server)
  • has access to the required ADLS files/folders which are processed (can be set e.g. via ADLS Data Explorer)
  • (if you previously used your own account to do all the AAS and ADLS development, this should work just fine)

In general, a similar approach should work for all kinds of datasources that require OAuth authentication but so far I have only tested it with Azure Data Lake Store!

Download: AAS_Process_OAuth_Runbook.ps1

Scheduled Data Refresh of OData Sources in Power BI

With the recent public release of Power BI it is finally possible to refresh Power Pivot workbooks online.Once a workbook is uploaded to SharePoint online and “Enabled” for Power BI you can schedule an automatic data refresh for the Power Pivot model. Though, at the moment only a very limit number of data sources are supported:

  • Windows Azure SQL Database data
  • Open Data protocol (OData) feeds
  • On premises data sources that are enabled for access in Power BI for Office 365

Especially for public available data OData feeds are very popular, for example from Wikipedia. Those public data feeds usually do not require any authentication so one would expect these data sources to work flawless with a scheduled data refresh of Power BI. Well, you are wrong here!
When you create a simple Power Pivot model with one OData source to e.g. Wikipedia, publish it and setup scheduled data refresh you will receive the following error:

Refresh_Error

The error message itself does not reveal any insights on the actual error. If you are in the (more or less) lucky situation that you are also owner of that site you can go to the Power BI Admin Center to get some further details on the error:

AdminCenter_ErrorLog

By downloading the CSV or hovering over a single Message you can see the details:

  1. "Failed to find a match for the data source (connection string: data source=http://publicdata.clouddatahub.net/Web/Tables/fa9af6681cd64206b3aafe6d12408117/V1/Data;include atom elements=Auto;include expanded entities=False;integrated security=SSPI;persist security info=false;time out=600;schema sample size=25;retry count=5;retry sleep=100;keep alive=False;max received message size=4398046511104;base url=http://publicdata.clouddatahub.net/Web/Tables/fa9af6681cd64206b3aafe6d12408117/V1/Data) for the user 'Gerhard.Brueckl@XYZ.onmicrosoft.com'. The user is unauthorized or, the corresponding data source is not created. Check the user's permission to the data source or create a data source for the connection string. Tracing ID: 23f244ad-7921-48f7-b13a-ef68e8cf5503"

It says that for my user no corresponding data source exists or I do not have permissions to access it.

In our case the reason is that our user is unauthorized – the actually data source that was used must not necessarily exist in the user’s data sources (Those can be found via “My Power BI”) for scheduled data refresh to work.

So you will ask yourself what could go possibly wrong here as you are just accessing a public OData feed?!?
The reason is that in the connection string the “Integrated Security”-property is set to SSPI by default. In your local Excel/Power Pivot model this works just fine as the SSPI context can be resolved and sent to the OData feed. Sure the OData feed actually ignores this information as it is public but from an authentication point of view everything works correctly!

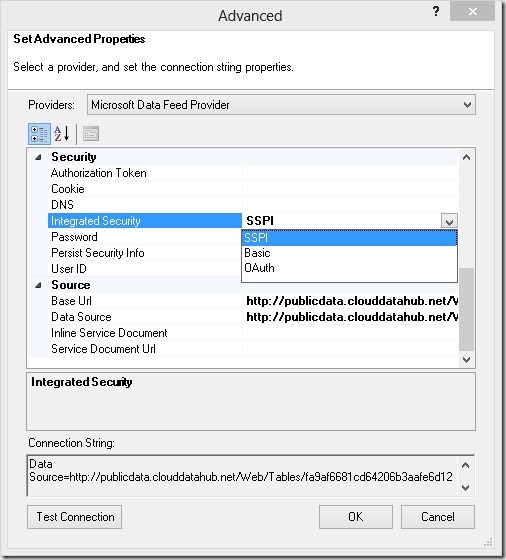
The problem with Scheduled Data Refresh is that SSPI simply does not work as it cannot be resolved and Power BI cannot use any service user for your request if SSPI is defined. The first thing that comes to your mind would be to simply set the authentication method to “Anonymous” which would be perfectly fine for a public data feed. However, Power Pivot does not support Anonymous authentication for OData sources:

OData_Authentication

As SSPI does not work we need to use “Basic” here and provide “User ID” and “Password”. Which UserID/Password you may ask? – and the simple answer is: “It does not matter!”
You can provide any values here, in my case I used “random” for both, User ID and Password! Another thing you need to ensure is that “Persist Securtiy Info” is set to True so your “Password” is stored in the final connection string making Power BI think that authentication is defined correctly within the connection string and Power BI does not have to do anything.

Once you changes those settings your data refresh will work like a charm:

Refresh_Success

On last thing you may realize is the “Running Time”. It takes significantly longer when doing the refresh in Power BI opposed to doing the refresh locally. Just keep that in mind, especially for bigger data feeds.

In the future I hope that Microsoft will introduce some kind of “Anonymous” authentication within the dropdown of Power Pivot or simply check at some point if the OData feed requires any authentication at all hence overwriting the authentication mode specified in the connection string when refreshing.