Release of Fabric Studio v1.0

I am very proud to announce the first public release of Fabric Studio v1.0 – a VSCode extension that allows you to manage and develop your Fabric workspace(s). Similar to Power BI Studio, it seamlessly integrates into VSCode for increased productivity for professional developers and admins alike.

It includes a lot of different features of which the most notable are probably these:

  • a generic workspace browser supporting all Fabric item types and their most common API actions
  • a custom file system provider allowing you to modify Fabric items as if they were local
  • a dedicated deployment pipeline manager
  • an integration of the Fabric Git into VSCode source control
  • a VSCode Fabric notebook to run arbitrary API calls

Workspace Browser

The workspace browser gives you an overview of all items that currently exist in your workspaces. This includes all items that currently exist and automatically extends to new items that might get added in the future. For selected items specific entries in the context menu were added e.g. Copy SQL ConnectionString, Run Notebook, …

There is also a common set of actions that exist for every item like opening the selected item directly in the Fabric Service via your browser or copy its ID or Name.

At the top you will find icons that allow you to filter the list of workspaces, refresh the current item, edit the items (e.g. semantic models, pipelines, … see below) or open a notebook that allows you to run arbitrary calls against the Fabric REST API.

Edit Fabric Items from VSCode
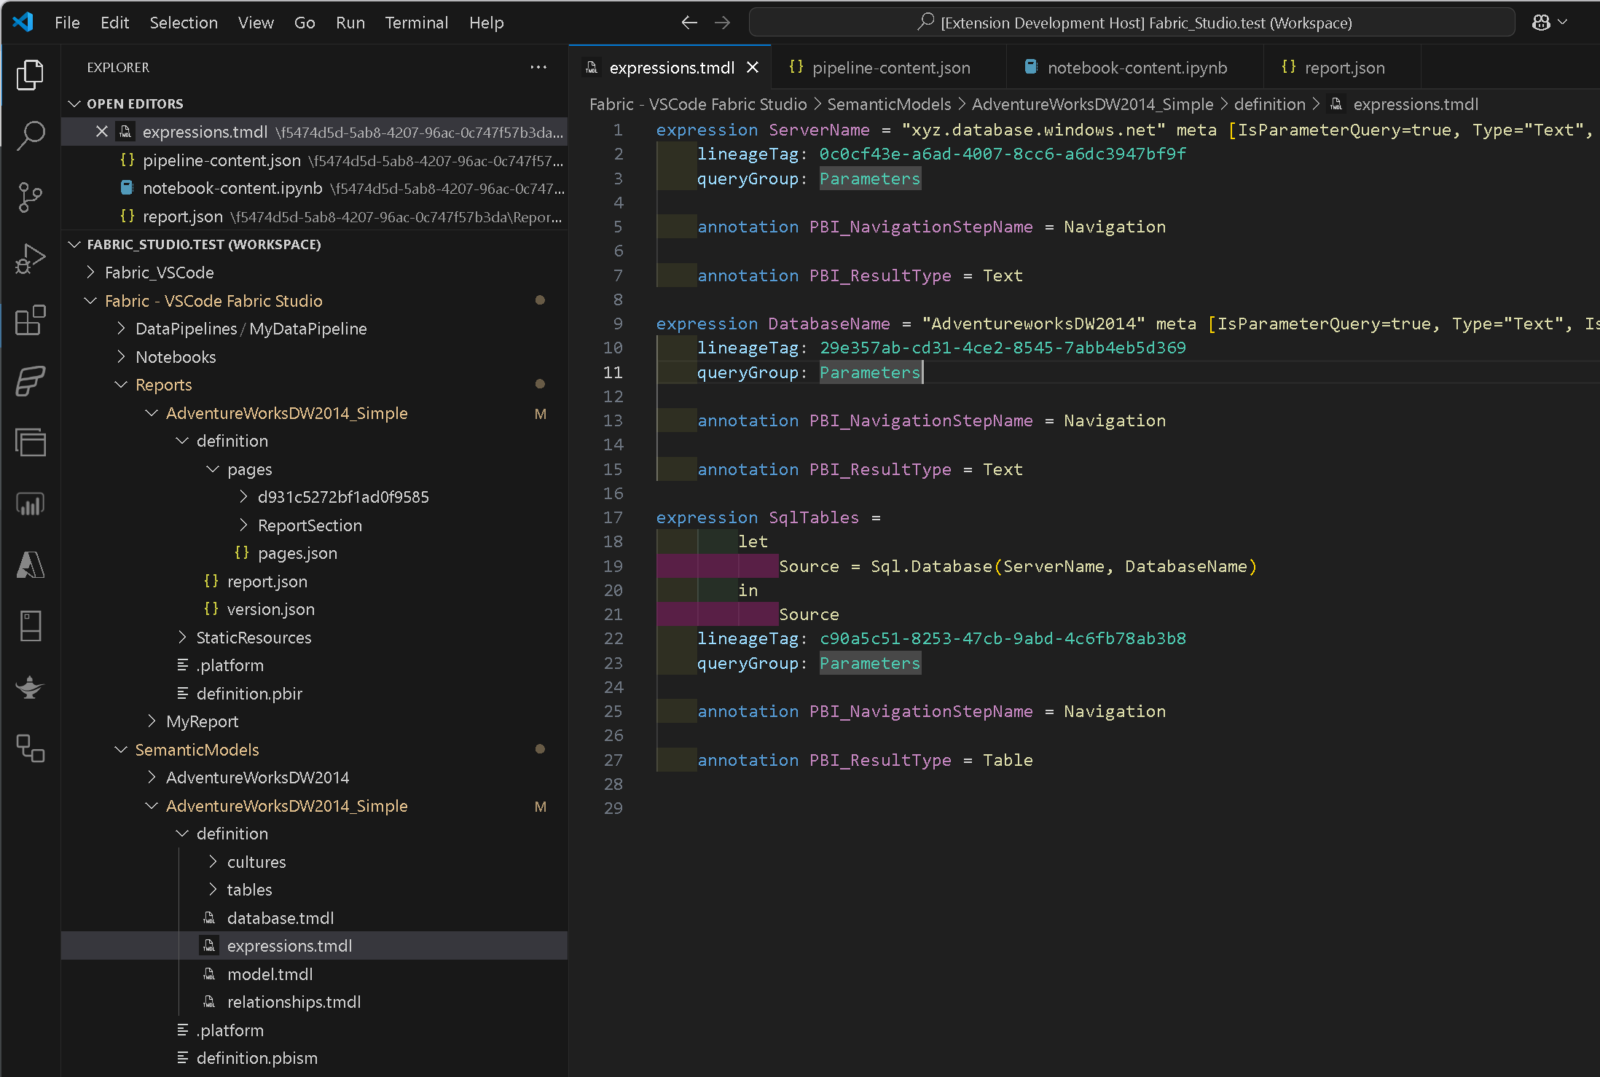
Using the context menu in the Workspace Browser you can select Edit Items which will open the definition of the selected item in your VSCode Solution Explorer as a new folder. You can either do this on the workspace level, a specific item type folder (Pipelines, Notebooks, …) or on an individual item. As of now, not all items are supported – here is a list of items that are supported as of now:

  • Semantic Models using TMDL (.tmdl)
  • Reports using PBIR (.json)
  • Data Pipelines using JSON (.json)
  • Notebooks using Python (.py) or Jupyter Notebooks (.ipynb)
  • Spark Job Definitions using JSON (.json)
  • Mirrored Databases using JSON (.json)

This feature is implemented using VSCode Custom File System providers which makes it behave as if it were a local file system. This means you can also copy&paste or drag&drop between Fabric and your local file system – in both directions! The use-cases are unlimited here:

  • easily copy a semantic model or report from one workspace to another
  • upload the report of a local PBI Project (.pbip) to Fabric without having to also publish and overwrite the dataset
  • do bulk-edits on your notebooks or pipelines

Once you are done with your changes, you can use “Publish to Fabric” to upload them back to Fabric and make the new version available to your users.

Deployment Pipelines

Selectively deploy individual items or whole item types (multi-select!)into the next stage directly from VSCode.

Fabric Git Integration
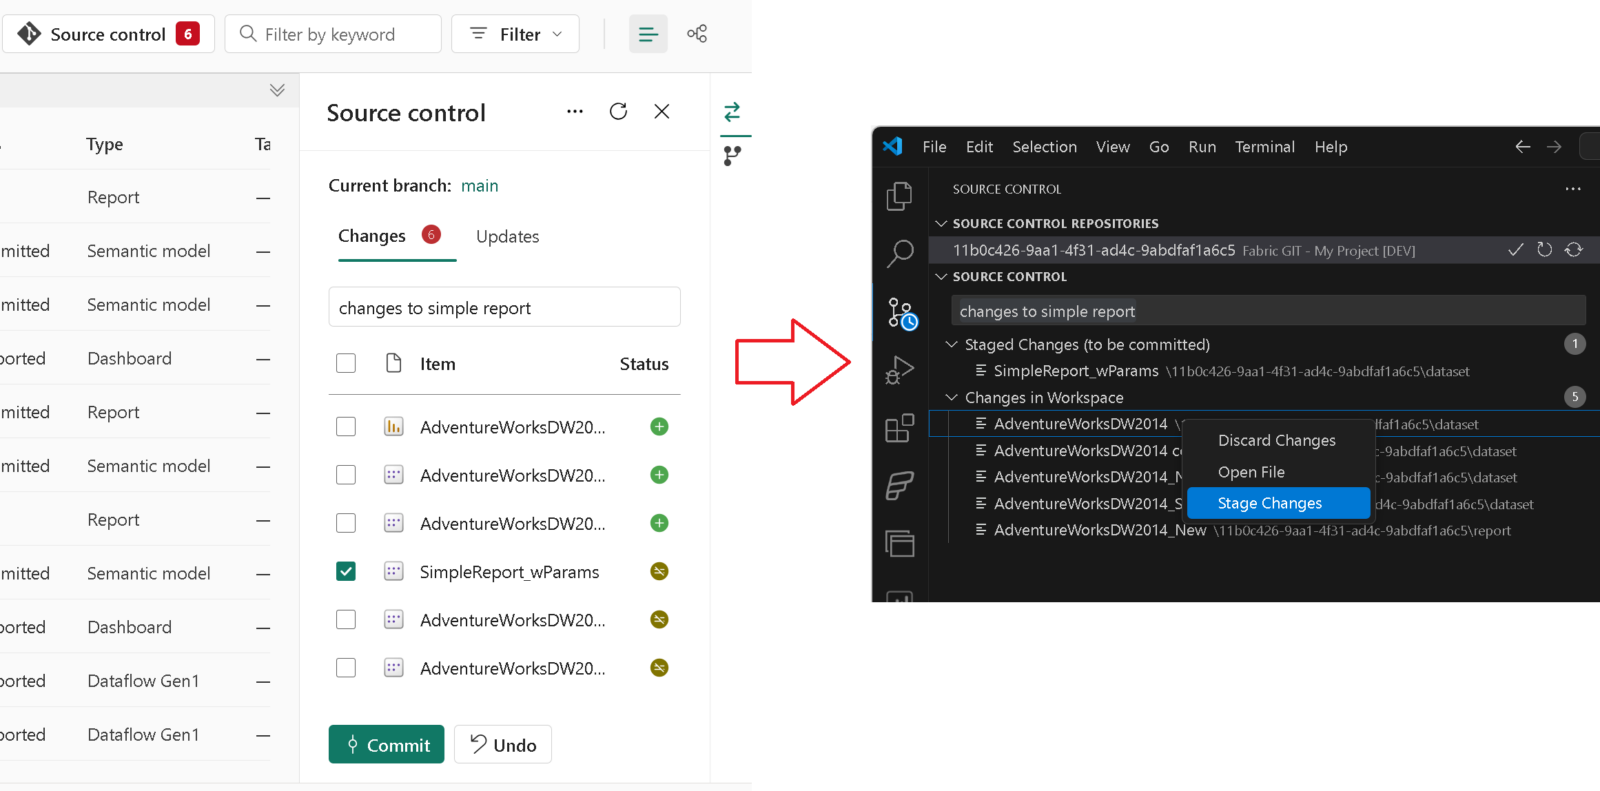
If your Fabric workspace is linked to GIT, you can now mange it from VSCode as if it were a local repository. Stage/Unstage/Discard changes or pull the latest changes from the underlying GIT repository.

Fabric API Notebooks
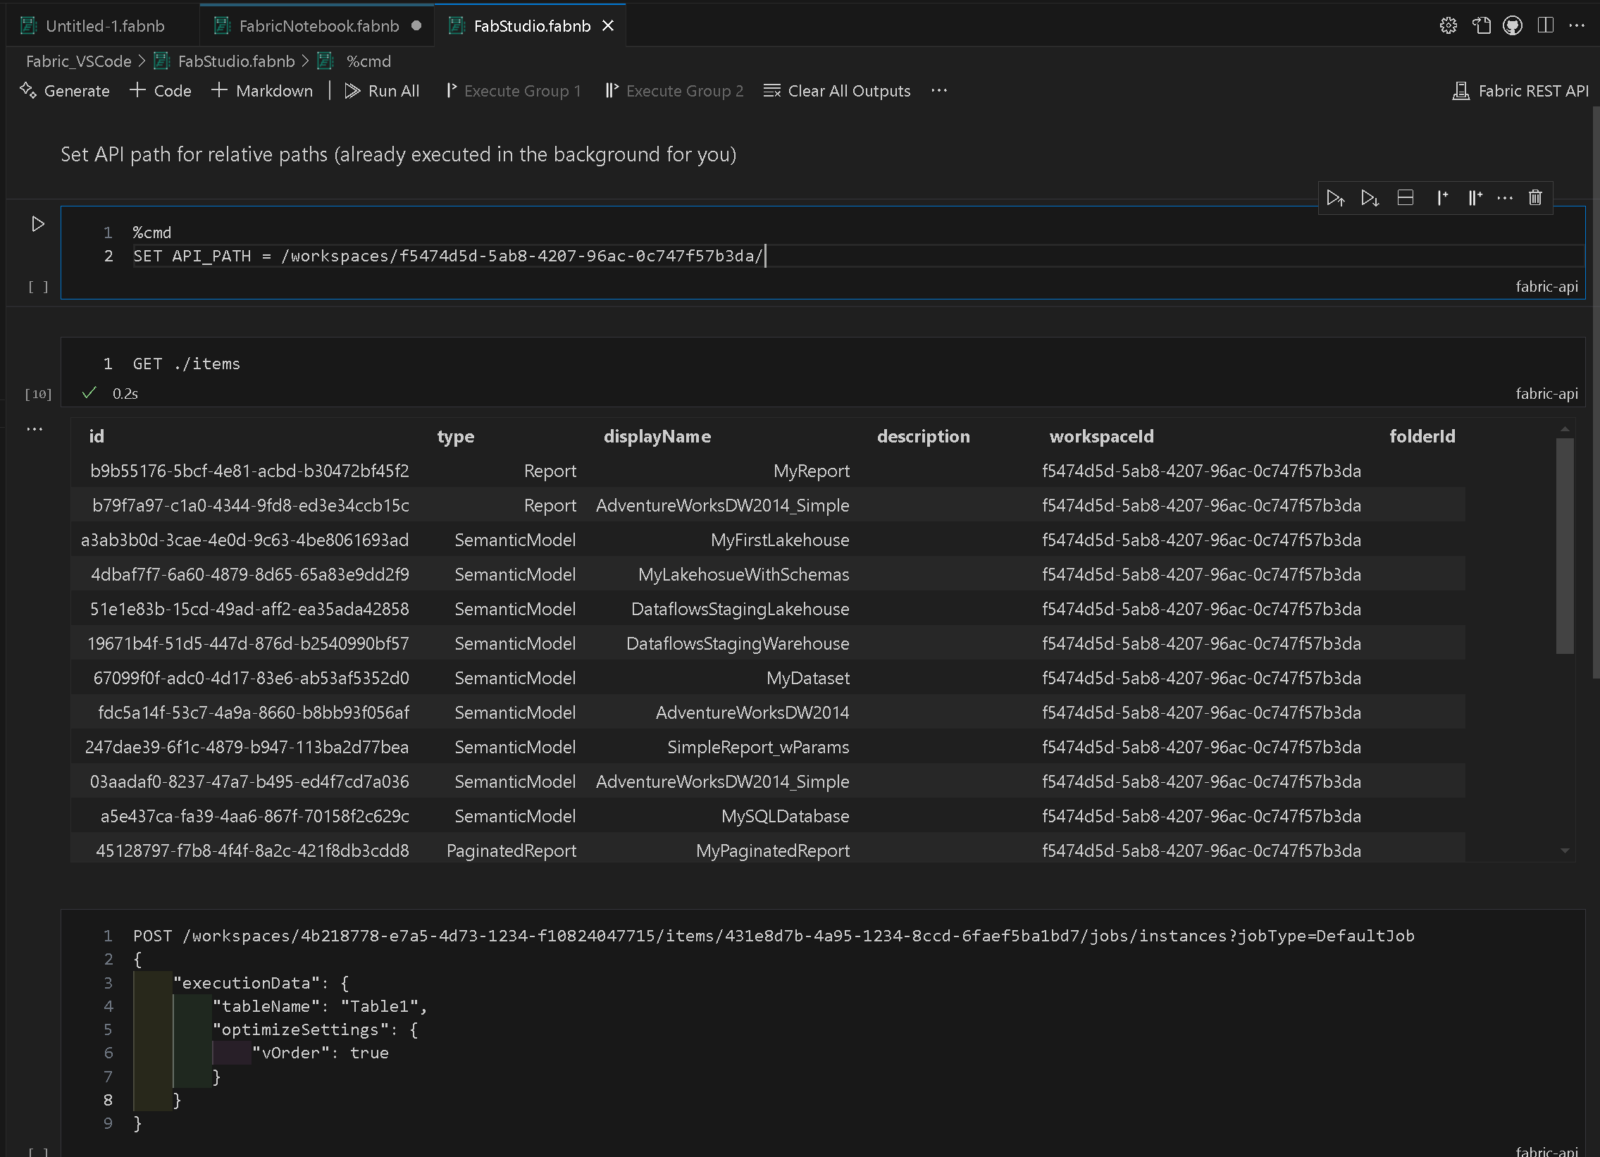
As Fabric Studio is solely based on the REST APIs provided by Fabric, I also wanted to offer a way to make running arbitrary API calls as easy as possible. The main problem when it comes to REST APIs is always authentication. As the API is already authenticated in the background, we can use the same mechanisms to also run any other API calls as well. Notebooks in VSCode offer an intuitive way to to do this. Another reason for this generic way of doing API calls is that not all endpoints will be covered by the UI so it just made sense to offer this option as well.

There would be a lot more features worth being mentioned here but instead I will create short demo videos and publish them via my social media channels (Bluesky, X/Twitter, LinkedIn). So to stay up-to-date with the most recent developments, make sure to also follow me there!

The last thing I want to mention is that the whole project is 100% open source and can be used under the MIT license. The repository is currently hosted in my GitHub account: https://github.com/gbrueckl/FabricStudio. If you are interested in the project and maybe want to contribute to it, please reach out to me!

If you like Fabric Studio but are working mainly with Power BI, make sure to also check out Power BI Studio – another extension developed by me, specifically tailored towards Power BI developers and admins!

Release of Power BI-VSCode Extension

Download from VSCode Gallery

I am working a lot with Power BI in my daily business and there have always been a couple of things that bothered me since the very beginning. Most of this is related to the web UI and its usability, mainly that you need too many clicks to get to where you want (e.g. viewing Datasets refreshes) but also that some features are simply not exposed in the UI that are possible with the Power BI REST APIs (e.g. rebinding a report to another dataset). So I thought there must be some better way to do this and make management and usability of Power BI easier and I came up with the idea for a Visual Studio Code extension for Power BI to close this gap.

As you may know, I have already written another VSCode extension for Databricks (Databricks Power Tools) which is basically also “just” a wrapper around the various Databricks APIs but makes various features of Databricks much more accessible, especially for people that spend most of their time in a local IDE anyway and are already used to it. At this point I also want to thank my company paiqo for supporting this engagements and making all this possible!

For about a year now I have been developing the Power BI VSCode extension and it finally reached a state where I want to release it. It has been in the VSCode market place for quite some time now but was never officially released by a blog post like this. To stay up-to-date I highly recommend to follow the repository which will always be updated to include the latest features and documentation.

So what is this Power BI VSCode extension all about and how can it help me in my daily work? There are currently three core components included which all serve different purposes:

  • Workspace browser
  • Notebooks to run arbitrary API calls and DAX
  • TMDL editor (!)

The workspace browser allows you to access all artifacts that you have access to and run the most common API calls directly from the VSCode UI. Besides features that are also available in the web UI like taking over an artifact, triggering a refresh/viewing the history or changing parameters, this includes additional features like Rebind, Clone, Configuring Query Scale Out, Update Report Content, etc. For some features you can also use Drag&Drop instead of the context menu. For example, if you drag a report and drop it on a dataset, a popup will ask you whether you want to rebind the report to that dataset or clone the report and link the clone to the dataset!

Besides the workspace browser there is also a dedicated one for Deployment Pipelines which allows you to configure Power BI deployment pipelines and also run selective deployments directly from VSCode!

There are also UIs for Capacities and Gateways, but those are mainly for informational purposes and are read-only.

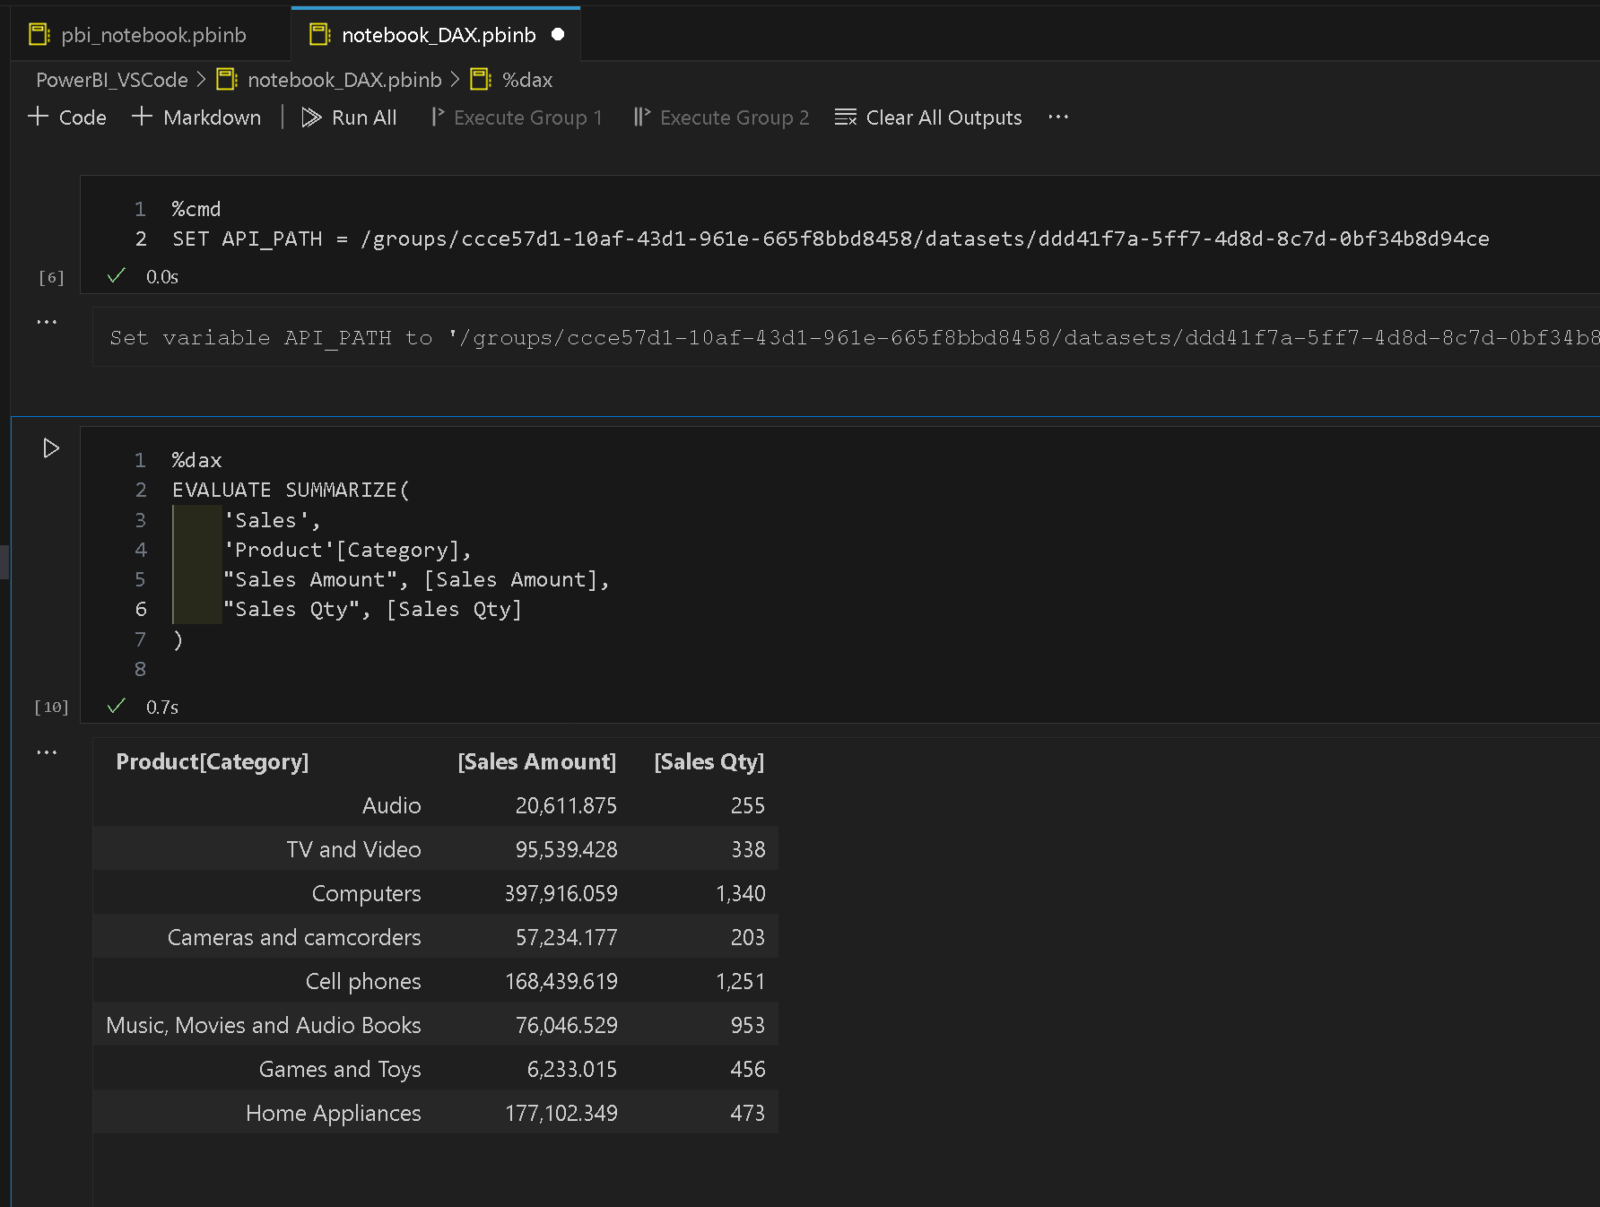
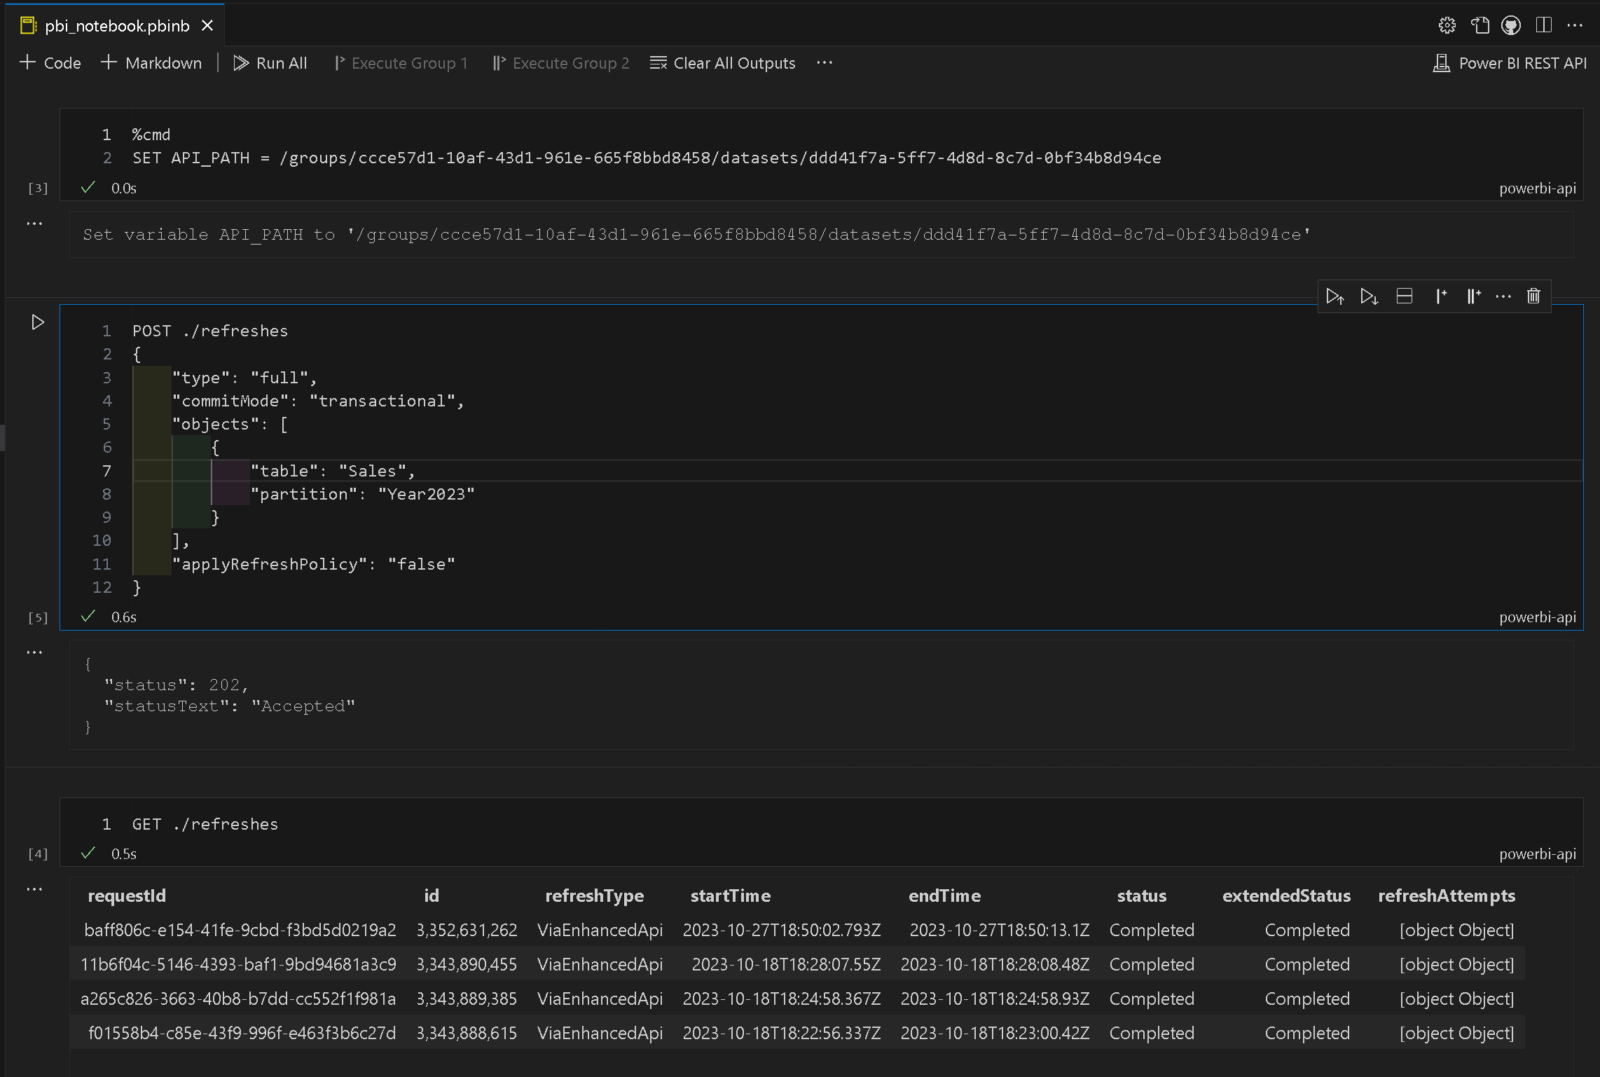
The second component of the extension are Power BI Notebooks which allow you to run any arbitrary API call . This is especially useful as not every API call can be built into the UI properly (e.g. due to too many parameters, etc.). Power BI Notebooks also support notebook magics like %dax or %cmd to run DAX queries or to set variables within the notebook. There is also intellisense/autocomplete which should help you a lot to discover and write your final API call. This also includes samples for more complex API calls like calling the Enhanced Refresh API.

To run a DAX statement via the Execute Queries API, you can simply use %dax in the first line of the notebook call and then start writing your DAX query:

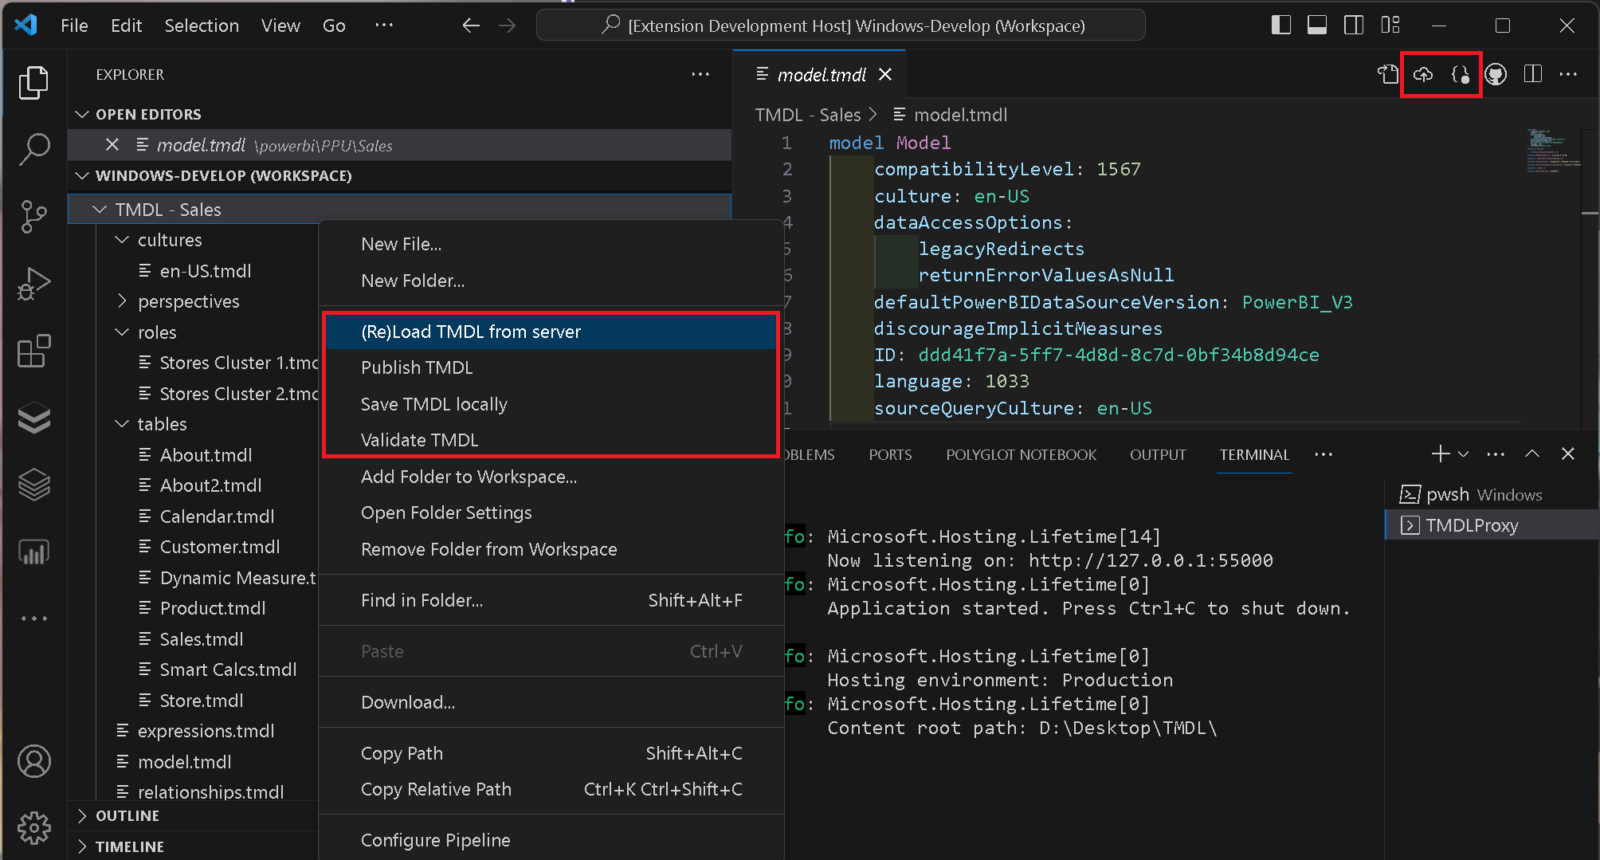
The last – but definitely not least(!) – part is the just recently added TMDL (Tabular Model Definition Language) integration, which allows you to modify Power BI datasets using TMDL. If your dataset resides in a premium capacity and the XMLA endpoint is enabled for read/write mode, you can select “Edit TMDL” from the context menu of your dataset. This will add a new folder to your VSCode workspace that represents the TMDL structure of that dataset. You can now navigate the individual .tmdl files, change them and validate them. once you are happy with the changes, you can also publish your changes back to the online dataset. The .tmdl files only reside in memory for the time of your VSCode session and will be reloaded every time. If necessary, you can also force a manual reload at any time to the the most recent version from the Power BI service.

Besides this “online”-mode, you can also save the TMDL definition locally – e.g. if you want to check it into a Git repository. The same features as described above are also available for locally stored TMDL definitions. this also includes TMDL definitions generated by other tools like Tabular Editor or pbi-tools!

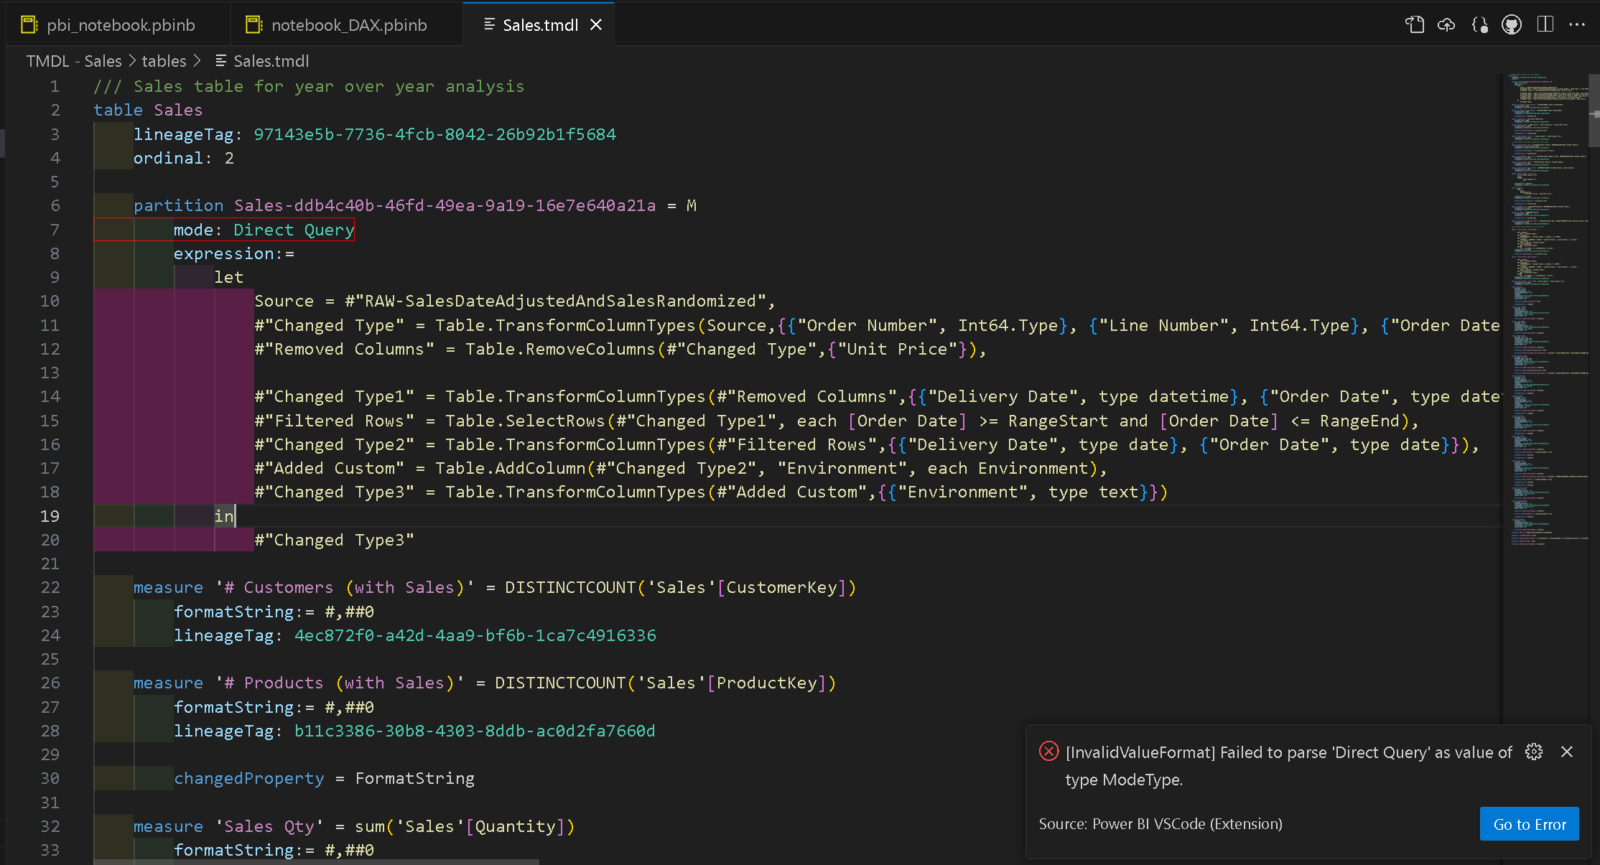
To ease debugging, there is also a [Go to Error] button if your TMDL is not valid which jumps directly to the faulty TMDL file and highlights the line with the error:

To make this all work, you need to have ASP.NET Core Runtime 7.0 or higher installed as described in the docs.

So whats next?

While I do have some new features already in the backlog, I am also eagerly looking forward to gather some feedback from the community to drive future developments. So if you have a feature that you want to have added to the extension, simply open a feature request in the repository.

Due to the open architecture of VSCode, the extension also integrates with/leverages all other extensions in the Power BI space. Though, there is not much available at the moment but I hope that his ecosystem grows and sooner or later there will be a language extension for DAX or TMDL that provides intellisense/autocomplete here too, or simply syntax highlighting for the very beginning.

As this is an open-source project, you can also contribute directly by creating pull requests. If you like the extension and make sure I don’t run out of coffee while continuously improving it you can also sponsor a cup of coffee for me to contribute to this extension.

Querying Power BI REST API using Fabric Spark SQL

Microsoft Fabric has a lot of different components which usually work very well together. However, even though Power BI is a fundamental part of Fabric, there is not really a tight integration between Data Engineering components and Power BI. In this blog post I will show you an easy and reusable way to query the Power BI REST API via Fabric SQL in a very straight forward way. The extracted data can then be stored in the data lake e.g. to create a history of your dataset refreshes, the state of your workspaces or any other information that is provided by the REST API.

To achieve this, we need to prepare a couple of things first:

  • get an access token to work with the Power BI REST API
  • expose the access token as a SQL variable
  • create a PySpark function to query the Power BI REST API
  • expose the PySpark function as a SQL user-defined function
  • use SQL to query the Power BI REST API

To get an access token for the Power BI REST API we can use mssparkutils.credentials.getToken and provide the OAuth audience for the Power BI REST API which would be https://analysis.windows.net/powerbi/api

pbi_access_token = mssparkutils.credentials.getToken("https://analysis.windows.net/powerbi/api")

We then need to make this token available in Fabric Spark SQL by storing it in a variable:

spark.sql(f"SET pbi_access_token={pbi_access_token}")

The next part is probably the most complex one. We need to write a Python function that runs a query against the Power BI REST API and returns the results in a standardized way. I will not go into too much detail but simply show the code. It basically queries the REST API via a GET request, checks if the result contains a property value with the results and then returns them as a list of items. Please check e.g. the GET Groups REST API call to better understand the structure of the result. The function further adds a new property to each item to make nesting of API calls easier as you will see in the final example.

import requests

# make sure to support different versions of the API path passed to the function
def get_api_path(path: str) -> str:
    base_path = "https://api.powerbi.com/v1.0/myorg/"
    base_items = list(filter(lambda x: x, base_path.split("/")))
    path_items = list(filter(lambda x: x, path.split("/")))

    index = path_items.index(base_items[-1]) if base_items[-1] in path_items else -1

    return base_path + "/".join(path_items[index+1:])

# call the api_path with the given token and return the list in the "value" property
def pbi_api(api_path: str, token: str) -> object:
    
    result = requests.get(get_api_path(api_path), headers = {"authorization": "Bearer " + token})

    if not result.ok:
        return [{"status_code": result.status_code, "error": result.reason}]

    json = result.json()

    if not "value" in json:
        return []

    values = json["value"]

    for value in values:
        if "id" in value:
            value["apiPath"] = f"{api_path}/{value['id']}"
        else:
            value["apiPath"] = f"{api_path}"

    return values

Once we have our Python function, we can make it accessible to Spark. In order to do this, we need to define a Spark data type that is returned by our function. To make it work with all different kinds of API calls without knowing all potential properties that might get returned, we use a map type with string keys and string values to cover all variations in the different APIs. As the result is always a list of items, we wrap our map type into an array type.
The following code exposes it to PySpark and also Spark SQL.

import pyspark.sql.functions as F
import pyspark.sql.types as T

# schema of the function output - an array of maps to make it work with all API outputs
schema = T.ArrayType(
    T.MapType(T.StringType(), T.StringType())
)

# register the function for PySpark
pbi_api_udf = F.udf(lambda api_path, token: pbi_api(api_path, token), schema)

# register the function for SparkSQL
spark.udf.register("pbi_api_udf", pbi_api_udf)

Now we are finally ready to query the Power BI REST API via Spark SQL. We need to use the magic %%sql to tell the notebook engine, we are running SQL code in this one cell. We then run our function in a simple SELECT statement and provide the API endpoint we want to query and a reference to our token-variable using the variable syntax ${variable-name}.

%%sql 
SELECT pbi_api_udf('/groups', '${pbi_access_token}') as workspaces

This will return a table with a single row and a single cell:

However, that cell contains an array which can be exploded to get our actual list of workspaces and their details:

%%sql
SELECT explode(pbi_api_udf('/groups', '${pbi_access_token}')) as workspace

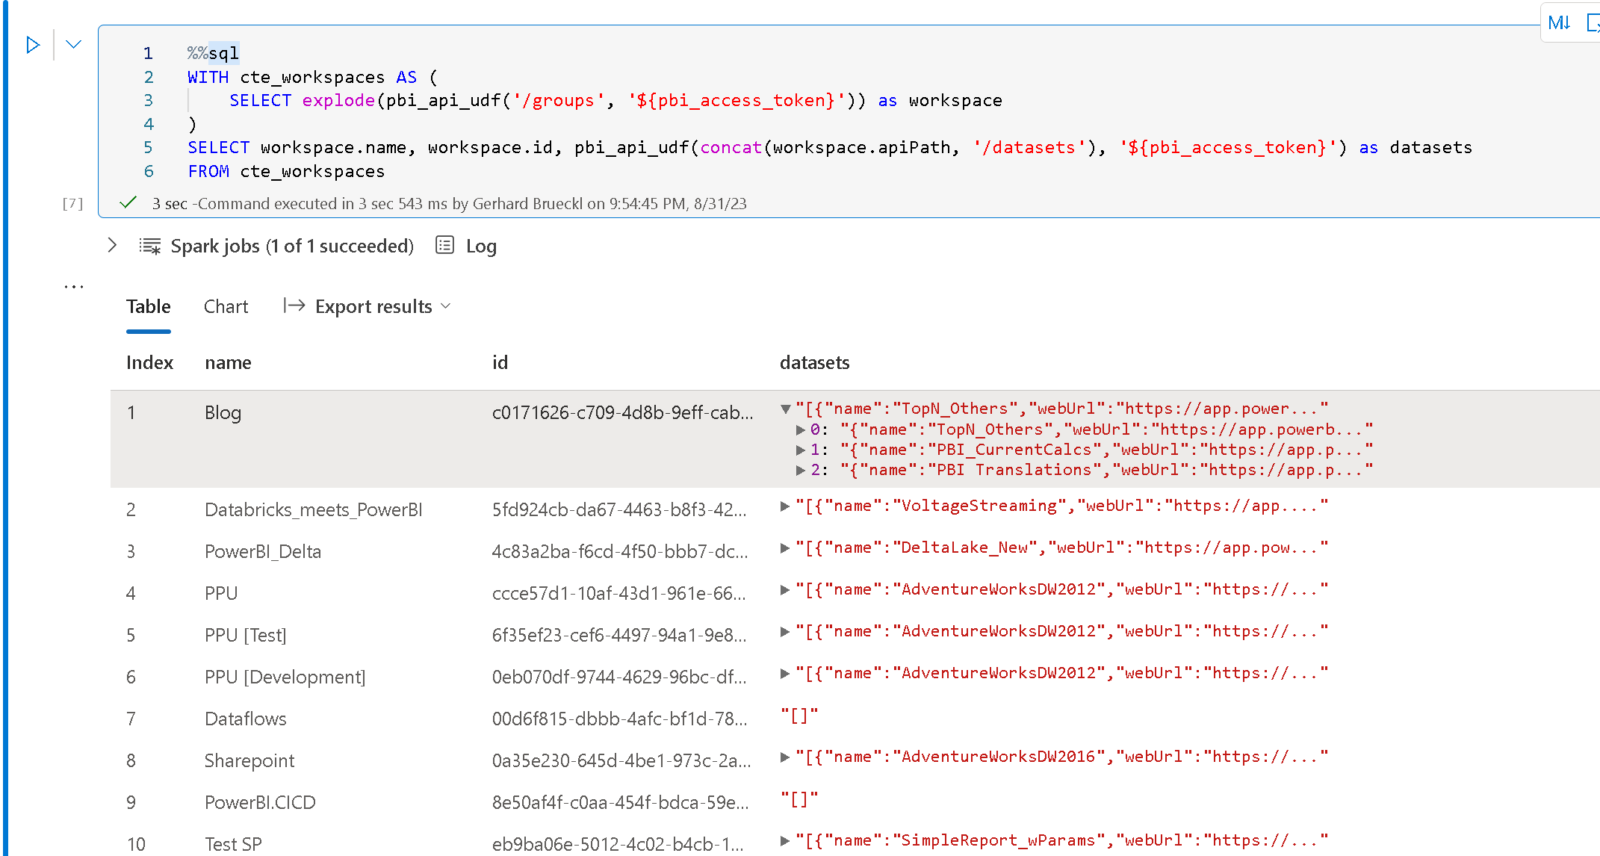
Once you understood those concepts, it is pretty easy to query the Power BI REST API via SQL as this can also be combined with other Spark SQL capabilities like CTEs, e.g. to get a list of all datasets across all workspaces as shown below:

%%sql
WITH cte_workspaces AS (
    SELECT explode(pbi_api_udf('/groups', '${pbi_access_token}')) as workspace
)
SELECT workspace.name, workspace.id, pbi_api_udf(concat(workspace.apiPath, '/datasets'), '${pbi_access_token}') as datasets
FROM cte_workspaces

As you can see, to show a given property as a separate column, you can just use the dot-notation to reference it – e.g. workspace.name or workspace.id

There are endless possibilities using this solution, from easy interactive querying to historically persisting the state of your Power BI objects in your data lake!

Obviously, there are still some things that could be improved. It would be much more elegant to have a Table Valued Function instead of the scalar function that returns an array which needs to be exploded afterwards. However, this is not yet possible in Fabric but will hopefully come soon.

This technique can also be applied to any other APIs that expose data. The most challenging part is usually the authentication but Fabric’s mssparkutils.credentials make it pretty easy for us to do this.

PowerShell module for Databricks on Azure and AWS

Avaiilable via PowerShell Gallery: DatabricksPS

Over the last year I worked a lot with Databricks on Azure and I have to say that I was (and still am) very impressed how well it works and how it integrates with other services of the Microsoft Azure Data Platform like Data Lake Store, Data Factory, etc.

Some of the projects I worked on also included CI/CD like pipelines using Azure DevOps where Databricks did not really shine so bright in the beginning. There are no native tasks for it or anything. But this is OK as for those scenarios, where you need to automate/script something, Databricks offers a REST API (Azure, AWS).

As most of our deployments use PowerShell I wrote some cmdlets to easily work with the Databricks API in my scripts. These included managing clusters (create, start, stop, …), deploying content/notebooks, adding secrets, executing jobs/notebooks, etc. After some time I ended up having 20+ single scripts which was not really maintainable any more. So I packed them into a PowerShell module and also published it to the PowerShell Gallery (https://www.powershellgallery.com/packages/DatabricksPS) for everyone to use!

The module works for Databricks on Azure and also if you run Databricks on AWS – fortunately the API endpoints are almost identical.
The usage is quite simple as for any other PowerShell module:

  1. Install it using Install-Module cmdlet
  2. Setup the Databricks environment using API key and endpoint URL
  3. run the actual cmdlets (e.g. to start a cluster)


Here is the same code for you to copy&paste:

Install-Module -Name DatabricksPS
$accessToken = "dapi123456789be672c4007052d4694a7c51"
$apiUrl = "https://westeurope.azuredatabricks.net"
Set-DatabricksEnvironment -AccessToken $accessToken -ApiRootUrl $apiUrl
Start-DatabricksCluster -ClusterID "1202-211320-brick1"

At the moment, the module supports the following APIs:

These APIs are not yet implemented but will be added in the near future:

All the cmdlets are documented and contain links to official documentation of the Rest API call used by the cmdlet. Some API endpoints support different variations of parameters – this was implemented using different parameter sets in PowerShell. There are still some ongoing tests (especially on AWS) and improvements but I general all cmdlets work as expected. I hope this helps anyone else who also has to deal with the Databricks APIs frequently or has to integrate it in a CI/CD pipeline.

The whole source code is also available from my Git-repository (https://github.com/gbrueckl/Databricks.API.PowerShell). If you want to provide any feedback, please use the Git-repository to do so.

Refresh PowerBI Datasets using PowerShell and Azure Runbooks

In June 2017, Microsoft announced a new set of API function to manage data refreshes in PowerBI. The new API basically allows you to trigger a refresh or retrieve the history of previously executed refreshes. The full specification can be found in the official MSDN documentation, or using this direct links: Refresh dataset and Get dataset refresh history

So besides the scheduled and manual refreshes from within the PowerBI service directly, we now have a third option to trigger refreshes but this time also from an external caller! This itself is already pretty awesome and some people already did some cool stuff leveraging the new API functions:

Charles Sterling: Running the Power BI Refresh API’s Headless
Sirui Sun: Git-Repository powerbi-powershell

The basic idea is to use object from pre-built Azure Management DLLs to generate the OAuth Access token that is necessary to use the API. This works very well locally but cannot be used in the cloud – e.g. in combination with Azure Automation Runbooks or Azure Functions where you cannot install or reference any custom DLLs.

In this blog post I will show you how you can accomplish exactly this  – create an Azure Automation Runbook to refresh your PowerBI dataset!
But first of all there are some things that you need to keep in mind:

  1. There are no service accounts in PowerBI so we will always use a “real” user
  2. you need to supply the credentials of a “real” user
  3. The user needs to have appropriate access to the dataset in order to refresh it
  4. the dataset refresh must succeed if you do it manually in PowerBI
  5. you are still limited to 8 refreshes/day through the API

OK, so lets get started. First of all we need an Azure Application which has permissions in PowerBI. The easiest way to do this is to use the navigate to https://dev.powerbi.com/apps, log in with your account and simply follow the steps on the screen. The only import thing is to select the App Type “Native app”. At the end, you will receive a ClientID and a ClientSecret – Please remember the ClientID for later use!

Next step is to create the Azure Runbook. There are plenty of tutorials out there on how to do this: My first PowerShell workflow runbook or Creating or importing a runbook in Azure Automation so I will no go into much more detail here. Besides the runbook itself you also need to create an Automation Credential to store the username and password in a secure way – here is a tutorial for this: Credential Assets in Azure Automation

Now lets take a look at the PowerShell code. Instead of using any pre-built DLLs I removed all unnecessary code and do all the communication using Invoke-RestMethod. This is a very low-level function and is part of the standard PowerShell modules so there is no need to install anything! The tricky part is to acquire an Authentication Token using username/password as it is nowhere documented (at least I could not find it) what the REST call has to look like. So I used Fiddler to track the REST calls that the pre-built DLLs use and rebuilt them using Invoke-RestMethod. This is what I came up with:

$authUrl = "https://login.windows.net/common/oauth2/token/"
$body = @{
"resource" = "https://analysis.windows.net/powerbi/api";
"client_id" = $clientId;
"grant_type" = "password";
"username" = $pbiUsername;
"password" = $pbiPassword;
"scope" = "openid"
}
$authResponse = Invoke-RestMethod -Uri $authUrl –Method POST -Body $body

$clientId is the ClientID of the Azure AD Application
$pbiUsername is the email address of the PowerBI user.
$pbiPassword is the password of the PowerBI user.
The $authRepsonse then contains our Authentication token which we can use to make our subsequent calls:

$restURL = "https://api.powerbi.com/v1.0/myorg/datasets/$pbiDatasetId/refreshes"
$headers = @{
"Content-Type" = "application/json";
"Authorization" = $authResponse.token_type + " " + $authResponse.access_token
}
$restResponse = Invoke-RestMethod -Uri $restURL –Method POST -Headers $headers

And that’s all you need. I wrapped everything into a PowerShell function that can be used as an Azure Runbook. The username/password is derived from an Azure Automation Credential.

The final runbook can be found here: PowerBI_Refresh_Runbook.ps1

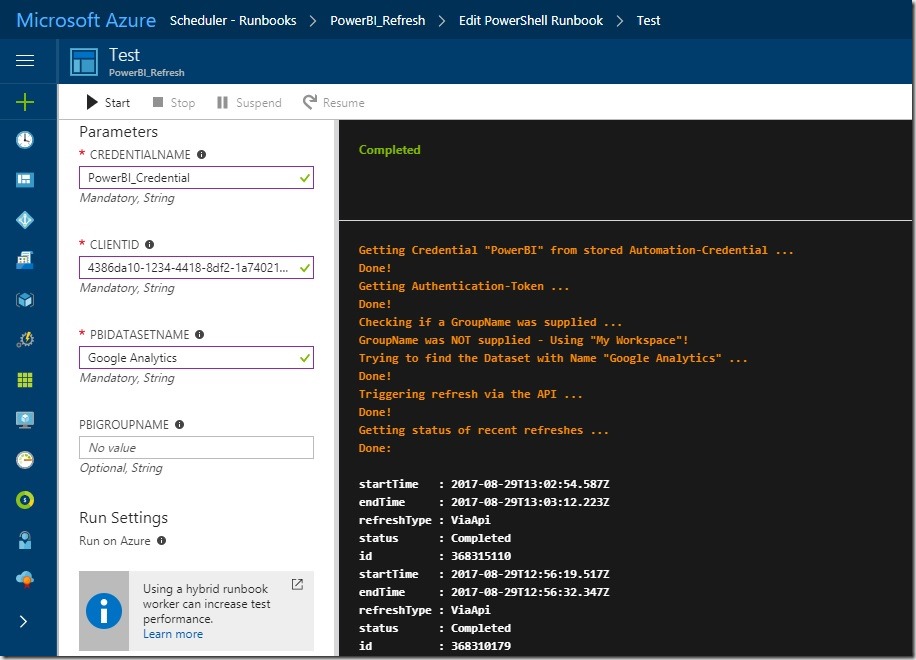
Refresh_PowerBI_Dataset_Azure_Runbook

It takes 4 Parameters:

  1. CredentialName – the name of the Azure Automation credential that you created and which stores the PowerBI username and password
  2. ClientID – the ID of your Azure Active Directory Application which you created in the first step
  3. PBIDatasetName – the name of the PowerBI dataset that you want to refresh
  4. PBIGroupName – (optional) the name of the group/workspace in which the PowerBI dataset from 3) resides

When everything is working as expected, you can create custom schedules or even create webhooks to trigger the script and refresh you PowerBI dataset! As you probably know, this is really powerful as you can now make the refresh of the PowerBI dataset part of your daily ETL job!

C# Wrapper for Power BI REST API – Version 2

Some time ago, when Microsoft released the first version of Power BI Rest API I already wrote a wrapper for C# which allowed you to map the object from the API into regular C# objects and work with them locally. However, there have been some major upgrades since then (Actually they were already announced in July 2016 but I did not find anytime to work on this again until now Smile ). Anyway, I just published a new version of my C# wrapper on my GitHub site: https://github.com/gbrueckl/PowerBI.API.Client

To use it, you first need to create an Azure AD application and get an ApplicationID – this is very well described here or can be done directly at https://dev.powerbi.com/apps

A new PowerBI API Client object can then be created using the ApplicationID:

Create a PowerBI API Client
PBIAPIClient pbic = new PBIAPIClient(ApplicationID);

Basically, most of the features described in the API reference are also included in the API Wrapper. So you can now use C# to create your PowerBI model locally and deploy it to the PowerBI service! The only to keep in mind is that the dataset you create via the API can only be sourced by pushing data into it using the Push/Streaming API. As this can be quite cumbersome sometimes, I also added the functionality to publish a whole C# DataTable with basically just two lines of code to publish your reference data/dimensions:

Publish DataTable to PowerBI
// create a regular DataTable – but could also be derived from a SQL Database!
DataTable dataTable = new DataTable();
/* populate the dataTable */
// create a PBI table from a regular DataTable object
PBITable productsTable = new PBITable(dataTable);
// publish the table and push the rows from the dataTable to the PowerBI table
productsTable.PublishToPowerBI(true);


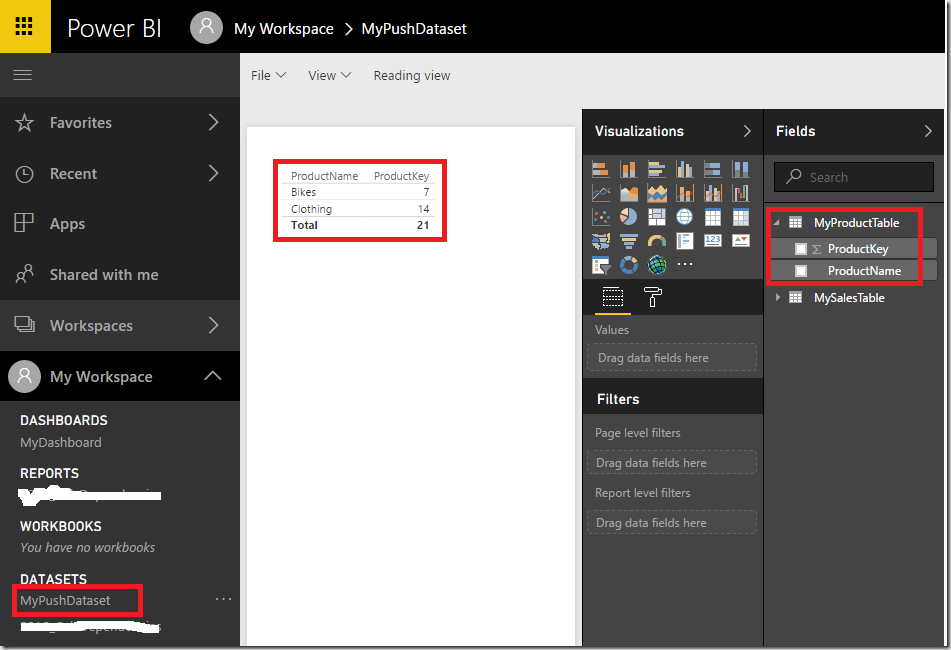
This snippet basically deploys the table structure to the PowerBI service and populates it with data from the DataTable:
Published_DataTable


For your “fact”-data you can also create single rows on your own using the PBIRow-object and publish them manually e.g. for WriteBack-scenarios:

Publish Rows to PowerBI
salesTable.DeleteRowsFromPowerBI();
PBIRow row = salesTable.GetSampleRow();
row.SetValue("ProductKey", 1);
row.SetValue("SalesDate", DateTime.Now);
row.SetValue("Amount_BASE", 100);
salesTable.PushRowToPowerBI(row);

Depending on the type of DataSet you choose (Push, PushStreaming or Streaming), you can also create DAX Measures or Relationships:

Add Measures and Relationships
salesTable.Measures.Add(new PBIMeasure("Sales Amount", "SUM('{0}'[{1}])", tableNameFacts, "Amount_BASE")); // adding a measure
dataset.Relationships.Add(new PBIRelationship("MyRelationship", salesTable.GetColumnByName("ProductKey"), productsTable.GetColumnByName("ProductKey")));


Of course, all the features that were already supported in the first version, are still supported:

  • Get Embed-URLs of Reports and Tiles
  • List Reports, Dashboards, Datasets, …

The new version also supports Streaming and PushStreaming datasets in the same way as it does for regular Push datasets. For details on Streaming datasets please take a look at Real-time streaming in PowerBI

I recommend to explore the API on your own by simply building your first PowerBI Push/Streaming Model on your own!
For the latest features and improvements please refer to the GitHub repository which will be updated frequently.

Any feedback and participation in the further development is highly appreciated and will be done via the GitHub repository.

C# Wrapper for Power BI REST API


UPDATE 2017-05-18:
I released a new version of this project and also published it on GitHub: https://github.com/gbrueckl/PowerBI.API.Client
A blog post which refers to the updates can be found here.


Since the last major update last year, Power BI offers some APIs which can be used to interact with content and also data that is stored in Power BI. Microsoft provides a good set of samples on how to use the APIs on GitHub and also a an interactive APIARY web-UI which you can use to build and test API calls on-the-fly. However, it can still be quite cumbersome as you have to deal with all the REST API calls and the returned JSON on your own. So I decided to write a little C# Wrapper where you simply pass in your Azure AD Application Client ID and you can deal with all Object of the Power BI API as they were regular C# objects.

Here is a little example on how to list all available reports and get the EmbedURL of a given tile using the PowerBIClient:

using System;
using System.Collections.Generic;
using System.Linq;
using System.Text;
using System.Threading.Tasks;
using pmOne.PowerBI;
using pmOne.PowerBI.PowerBIObjects;

namespace SampleApplication
{
    class Program
    {
        static void Main(string[] args)
        {
            PowerBIClient pbic = new PowerBIClient(“ef4aed1a-9cab-4bb3-94ea-ffffffffffff”);

            Console.WriteLine(“Available Reports:”);
            foreach(PBIReport pbir in pbic.Reports)
            {
                Console.WriteLine(pbir.Name);
            }

            Console.WriteLine();
            Console.WriteLine(“Get EmbedURL for Tile [Retail Analysis Sample].[This Year’s Sales]”);
            Console.WriteLine(pbic.GetDashboardByName(“Retail Analysis Sample”).GetTileByName(“This Year’s Sales”).EmbedURL);

            Console.WriteLine(“Press <Enter> to exit …”);
            Console.ReadLine();
        }
    }
}

As you can see, its pretty simple and very easy to use, even for non-developers. You can find all the source-code and the sample application for download below. The code as I have written it is very likely not the best code possible, but it works for my needs, is straight forward, simple and saves me a lot of work and time when dealing with the PowerBI API. Also, if the API changes, you may need to adopt the code accordingly. However, for the future I hope that Microsoft provides some metadata so that VisualStudio can build all this code automatically using e.g. Swagger. But for the time being feel free to use, improve or extend my code Smile

SourceCode: PowerBIClient_Source.zip