Upgrading your reports from PowerBI to Azure Analysis Services

Since April 2017 it is possible to build reports on top of datasets that are hosted in the PowerBI service. This was announced and described here and here in more detail. This might not seem like a big deal at first sight, but it can have a huge impact on how you work with PowerBI. By separating the data model from the report, you can have two or more independent people working with the same dataset. Also, the people who build the reports in the end most not necessarily have the knowledge to build a data model – the just need to use it. So, there are some clear advantages when you split up your workbook:

  • separation of duty (data modeler vs. report builder)´
  • any number of reports on top of the same model
  • easy control over reports as the files are quite small (they only contain the definition of the report)

This is all pretty cool and, from my point of view, the way to go once you want to use the reports in production and/or have several people working on/with the same reports.

But lets go a step further. After some time, as your data model grows, you realize that the reports get slow and also the processing takes a considerable amount of time to finish. The official upgrade path will then guide you to Azure Analysis Services and you will migrate your data model to deal with the larger data volumes and make use of the flexibility in processing you gained by your upgrade. This migration process is very well described here.

So far so good, but what happens to your reports? Last week I was in exactly the position described above and we had to migrate the existing reports (which were base on a dataset hosted in PowerBI) to Azure Analysis Services. As of now, there is now simple way to simply change the connection string from PowerBI to Azure Analysis Services neither in PBI Desktop nor in the Service. But we could think of some options how it might work:

  • rebuild all reports
  • use the REST API to update the connection string of the existing reports
  • modify the .pbix file manually (NOT OFFICIALLY SUPPORTED)

As you can imagine, rebuilding all reports was not really an option.

The next option, the PowerBI REST API looked pretty promising at first sight. It allows you to retrieve and set the dataset that is used by your report. So the idea is to simply create a new dataset which points to Azure Analysis Services in Live Query mode, take the existing report and use the Rebind API call to bind it to the new AAS dataset. Even though this is supposed to work, I could not make it work in my environment. I tried all things that I could think of but nothing work and I also gave up on this.

So I was stuck there but knew that the information of the data source has to be somewhere in the .pbix file. In the past I already did something similar with Excel/PowerPivot files (“Restoring a SSAS Tabular model to PowerPivot”) so I thought I would also give it a try for .pbix files. And it turns out that they are quite similar. For those of you who are new to this, most (if not all) of the files that are associated with a Microsoft tool and end with “x” (e.g. .xlsx/docx/…) are just ZIP-files in the end. To unzip them, simply rename them to .zip and use your favorite zip-tool to open them. You will see a file-structure similar to the one below:
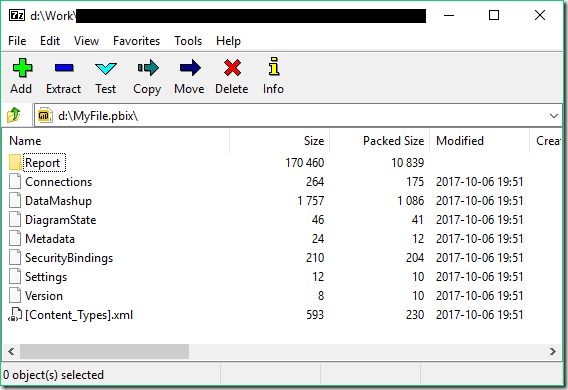
pbix zip file content

(If your file contains a data model, you see a file called “DataModelSchema” instead of “Connections”. The next steps will not work in this case!). However, in our case, as the report is linked to a dataset hosted in the PowerBI service, our file does not contain any data itself but only the connection information to our data source. As you can guess, this information is stored in the “Connections” file.

To see what a connection to an Azure Analysis Services dataset looks like, I simply created a new PowerBI desktop model and established a Live Connection. Saved it and opened it again as zip file. The Connection file itself is just a JSON but the details are not really relevant here. I simply replaced the Connections file from my original report with the one from my new workbook linked to AAS. Renamed it back to pbix, opened it and voilà, my report was connected to AAS!

This saved us a lot of time and we could move all of our reports within a couple of hours!

Please keep in mind, that this is not officially supported and might break your model. So make sure to always create a backup before you modify the contents of a pbix file manually!
I do not take any responsibility for any broken models or anything else that might happen!
Refresh PowerBI Datasets using PowerShell and Azure Runbooks

In June 2017, Microsoft announced a new set of API function to manage data refreshes in PowerBI. The new API basically allows you to trigger a refresh or retrieve the history of previously executed refreshes. The full specification can be found in the official MSDN documentation, or using this direct links: Refresh dataset and Get dataset refresh history

So besides the scheduled and manual refreshes from within the PowerBI service directly, we now have a third option to trigger refreshes but this time also from an external caller! This itself is already pretty awesome and some people already did some cool stuff leveraging the new API functions:

Charles Sterling: Running the Power BI Refresh API’s Headless
Sirui Sun: Git-Repository powerbi-powershell

The basic idea is to use object from pre-built Azure Management DLLs to generate the OAuth Access token that is necessary to use the API. This works very well locally but cannot be used in the cloud – e.g. in combination with Azure Automation Runbooks or Azure Functions where you cannot install or reference any custom DLLs.

In this blog post I will show you how you can accomplish exactly this  – create an Azure Automation Runbook to refresh your PowerBI dataset!
But first of all there are some things that you need to keep in mind:

  1. There are no service accounts in PowerBI so we will always use a “real” user
  2. you need to supply the credentials of a “real” user
  3. The user needs to have appropriate access to the dataset in order to refresh it
  4. the dataset refresh must succeed if you do it manually in PowerBI
  5. you are still limited to 8 refreshes/day through the API

OK, so lets get started. First of all we need an Azure Application which has permissions in PowerBI. The easiest way to do this is to use the navigate to https://dev.powerbi.com/apps, log in with your account and simply follow the steps on the screen. The only import thing is to select the App Type “Native app”. At the end, you will receive a ClientID and a ClientSecret – Please remember the ClientID for later use!

Next step is to create the Azure Runbook. There are plenty of tutorials out there on how to do this: My first PowerShell workflow runbook or Creating or importing a runbook in Azure Automation so I will no go into much more detail here. Besides the runbook itself you also need to create an Automation Credential to store the username and password in a secure way – here is a tutorial for this: Credential Assets in Azure Automation

Now lets take a look at the PowerShell code. Instead of using any pre-built DLLs I removed all unnecessary code and do all the communication using Invoke-RestMethod. This is a very low-level function and is part of the standard PowerShell modules so there is no need to install anything! The tricky part is to acquire an Authentication Token using username/password as it is nowhere documented (at least I could not find it) what the REST call has to look like. So I used Fiddler to track the REST calls that the pre-built DLLs use and rebuilt them using Invoke-RestMethod. This is what I came up with:

$authUrl = "https://login.windows.net/common/oauth2/token/"
$body = @{
"resource" = "https://analysis.windows.net/powerbi/api";
"client_id" = $clientId;
"grant_type" = "password";
"username" = $pbiUsername;
"password" = $pbiPassword;
"scope" = "openid"
}
$authResponse = Invoke-RestMethod -Uri $authUrl –Method POST -Body $body

$clientId is the ClientID of the Azure AD Application
$pbiUsername is the email address of the PowerBI user.
$pbiPassword is the password of the PowerBI user.
The $authRepsonse then contains our Authentication token which we can use to make our subsequent calls:

$restURL = "https://api.powerbi.com/v1.0/myorg/datasets/$pbiDatasetId/refreshes"
$headers = @{
"Content-Type" = "application/json";
"Authorization" = $authResponse.token_type + " " + $authResponse.access_token
}
$restResponse = Invoke-RestMethod -Uri $restURL –Method POST -Headers $headers

And that’s all you need. I wrapped everything into a PowerShell function that can be used as an Azure Runbook. The username/password is derived from an Azure Automation Credential.

The final runbook can be found here: PowerBI_Refresh_Runbook.ps1

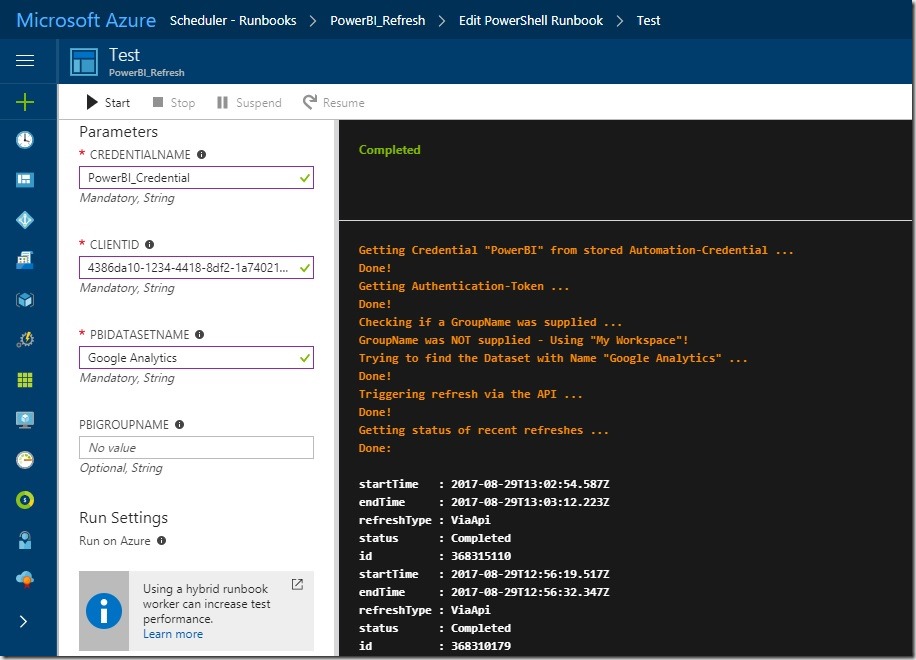
Refresh_PowerBI_Dataset_Azure_Runbook

It takes 4 Parameters:

  1. CredentialName – the name of the Azure Automation credential that you created and which stores the PowerBI username and password
  2. ClientID – the ID of your Azure Active Directory Application which you created in the first step
  3. PBIDatasetName – the name of the PowerBI dataset that you want to refresh
  4. PBIGroupName – (optional) the name of the group/workspace in which the PowerBI dataset from 3) resides

When everything is working as expected, you can create custom schedules or even create webhooks to trigger the script and refresh you PowerBI dataset! As you probably know, this is really powerful as you can now make the refresh of the PowerBI dataset part of your daily ETL job!