In one of my recent posts I explained how to use the Power BI Data Management Gateway to access data hosted in a SQL Server running on an Azure VM. At the time of writing that post the steps to establish connectivity were not quite intuitive. With the latest Update of the Data Management Gateway (Version 1.2.5303.1 and later) things got a bit easier. However, there is still a little thing that you have to configure to make everything work smoothly. First of all, I highly recommend you to read my first post on this topic to fully understand the actual issue and why it does not work out-of-the-box.
When creating a new Data Source the DMG has to be reachable from the machine on which the Data Source Manager (the Click-Once application where you enter your SQL credentials) is executed. The hostname is derived from the DMG and for Azure VMs this does by default not reflect the hostname under which the VM is reachable from public. The hostname would be “MyServer” whereas the public DNS name is “MyServer.cloudapp.net”. To check what hostname the DMG is using you can execute the following Power Shell command:
- [System.Net.Dns]::GetHostEntry("localhost")
In order to change this hostname you can either join the VM to a domain (which is not what we want to do here) or use the following approach:
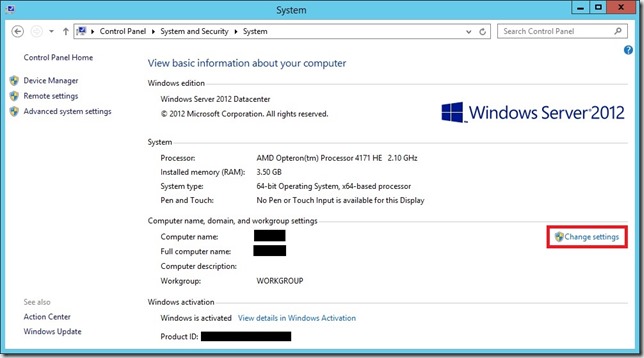
Open the System settings of your server:
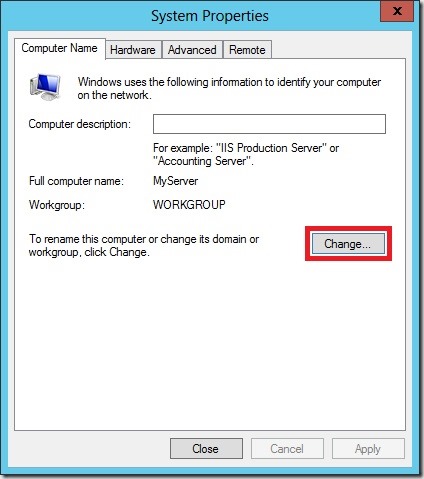
You will notice that both, “Computer name” and “Full computer name” show the same name, and both without the suffix “.cloudapp.net”. In order to change this we need to click the “Change settings” button right next to the names to open the System Properties:
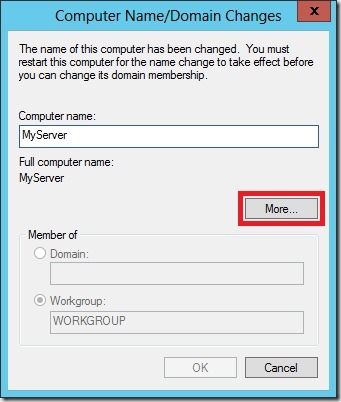
Again, click [Change …] to open the computers domain settings:
As you can see, the “Full computer name” does not show our required suffix “.cloudapp.net” yet. We can change this in the dialog available via the [More …] Button:
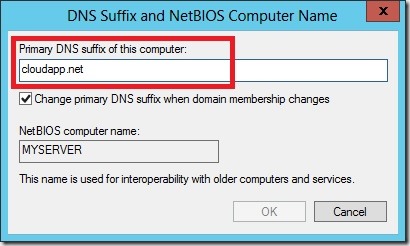
Here we can set our “Primary DNS suffix” – we set it to “cloudapp.net” (without leading dot) to reflect our public DNS name.
By clicking [OK] on all open windows you will see the new full name “MyServer.cloudapp.net” now being used as “Full computer name” everywhere. Also our Power Shell command from above now shows the correct hostname. Note that this change also requires a reboot of the VM.
Once the machine is rebooted and DMG is running again you can now use any client machine to create your Data Source which was previously only possible from the server directly and required a RDP connection. Also HTTPS connectivity with self-signed certificates works with this approach which I will show in one of my next posts – so stay tuned!
Pingback: Using Power BI to access on-premise data | James Serra's Blog