Using Self-Signed Certificates for your Power BI DMG

In my previous post I showed how to setup a Power BI Data Management Gateway on a non-domain Azure VM. The final setup is also the starting-point for this post where we will use self-signed certificates to use HTTPS/SSL connectivity to our DMG. So make sure that you have all prerequisites up and running before you continue reading.

Basically, the process to switch to HTTPS is pretty straight forward. Simply open your DMG, go to Settings and change from HTTP to HTTPS. Finally select your certificate and you are ready to go!
This may work in a corporate hybrid environment where everything is set up correctly but for a non-Azure VM this is a bit more complicated and this is what this post is about.

Besides the initial setup from my previous post there are some steps you need to do in advance in order for HTTPS connectivity to work:
1) Open the port that the DMG HTTPS connection uses in your Windows Firewall (default is port 8050)
2) Create an Endpoint for your Azure VM for the very same port
3) Create a self-signed certificate to be used to establish a secure connection

You should already be familiar with 1) and 2) as you needed to do the same steps also for your HTTP port of your DMG (default is port 8051 here). To create a self-signed certificate you can simply follow the steps as described here. The important thing here is to use the full qualified server name: CN=myserver.cloudapp.net
This is very import, otherwise the final connection will not work!

Your MakeCert-command should look similar to this:
makecert -r -pe -n “CN=myserver.cloudapp.net” -b 01/01/2000 -e 01/01/2050 -eku 1.3.6.1.5.5.7.3.1 -ss my -sr localMachine -sky exchange -sp “Microsoft RSA SChannel Cryptographic Provider” -sy 12

After you run the command the new certificate is automatically added to your users personal certificates and can be used when setting up HTTPS connectivity for your DMG:
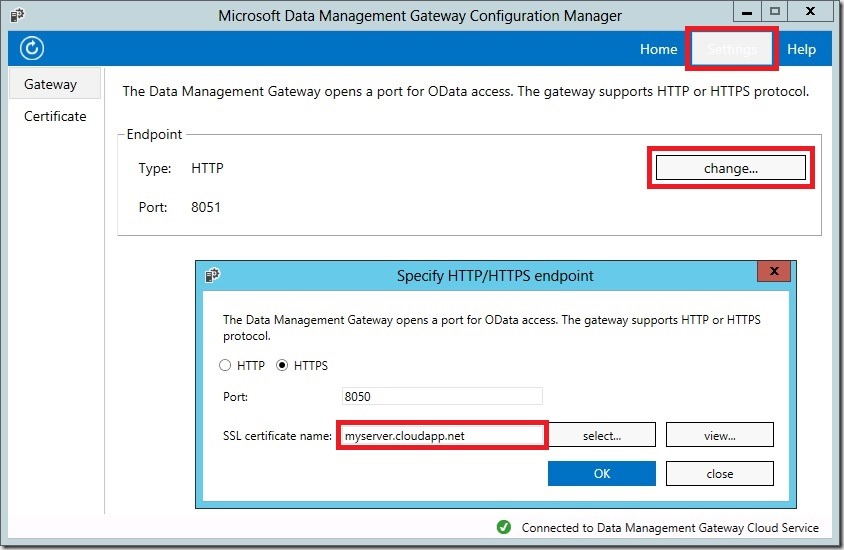
SetupDMG

Once you click [OK] it takes some time (~1 Minute) until everything is updated and HTTPS connectivity can be used. Now you can use Excel and Power Query to search for your data sources that are published via OData. You will find all of them but as soon as you try to load the data you will receive the following error:
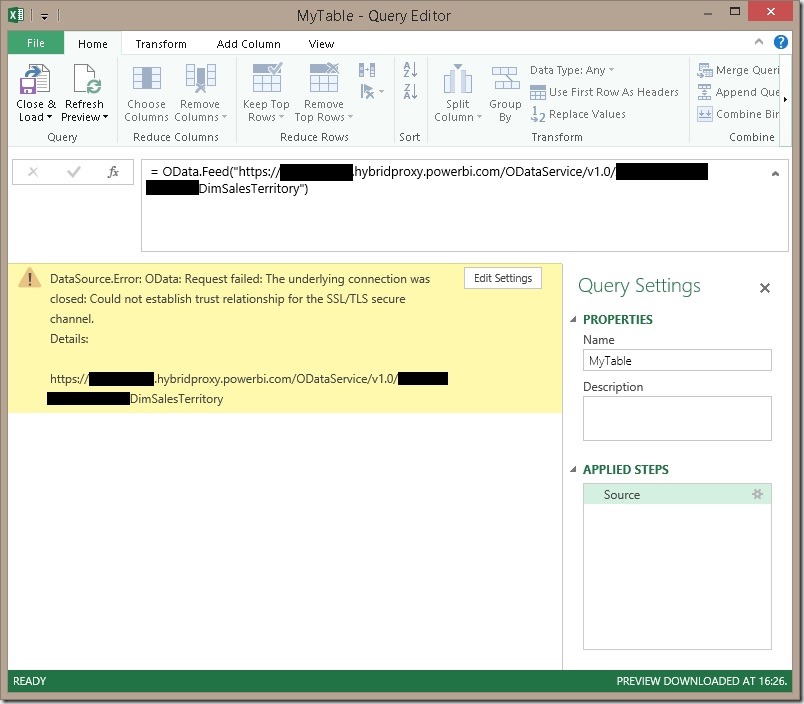
ErrorPQ

That’s a bit surprising as the DMG is configured correctly using HTTPS and the very same OData feed worked just fine with HTTP. But here comes the error in my thinking that I was not aware of before talking to Benjamin Tang and Samuel Zhang from the product team. Until that point I always thought that the data is load through the cloud and there is no direct connection from my client to the server:
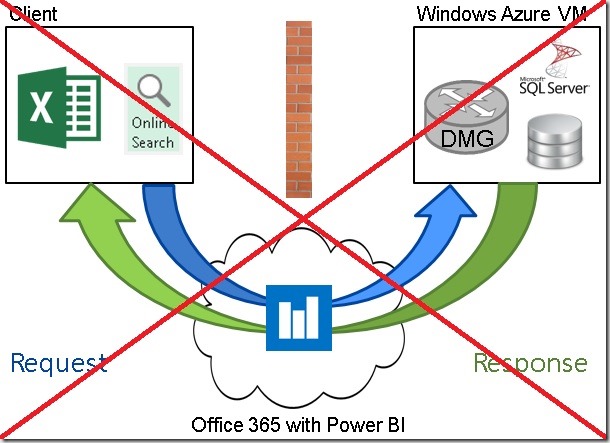
WrongConnectivityThought
But this is not how it works!

What actually happens in the background is that the request to the Power BI OData service gets redirected to the server and the client connects directly to the server:
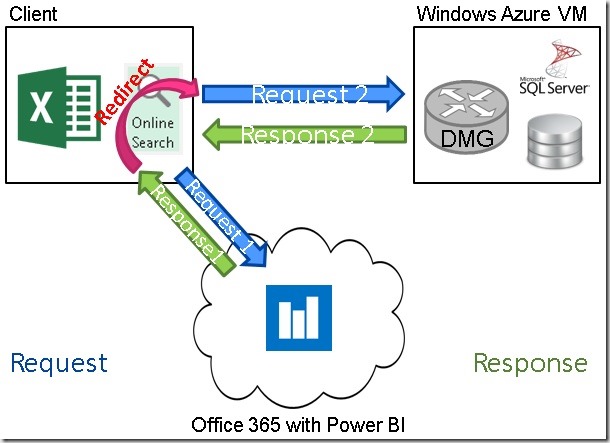
ActualConnection

And this is also where our PQ error originates as the certificate used is not a trusted certificate on the client. In order to make it a trusted certificate you need to install it on the client. This can be done by following these steps:
1) Launch Internet Explorer using “Run as Administrator”
    (I’m serious here, this only works with IE but not with e.g. Chrome!)
2) navigate to https://myserver.cloudapp.net:8050 (or whatever servername/port you used)
3) continue to the website and ignore the certificate error
4) press [Cancel] at the popup the asks for credentials
5) now click on the “Certificate error” in the menu bar and press “View certificates”
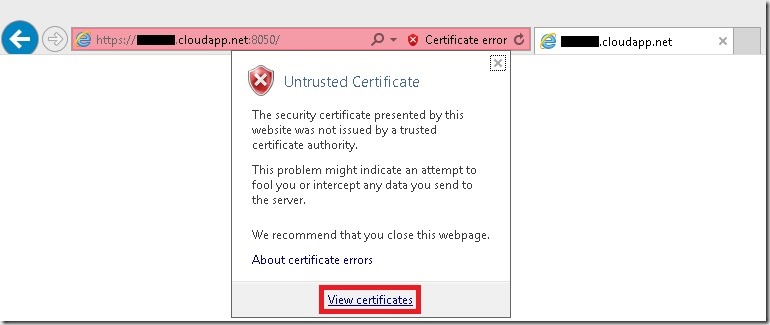
ViewCertificate
6) Now install the certificate:
InstallCertificate
(Please note that this option is only available if you are using Internet Explorer launched as Administrator!!!)
7) select the location where you want to store the certificate (Current User or Local Machine depending whether it should be installed for you only or for all users)
8) whichever storage location you used, just make sure that you place the certificate in the “Trusted Root Certification Authorities” on the next page:
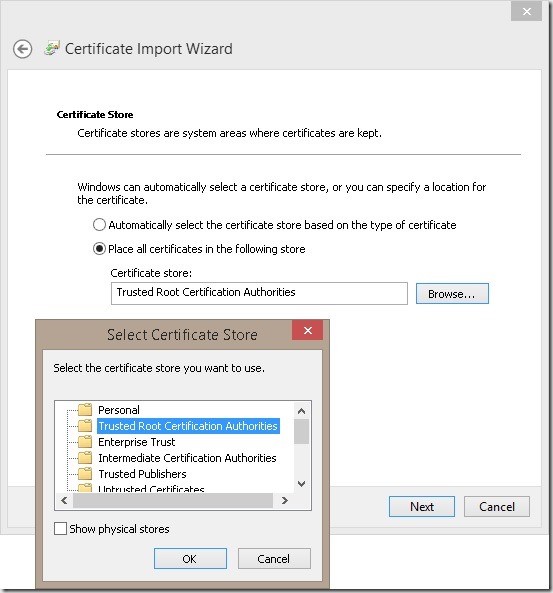
InstallCertificateStore

Once you have installed the certificate to your Trusted Root Certificate Authorities store the Power Query connections works again but now it is using HTTPS!

Of course this solution is only for demo and testing purposes, in a real world scenario you would already have your certificates in place and everything should indeed work out-of-the-box.
Using Power BI DMG on Non-Domain Azure VMs – August 2014 Update

In one of my recent posts I explained how to use the Power BI Data Management Gateway to access data hosted in a SQL Server running on an Azure VM. At the time of writing that post the steps to establish connectivity were not quite intuitive. With the latest Update of the Data Management Gateway (Version 1.2.5303.1 and later) things got a bit easier. However, there is still a little thing that you have to configure to make everything work smoothly. First of all, I highly recommend you to read my first post on this topic to fully understand the actual issue and why it does not work out-of-the-box.

When creating a new Data Source the DMG has to be reachable from the machine on which the Data Source Manager (the Click-Once application where you enter your SQL credentials) is executed. The hostname is derived from the DMG and for Azure VMs this does by default not reflect the hostname under which the VM is reachable from public. The hostname would be “MyServer” whereas the public DNS name is “MyServer.cloudapp.net”. To check what hostname the DMG is using you can execute the following Power Shell command:

  1. [System.Net.Dns]::GetHostEntry("localhost")

In order to change this hostname you can either join the VM to a domain (which is not what we want to do here) or use the following approach:

Open the System settings of your server:
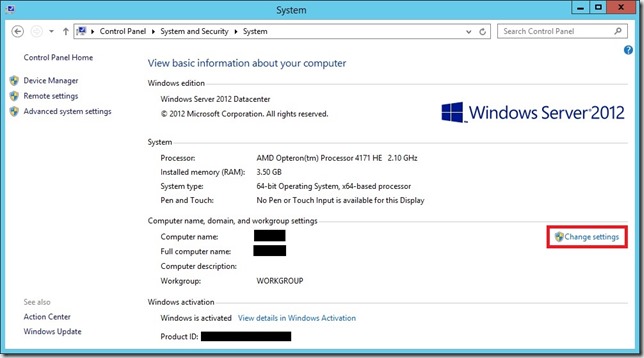
SystemSettings_default
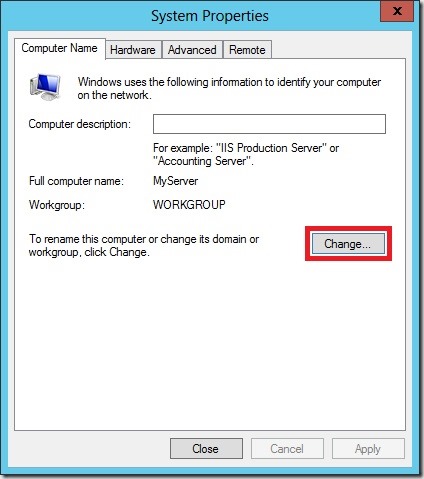
You will notice that both, “Computer name” and “Full computer name” show the same name, and both without the suffix “.cloudapp.net”. In order to change this we need to click the “Change settings” button right next to the names to open the System Properties:
SystemProperties

Again, click [Change …] to open the computers domain settings:
DomainSettings
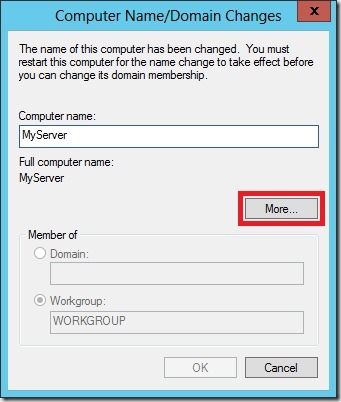
As you can see, the “Full computer name” does not show our required suffix “.cloudapp.net” yet. We can change this in the dialog available via the [More …] Button:
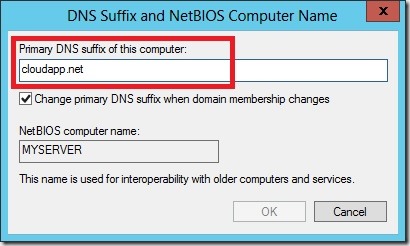
DNS_Settings
Here we can set our “Primary DNS suffix” – we set it to “cloudapp.net” (without leading dot) to reflect our public DNS name.

By clicking [OK] on all open windows you will see the new full name “MyServer.cloudapp.net” now being used as “Full computer name” everywhere. Also our Power Shell command from above now shows the correct hostname. Note that this change also requires a reboot of the VM.

Once the machine is rebooted and DMG is running again you can now use any client machine to create your Data Source which was previously only possible from the server directly and required a RDP connection. Also HTTPS connectivity with self-signed certificates works with this approach which I will show in one of my next posts – so stay tuned!

Using Power BI Data Management Gateway on Non-Domain Azure VM

UPDATE AUGUST 2014:
There were some changes to the DMG in August 2014. Please refer to my new blog post which addresses the issues with the new version! However, I still recommend you to read this post first in order to fully understand the original issue!
The new post can be found here.


I am currently preparing some demos and examples for Power BI. As you can expect for demos you do not want to put too much effort in building up any infrastructure so I decided to use an Azure VM to host my SQL databases and SSAS cubes. Keeping things simple the Azure VM is not joined to a domain which is fine for SQL where I can use SQL authentication, for SSAS I use msmdpump.dll. After everything was set up I wanted to install the Data Management Gateway to expose my SQL tables via OData to Power Query and Online Search.
Bryan C. Smith recently published an article on that very same topic Creating a Demo Power BI Data Gateway using an Azure Virtual Machine but for some reasons it did not work for me. Further, as Bryan already mentions in the first paragraph, his setup is not supported and  its also a bit of a hack (modifying hosts-file, and so on).
So I started my own investigations and came up with another solution, which only uses out-of-the-box features and tools and is actually quite simple. Another thing to mention here is that it will (probably) not work for scheduled data refreshes but only for exposing the SQL database via OData and make it searchable in Power Query.
Having that said, here are the steps to follow:

1) Setup the Data Management Gateway itself on the Azure VM as described here: Create a Data Management Gateway. This should work just fine and the Gateway should be in the “Registered”-state on the Azure VM and in “Ready”-state in the Power BI Admin Center:
 AdminCenter_GW_Ready

2) Create a new Data Source on top of the previously created Gateway as described here: Create a Data Source and Enable OData Feed in Power BI Admin Center

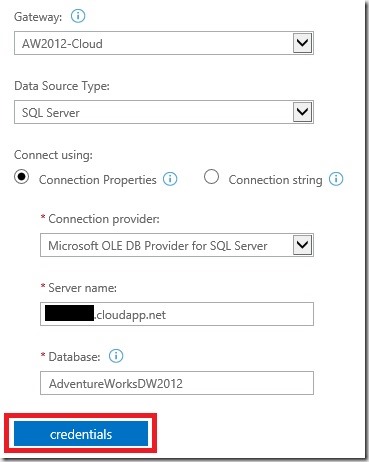
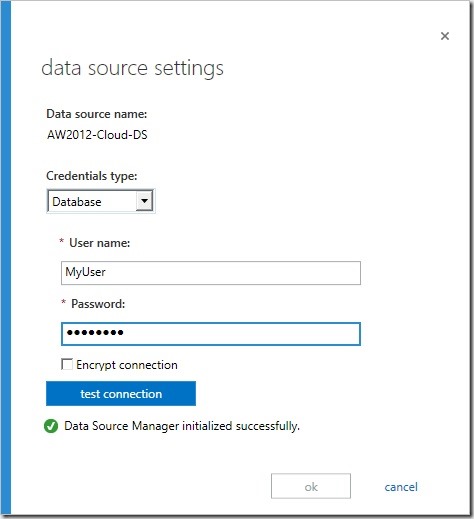
Here you will usually receive an error when you want to enter credentials for the SQL Database:
AdminCenter_DS

By Clicking on the [credentials]-button a new window pops up. Please note that this is a click-once application that actually runs on your client and is independent of your actual browser!
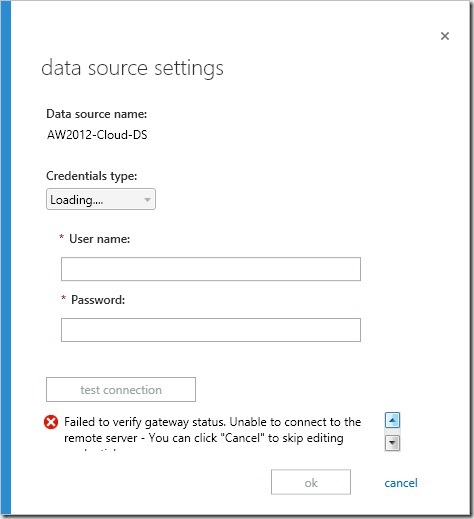
DataSource_Error

If the Gateway is running on an Azure VM, or basically any machine which cannot be reached from your current client you will receive an error that a connection could not be established or something similar.
Assuming you called your Azure VM “MyCloudServer” and is perfectly reachable via “MyCloudServer.cloudapp.net” you will receive an error saying that “MyCloudServer” (without “.cloudapp.net”) could not be resolved. Which is actually true as the correct server would be “MyCloudServer.cloudapp.net”. Unfortunatelly, this server name cannot be changed anywhere as far as I know. As the name cannot be changed we need to make the name somehow “resolveable”. Bryan manually modifies the hosts file and makes “MyCloudServer” point to the public IP address of “MyCloudServer.cloudapp.net”. This should usually work just fine, but somehow did not work for me. Also the public IP address may change if you reboot your Azure VM and so you would need to modify the hosts-file again.

So these are the findings we mad so far:
– the Data Source Manager is a click-once application which runs on the client
– the client must be able to resolve “MyCloudServer”

After some thinking I ended up with the following:
The only machine in my scenario that can correctly resolve “MyCloudServer” is the Azure VM itself! So instead of running the Data Source Manager on my client I simply connected to the Power BI Admin Center from my server and repeated the steps from above there.
Now everything works fine and we can proceed:
DataSource_Success
This connectivity check is only done once and has no further impact (I am not 100% sure on this Smile ). Though, the Username and Password are stored and used for all subsequent connection through the gateway, e.g. for OData access so make sure the user has the necessary access rights.

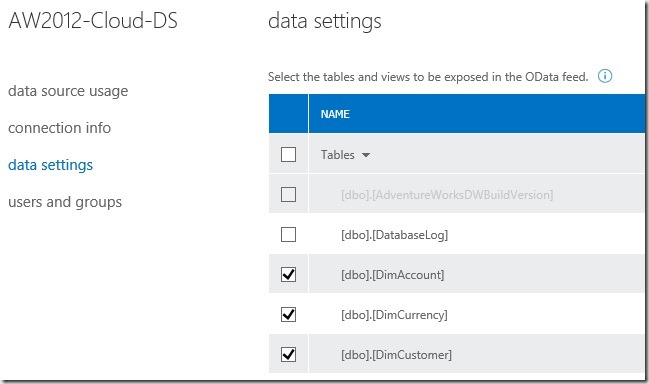
In the next step you can select the tables and views that you want to expose:
DataSource_TablesViews

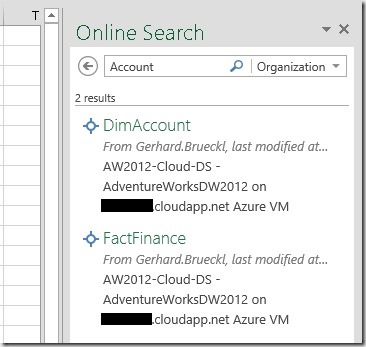
Those can then be searched and queried using Excel and Power Query from any client:
Excel_PowerQuery

And that’s it – The simple trick is to run the Power BI Admin Center from the server itself and create the data source there!

Hope this helps everyone who is dealing with the same issue or wants to setup a demo environment too.