Reading Delta Lake Tables natively in PowerBI

I also contributed the connector described in this post to the official delta.io Connectors page and repo (link). You will find the most recent updates in my personal repo which are then merged to the official repo once it has been tested thoroughly!

Working with analytical data platforms and big data on a daily basis, I was quite happy when Microsoft finally announced a connector for Parquet files back in November 2020. The Parquet file format is developed by the Apache foundation as an open-source project and has become a fundamental part of most data lake systems nowadays.

“Apache Parquet is a columnar storage format available to any project in the Hadoop ecosystem, regardless of the choice of data processing framework, data model or programming language.”

However, Parquet is just a file format and does not really support you when it comes to data management. Common data manipulation operations (DML)  like updates and deletes still need to be handled manually by the data pipeline. This was one of the reasons why Delta Lake (delta.io) was developed besides a lot of other features like ACID transactions, proper meta data handling and a lot more. If you are interested in the details, please follow the link above.

So what is a Delta Lake table and how is it related to Parquet? Basically a Delta Lake table is a folder in your Data Lake (or wherever you store your data) and consists of two parts:

  1. Delta log files (in the sub-folder _delta_log)
  2. Data files (Parquet files in the root folder or sub-folders if partitioning is used)

The Delta log persists all transactions that modified the data or meta data in the table. For example, if you execute an INSERT statement, a new transaction is created in the Delta log and a new file is added to the data files which is referenced by the Delta log. If a DELETE statement is executed, a particular set of data files is (logically) removed from the Delta log but the data file still resides in the folder for a certain time. So we cannot just simply read all Parquet files in the root folder but need to process the Delta log first so we know which Parquet files are valid for the latest state of the table.

These logs are usually stored as JSON files (actually JSONL files to be more precise). After 10 transactions, a so-called checkpoint-file is created which is in Parquet format and stores all transactions up to that point in time. The relevant logs for the final table are then the combination of the last checkpoint-file and the JSON files that were created afterwards. If you are interested in all the details on how the Delta Log works, here is the full Delta Log protocol specification.

From those logs we get the information which Parquet files in the main folder must be processed to obtain the final table. The content of those Parquet files can then simply be combined and loaded into PowerBI.

I encapsulated all this logic into a custom Power Query function which takes the folder listing of the Delta table folder as input and returns the content of the Delta table. The folder listing can either come from an Azure Data Lake Store, a local folder, or an Azure Blob Storage. The mandatory fields/columns are [Content], [Name] and [Folder Path]. There is also an optional parameter which allows you the specify further options for reading the Delta table like the Version  if you want to use time-travel. However, this is still experimental and if you want to get the latest state of the table, you can simply omit it.

The most current M-code for the function can be found in my Github repository for PowerBI: fn_ReadDeltaTable.pq and will also be constantly updated there if I find any improvement.
The repository also contains an PowerBI desktop file (.pbix) where you can see the single steps that make up for the final function.

Once you have added the function to your PowerBI / Power Query environment you can call it like this:

= fn_ReadDeltaTable(
    AzureStorage.DataLake(
        "https://myadls.dfs.core.windows.net/public/data/MyDeltaTable.delta", 
        [HierarchicalNavigation = false]), 
    [Version = 12])
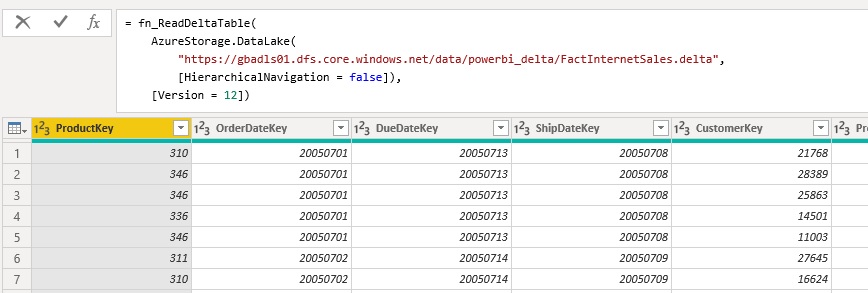
I would further recommend to nest your queries and separate the access to the storage (e.g. Azure Data Lake Store) and the reading of the table (execution of the function). If you are reading for an ADLS, it is mandatory to also specify [HierarchicalNavigation = false] !
If you are reading from a blob storage, the standard folder listing is slightly different and needs to be changed.

Right now the connector/function is still experimental and performance is not yet optimal. But I hope to get this fixed in the near future to have a native way to read and finally visualize Delta lake tables in PowerBI.

After some thorough testing the connector/function finally reached a state where it can be used without any major blocking issues, however there are still some known limitations:

  • Partitioned tables
    • currently columns used for partitioning will always have the value NULL FIXED!
    • values for partitioning columns are not stored as part of the parquet file but need to be derived from the folder path FIXED!
  • Performance
    • is currently not great but this is mainly related to the Parquet connector as it seems
    • very much depends on your data – please test on your own!
  • Time Travel
    • currently only supports “VERSION AS OF”
    • need to add “TIMESTAMP AS OF”
  • Predicate Pushdown / Partition Elimination
    • currently not supported – it always reads the whole table FIXED!

Any feedback is welcome!

Special thanks also goes to Imke Feldmann (@TheBIccountant, blog) and Chris Webb (@cwebb_bi, blog) who helped me writing and tuning the PQ function!

Downloads: fn_ReadDeltaTable.pq (M-code)
Processing Azure Analysis Services with OAuth Sources (like Azure Data Lake Store)

As you probably know from my last blog post, I am currently upgrading the PowerBI reporting platform of one of my customer from a PowerBI backend (dataset hosted in PowerBI service) to an Azure Analysis Services backend. The upgrade/import of the dataset into Azure Analysis Services itself worked pretty flawless and after switching the connection of the reports everything worked as expected and everyone was happy. However, things got a bit tricky when it came to automatically refreshing the Azure Analysis Services database which was based on an Azure Data Lake Store. For the original PowerBI dataset, this was pretty straight forward as a scheduled refresh from an Azure Data Lake store data source works out of the box. For Azure Analysis Services this is a bit different.

When you build and deploy your data model from Visual Studio, your are prompted for the credentials to access ADLS which are then stored in the data source object of AAS. As you probably know, AAS uses OAuth authentication to access data from ADLS. And this also causes a lot of problems. OAuth is based on tokens and those tokens are only valid for a limited time, by default this is 2 hours. This basically means, that you can process your database for the next 2 hours and it will fail later on with an error message saying that the token expired. (The above applies to all OAuth sources!)
This problem is usually solved by using an Azure Service Principal instead of a regular user account where the token does not expire. Unfortunately, this is not supported at the moment for ADLS data sources and you have to work around this issue.


IMPORTANT NOTE: NONE OF THE FOLLOWING IS OFFICIALLY SUPPORTED BY MICROSOFT !!!


So the current situation that we need to solve is as follows:

  • we can only use regular user accounts to connect AAS to ADLS as service principals are not supported yet
  • the token expires after 2 hours
  • the database has to be processed on a regular basis (daily, hourly, …) without any manual interaction
  • manually updating the token is (of course) not an option

Before you continue here, make sure that you read this blog post first: https://blogs.msdn.microsoft.com/dataaccesstechnologies/2017/09/01/automating-azure-analysis-service-processing-using-azure-automation-account/
It describes the general approach of using Azure Automation to process an Azure Analysis Services model and most of the code in this blog post if based on this!
Also this older blog post will be a good read as some concepts and code snippets are reused here.

Back to our example – as we were already using Azure Automation for some other tasks, we decided to also use it here. Also, PowerShell integrates very well with other Azure components and was the language of choice for us. To accomplish our goal we had to implement 3 steps:

  1. acquire a new OAuth token
  2. update the ADLS data source with the new token
  3. run our processing script

I could copy the code for the first step more or less from one of my older blog post (here) where I used PowerShell to acquire an OAuth token to trigger a refresh in PowerBI.

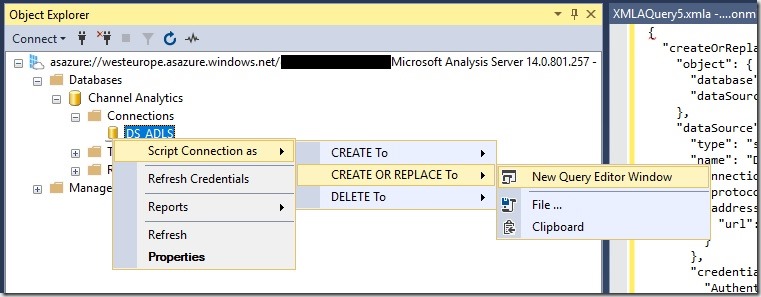
The second step is to update ADLS data source of our Azure Analysis Services model. To get started, the easiest thing to do is to simply open the AAS database in SQL Server Management Studio and let it script the existing datasource for you: AAS_Script_OAuth_DataSource
The resulting JSON will look similar to this one:

Update ADLS DataSource
{
“createOrReplace”: {
“object”: {
“database”: “Channel Analytics”,
“dataSource”: “DS_ADLS”
},
“dataSource”: {
“type”: “structured”,
“name”: “DS_ADLS”,
“connectionDetails”: {
“protocol”: “data-lake-store”,
“address”: {
“url”: “https://mydatalake.azuredatalakestore.net”
}
},
“credential”: {
“AuthenticationKind”: “OAuth2”,
“token_type”: “********”,
“scope”: “********”,
“expires_in”: “********”,
“ext_expires_in”: “********”,
“expires_on”: “********”,
“not_before”: “********”,
“resource”: “********”,
“id_token”: “********”,
“kind”: “DataLake”,
“path”: “https://mydatalake.azuredatalakestore.net/”,
“RefreshToken”: “********”,
“AccessToken”: “********”
}
}
}
}

The important part for us is the “credential” field. It contains all the information necessary to authenticate against our ADLS store. However, most of this information is sensitive so only asterisks are displayed in the script. The rest of the JSON (except for the “credential” field) is currently hardcoded in the PowerShell cmdlet so if you want to use it, you need to change this manually!
The PowerShell cmdlet then combines the hardcoded part with an updated “credential”-field which is obtained by invoking a REST request to retrieve a new OAuth token. The returned object is modified a bit in order to match the required JSON for the datasource.
Once we have our final JSON created, we can send it to our Azure Analysis Services instance by calling the Invoke-ASCmd cmdlet from the SqlServer module.
Again, please see the original blog post mentioned above for the details of this approach.

After we have updated our datasource, we can simply call our regular processing commands which will then be executed using the newly updated credentials.
The script I wrote allows you to specify which objects to process in different ways:

  • whole database (by leaving AASTableName and AASPartitionName empty)
  • a single or multiple table and all its partitions (by leaving only AASPartitionName empty)
  • or multiple partitions of a single table (by specifying exactly one AASTableName and multiple AASPartitionNames

If multiple tables or partitions are specified, the elements are separated by commas (“,”)

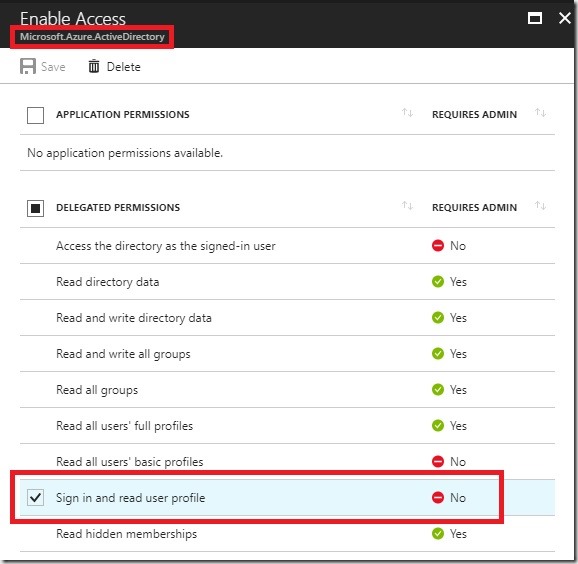
So to make the Runbook work in your environment, follow all the initial steps as described in the original blog post from Microsoft. In addition, you also need to create an Application (Type = “Native”) in your Azure Active Directory to obtain the OAuth token programmatically. This application needs the “Sign in and read user profile” permission from the API “Windows Azure Active Directory (Microsoft.Azure.ActiveDirectory)”:
AAD_App_Permissions
Also remember the ApplicationID, it will be used as a parameter for the final PowerShell Runbook (=parameter “ClientID”!
When it comes to writing the PowerShell code, simply use the code from the download at the end of this blog post.

For the actual credential that you are using, make sure that it has the following permissions:

  • to update the AAS datasource (can be set in the AAS model or for the whole server)
  • has access to the required ADLS files/folders which are processed (can be set e.g. via ADLS Data Explorer)
  • (if you previously used your own account to do all the AAS and ADLS development, this should work just fine)

In general, a similar approach should work for all kinds of datasources that require OAuth authentication but so far I have only tested it with Azure Data Lake Store!

Download: AAS_Process_OAuth_Runbook.ps1