Automating the Extraction of BIM metadata from PBIX Files using CI/CD pipelines

The latest updates can always be found in the

PowerBI.CICD repository

In the past I have been working on a lot of different Power BI projects and it has always been (and still is) a pain when it comes to the deployment of changes across multiple tiers(e.g. Dev/Test/Prod). The main problem here being that a file generated in Power BI desktop (</mark>.pbix<mark style="background-color:#ffffff" class="has-inline-color has-black-color">) is basically a binary file and the metadata of the actual data model (BIM) cannot be easily extracted or derived. This causes a lot of problems upstream when you want to automate the deployment using CI/CD pipelines. Here are some common approaches to tackle these issues:

  • Use of Power BI deployment pipelines
    The most native solution, however quite inflexible when it comes to custom and conditional deployments to multiple stages
  • Creation a Power BI Template (.pbit) in addition to your .pbix<mark style="background-color:#ffffff" class="has-inline-color has-black-color"> file and check in both
    This works because the </mark></mark><mark style="background-color:#ffffff" class="has-inline-color">.pbit</mark><mark style="background-color:#ffffff" class="has-inline-color has-black-color"><mark style="background-color:#ffffff" class="has-inline-color has-black-color"> file basically contains the BIM file but its creation is also a manual step
  • Extraction of the BIM file while PBI desktop is still running (e.g. using Tabular Editor)
    With the support of external tools this is quite easy, but is still a manual step and requires a 3rd party tool
  • Development outside of PBI desktop (e.g. using Tabular Editor)
    Probably the best solution but unfortunately not really suited for business users and for the data model only but not for the Power Queries

As you can see, there are indeed some options, but none of them is really ideal, especially not for a regular business user (not talking about IT pros). So I made up my mind and came up with the following list of things that I would want to see for proper CI/CD with Power BI files:

  • Users should be able to work with their tool of choice (usually PBI desktop, optional with Tabular Editor or any other 3rd party tool)
  • Automatically extracting the metadata whenever the data model changes
  • Persisting the metadata (BIM) in git to allow easy tracking of changes
  • Using the persisted BIM file for further automation (CD)

Solution

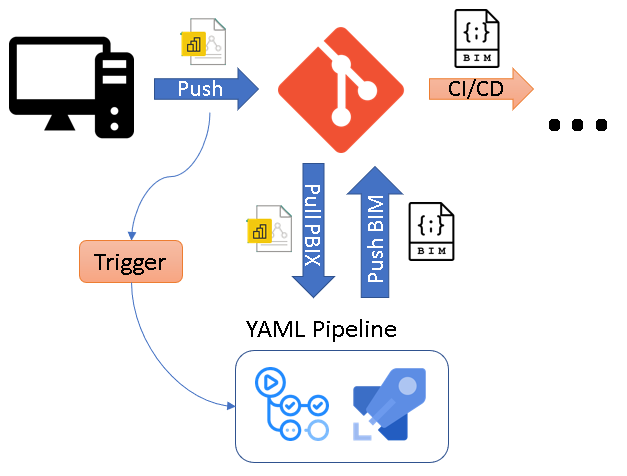
The core idea of the solution is to use CI/CD pipelines that automatically extracts the metadata of a .pbix file as soon as it is pushed to the Git repository. To do this, the .pbix file is automatically uploaded to a Power BI Premium workspace using the Power BI REST API and the free version of Tabular Editor 2 then extracts the BIM file via the XMLA endpoint and push it back to the repository.

I packaged this logic into ready-to-use YAML pipelines for Github Actions and Azure DevOps Pipelines being the two most common choices to use with Power BI. You can just copy the YAML files from the PowerBI.CICD repository to your own repo. Then simply provide the necessary information to authentication against the Power BI service and that’s it. As soon as everything is set up correctly. the pipeline will automatically create a .database.json for every PBIX file that you upload (assuming it contains a data model) and track it in your git repository!

All further details can be found directly in the repository which is also updated frequently!

Azure Data Factory, dynamic JSON and Key Vault references

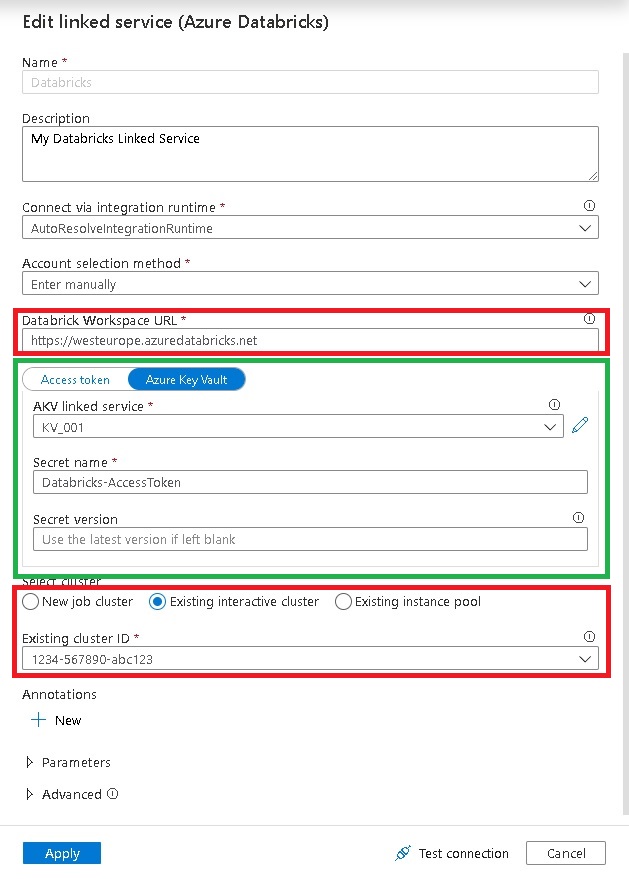
Paul Andrews (b, t) recently blogged about HOW TO USE ‘SPECIFY DYNAMIC CONTENTS IN JSON FORMAT’ IN AZURE DATA FACTORY LINKED SERVICES. He shows how you can modify the JSON of a given Azure Data Factory linked service and inject parameters into settings which do not support dynamic content in the GUI. What he shows with Linked Services and parameters also applies to Key Vault references – sometimes the GUI allows you to reference a value from the Key Vault instead of hard-coding it but for other settings the GUI only offers a simple text box:

As You can see, the setting “AccessToken” can use a Key Vault reference whereas settings like “Databricks Workspace URL” and “Cluster” do not support them. This is usually fine because the guys at Microsoft also thought about this and support Key Vault references for the settings that are actually security relevant or sensitive. Also, providing the option to use Key Vault references everywhere would flood the GUI. So this is just fine.

But there can be good reasons where you want to get values from the Key Vault also for non-sensitive settings, especially when it comes to CI/CD and multiple environments. From my experience, when you implement a bigger ADF project, you will probably have a Key Vault for your sensitive settings and all other values are provided during the deployment via ARM parameters.

So you will end up with a mix of Key Vault references and ARM template parameters which very likely will be derived from the Key Vault at some point anyway. To solve this, you can modify the JSON of an ADF linked service directly and inject KeyVault references into almost every property!
Lets have a look at the JSON of the Databricks linked service from above:

{
    "name": "Databricks",
    "properties": {
        "annotations": [],
        "type": "AzureDatabricks",
        "typeProperties": {
            "domain": "https://westeurope.azuredatabricks.net",
            "accessToken": {
                "type": "AzureKeyVaultSecret",
                "store": {
                    "referenceName": "KV_001",
                    "type": "LinkedServiceReference"
                },
                "secretName": "Databricks-AccessToken"
            },
            "existingClusterId": "0717-094253-sir805"
        },
        "description": "My Databricks Linked Service"
    },
    "type": "Microsoft.DataFactory/factories/linkedservices"
}

As you can see in lines 8-15, the property “accessToken” references the secret “Databricks-Accesstoken” from the Key Vault linked service “KV_001” and the actual value is populated at runtime.

After reading all this, you can probably guess what we are going to do next –
We also replace the other properties by Key Vault references:

{
    "name": "Databricks",
    "properties": {
        "type": "AzureDatabricks",
        "annotations": [],
        "typeProperties": {
            "domain": {
                "type": "AzureKeyVaultSecret",
                "store": {
                    "referenceName": "KV_001",
                    "type": "LinkedServiceReference"
                },
                "secretName": "Databricks-Workspace-URL"
            },
            "accessToken": {
                "type": "AzureKeyVaultSecret",
                "store": {
                    "referenceName": "KV_001",
                    "type": "LinkedServiceReference"
                },
                "secretName": "Databricks-AccessToken"
            },
            "existingClusterId": {
                "type": "AzureKeyVaultSecret",
                "store": {
                    "referenceName": "KV_001",
                    "type": "LinkedServiceReference"
                },
                "secretName": "Databricks-ClusterID"
            }
        }
    }
}

You now have a linked service that is configured solely by the Key Vault. If you think one step further, you can replace all values which are usually sourced by ARM parameters with Key Vault references instead and you will end up with an ARM template that only has two parameters – the name of the Data Factory and the URI of the Key Vault linked service! (you may even be able to derive the Key Vaults URI from the Data Factory name if the names are aligned!)

The only drawback I could find so far was that you cannot use the GUI anymore but need to work with the JSON from now on – or at least until you remove the Key Vault references again so that the GUI can display the JSON properly again. But this is just a minor thing as linked services usually do not change very often.

I also tried using the same approach to inject Key Vault references into Pipelines and Dataset but unfortunately this did not work 🙁
This is probably because Pipelines and Datasets are evaluated at a different stage and hence cannot dynamically reference the Key Vault.

DatabricksPS and Azure AD Authentication

Avaiilable via PowerShell Gallery: DatabricksPS

Databricks recently announced that it is now also supporting Azure Active Directory Authentication for the REST API which is now in public preview. This may not sound super exciting but is actually a very important feature when it comes to Continuous Integration/Continuous Delivery pipelines in Azure DevOps or any other CI/CD tool. Previously, whenever you wanted to deploy content to a new Databricks workspace, you first needed to manually create a user-bound API access token. As you can imagine, manual steps are also bad for otherwise automated processes like a CI/CD pipeline. With Databricks REST API finally supporting Azure Active Directory Authentication of regular users and service principals, this last manual step is finally also gone!

As I had this issue at many of my customers where we had already fully automated the deployment of our data platform based on Azure and Databricks, I also wanted to use this new feature there. The deployment of regular Databricks objects (clusters, notebooks, jobs, …) was already implemented in the CI/CD pipeline using my PowerShell module DatabricksPS and of course I did not want to rewrite any of those steps. So, I simply extend the module’s authentication methods to also support Azure Active Directory Authentication. The only thing that actually changed was the call to Set-DatabricksEnvironment which now supports additional parameter sets and parameters:

The first thing you will realize is that it is now necessary to specify the Databricks Workspace explicitly either using SubscriptionID/ResourceGroupName/WorkspaceName to uniquely identify the Databricks workspace within Azure or using the OrganizationID that you see displayed in the URL of your Databricks Workspace. For the actual authentication the parameters -ClientID, -TenantID, -Credential and the switch -ServicePrincipal are used.

Regardless of whether you use regular username/password authentication with an AAD user or an AAD service principal, the first thing you need to do in both cases is to create an AAD Application as described in the official docs from Databricks:
Using Azure Active Directory Authentication Library
Using a service principal

Once you have ensured all prerequisites exist, you can use the samples below to authenticate with your AAD username/password with DatabricksPS:

$username = 'myuser@mydomain.com'
$password = 'Pass@word1!'
$securePassword = ConvertTo-SecureString $password -AsPlainText -Force
$credential = New-Object System.Management.Automation.PSCredential($username, $securePassword)

$apiUrl = "https://westeurope.azuredatabricks.net"
$tenantId = "15970f38-6789-6789-6789-6e44bf2f5d11"
$clientId = "d73905f5-aaaa-bbbb-cccc-ecff76ba959c"
$subscriptionId = "69389949-1234-1234-1234-e499fac64209"
$resourceGroupName = "myResourceGroup"
$workspaceName = "myDatabricksWorkspace"

# Setup connection to Databricks using AAD Authentication
Set-DatabricksEnvironment -ApiRootUrl $apiUrl -Credential $credential 
  -ClientID $clientId -TenantID $tenantId 
  -SubscriptionID $subscriptionId -ResourceGroupName $resourceGroupName 
  -WorkspaceName $workspaceName

# Stop all existing clusters
Get-DatabricksCluster | Stop-DatabricksCluster

Here is another sample using a regular service principal authentication and the OrganizationID with DatabricksPS:

$clientId = '12345678-6789-6789-6789-6e44bf2f5d11' # = Application ID
$clientSecret = 'tN4Lrez.=5.Il]IAgRx6w6kJ@6C.ap7Y'
$secureClientSecret = ConvertTo-SecureString $clientSecret -AsPlainText -Force
$credential = New-Object System.Management.Automation.PSCredential($clientId, $secureClientSecret)

$apiUrl = "https://westeurope.azuredatabricks.net"
$tenantId = "15970f38-6789-6789-6789-6e44bf2f5d11"
$orgId = "1234535501392586"

# Setup connection to Databricks using AAD Authentication
Set-DatabricksEnvironment -ApiRootUrl $apiUrl -Credential $credential 
  -ClientID $clientId -TenantID $tenantId 
  -OrgID $orgId -ServicePrincipal

# Export all notebooks of the Databricks Workspace to a local folder
Export-DatabricksEnvironment -LocalPath "C:\db_export" 
 -Artifacts "Workspace" -WorkspaceRootPath "/" 

As you can see, once the environment is set up using the new authentication methods, the rest of the script stays the same and there is not much more you need to do fully automate your CI/CD pipeline with DatabricksPS!

I have not yet fully tested all cmdlets of the module so if you experience any issues, please contact me or open a ticket in the GIT repository.

Professional Development for Databricks with Visual Studio Code

When working with Databricks you will usually start developing your code in the notebook-style UI that comes natively with Databricks. This is perfectly fine for most of the use cases but sometimes it is just not enough. Especially nowadays, where a lot of data engineers and scientists have a strong background also in regular software development and expect the same features that they are used to from their original Integrated Development Environments (IDE) also in Databricks.

For those users Databricks has developed Databricks Connect (Azure docs) which allows you to work with your local IDE of choice (Jupyter, PyCharm, RStudio, IntelliJ, Eclipse or Visual Studio Code) but execute the code on a Databricks cluster. This is awesome and provides a lot of advantages compared to the standard notebook UI. The two most important ones are probably the proper integration into source control / git and the ability to extend your IDE with tools like automatic formatters, linters, custom syntax highlighting, …

While Databricks Connect solves the problem of local execution and debugging, there was still a gap when it came to pushing your local changes back to Databricks to be executed as part of a regular ETL or ML pipeline. So far you had to either “deploy” your changes by manually uploading them via the Databricks UI again or write a script that uploads it via the REST API (Azure docs).

NOTE: I also published a PowerShell module that eases the automation/scripting of these tasks also as part of CI/CD pipeline. It is available from the PowerShell gallery DatabricksPS and integrates very well with this VSCode extension too!

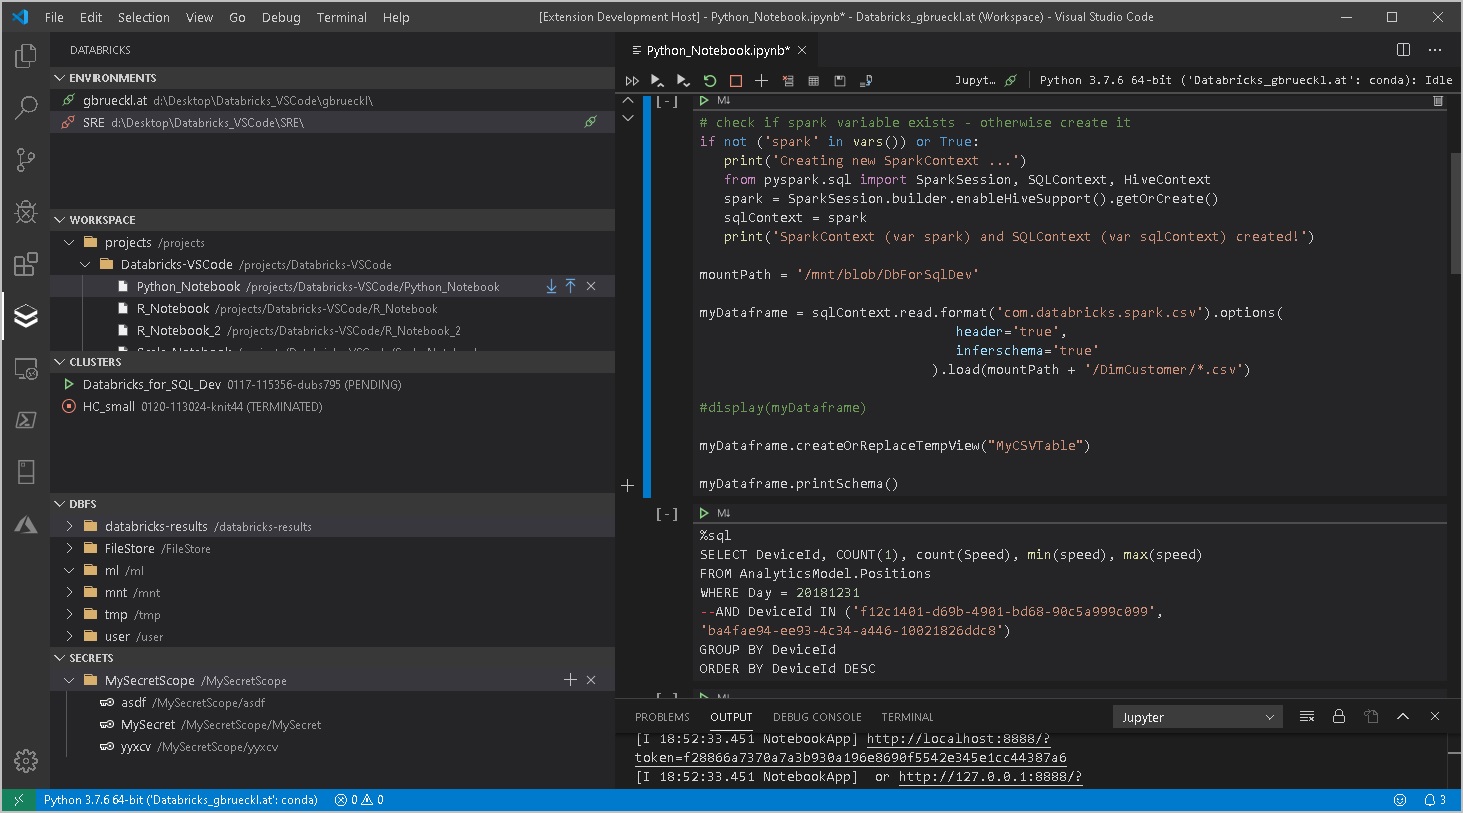
However, this is not really something you would call a “seamless experience” so I also started working on an extension for Visual Studio Code to work more efficiently with Databricks. It has been in the VS Code gallery (Databricks VSCode) for about a month now and I received mostly positive feedback so far. Now I am at a stage where I want to get more people to use it – hence this blog post to announce it officially. The extension is currently published under GPLv3 license and is free to use for everyone. The GIT repository is also linked in the VS Code gallery if you want to participate or have any issues with the extension.

It currently supports the following features:

  • Workspace browser
    • Up-/download of notebooks and whole folders
    • Compare/Diff of local vs online notebook (currently only supported for raw files but not for notebooks)
    • Execution of local code and notebooks against a Databricks Cluster (via Databricks-Connect)
  • Cluster manager
    • Start/stop clusters
    • Script cluster definition as JSON
  • Job browser
    • Start/stop jobs
    • View job-run history + status
    • Script job definition as JSON
    • Script job-run output as JSON
  • DBFS browser
    • Upload files
    • Download files
    • (also works with mount points!)
  • Secrets browser
    • Create/delete secret scopes
    • Create/delete secrets
  • Support for multiple Databricks workspaces (e.g. DEV/TEST/PROD)
  • Easy configuration via standard VS Code settings

More features to come in the future but these will be mainly based on the requests that come from users or my personal needs. So your feedback is highly appreciated – either directly here or using the feedback section in the GIT repository.

I will also write some follow up post to show you how to work in the most efficient way using this new VSCode extension in combination with your Databricks workspace so stay tuned!

VS Code gallery: paiqo.Databricks-VSCode
Github repository: Databricks-VSCode