In my previous post I showed how to setup a Power BI Data Management Gateway on a non-domain Azure VM. The final setup is also the starting-point for this post where we will use self-signed certificates to use HTTPS/SSL connectivity to our DMG. So make sure that you have all prerequisites up and running before you continue reading.
Basically, the process to switch to HTTPS is pretty straight forward. Simply open your DMG, go to Settings and change from HTTP to HTTPS. Finally select your certificate and you are ready to go!
This may work in a corporate hybrid environment where everything is set up correctly but for a non-Azure VM this is a bit more complicated and this is what this post is about.
Besides the initial setup from my previous post there are some steps you need to do in advance in order for HTTPS connectivity to work:
1) Open the port that the DMG HTTPS connection uses in your Windows Firewall (default is port 8050)
2) Create an Endpoint for your Azure VM for the very same port
3) Create a self-signed certificate to be used to establish a secure connection
You should already be familiar with 1) and 2) as you needed to do the same steps also for your HTTP port of your DMG (default is port 8051 here). To create a self-signed certificate you can simply follow the steps as described here. The important thing here is to use the full qualified server name: CN=myserver.cloudapp.net
This is very import, otherwise the final connection will not work!
Your MakeCert-command should look similar to this:
makecert -r -pe -n “CN=myserver.cloudapp.net” -b 01/01/2000 -e 01/01/2050 -eku 1.3.6.1.5.5.7.3.1 -ss my -sr localMachine -sky exchange -sp “Microsoft RSA SChannel Cryptographic Provider” -sy 12
After you run the command the new certificate is automatically added to your users personal certificates and can be used when setting up HTTPS connectivity for your DMG: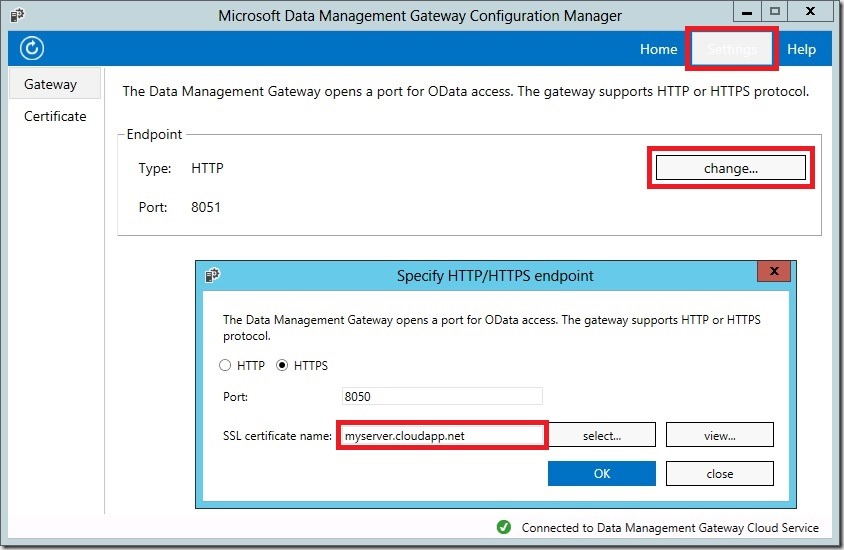
Once you click [OK] it takes some time (~1 Minute) until everything is updated and HTTPS connectivity can be used. Now you can use Excel and Power Query to search for your data sources that are published via OData. You will find all of them but as soon as you try to load the data you will receive the following error: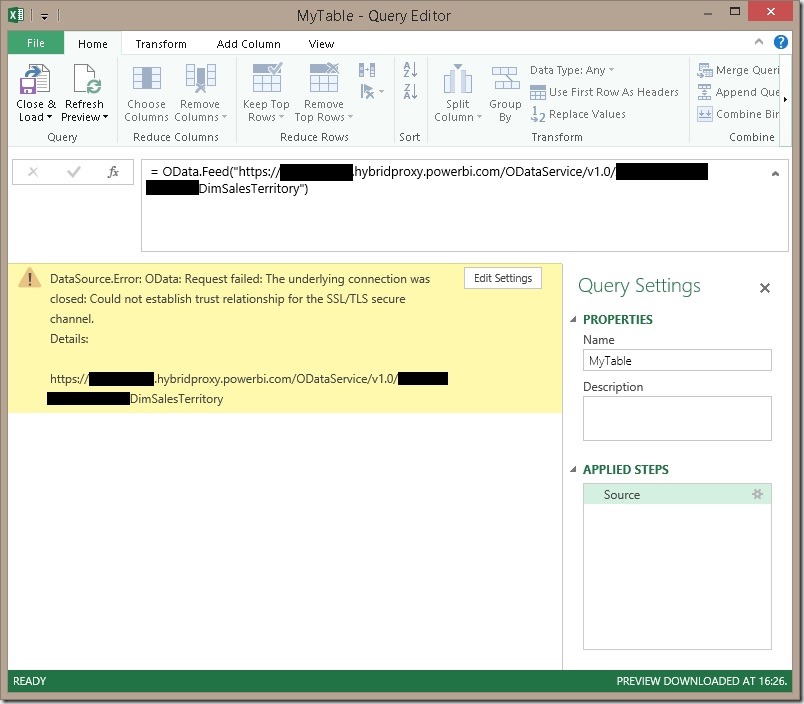
That’s a bit surprising as the DMG is configured correctly using HTTPS and the very same OData feed worked just fine with HTTP. But here comes the error in my thinking that I was not aware of before talking to Benjamin Tang and Samuel Zhang from the product team. Until that point I always thought that the data is load through the cloud and there is no direct connection from my client to the server: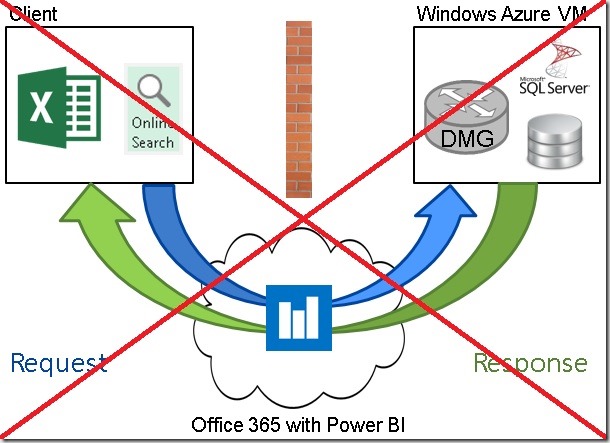
But this is not how it works!
What actually happens in the background is that the request to the Power BI OData service gets redirected to the server and the client connects directly to the server: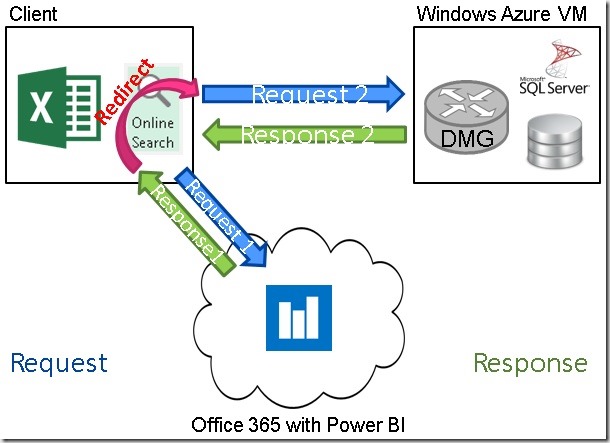
And this is also where our PQ error originates as the certificate used is not a trusted certificate on the client. In order to make it a trusted certificate you need to install it on the client. This can be done by following these steps:
1) Launch Internet Explorer using “Run as Administrator”
(I’m serious here, this only works with IE but not with e.g. Chrome!)
2) navigate to https://myserver.cloudapp.net:8050 (or whatever servername/port you used)
3) continue to the website and ignore the certificate error
4) press [Cancel] at the popup the asks for credentials
5) now click on the “Certificate error” in the menu bar and press “View certificates”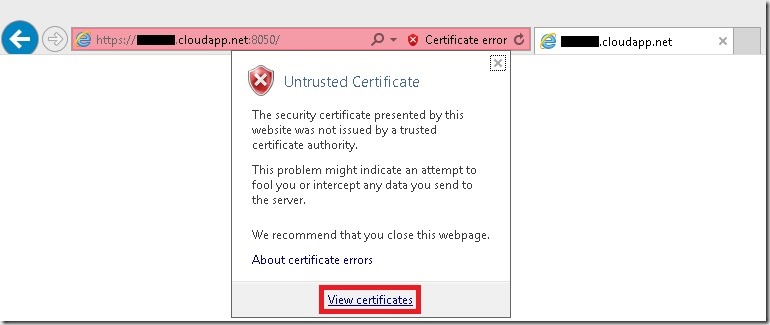
6) Now install the certificate:
(Please note that this option is only available if you are using Internet Explorer launched as Administrator!!!)
7) select the location where you want to store the certificate (Current User or Local Machine depending whether it should be installed for you only or for all users)
8) whichever storage location you used, just make sure that you place the certificate in the “Trusted Root Certification Authorities” on the next page: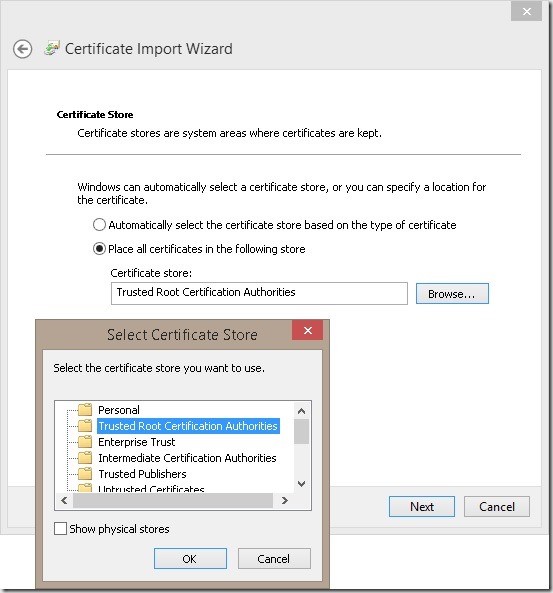
Once you have installed the certificate to your Trusted Root Certificate Authorities store the Power Query connections works again but now it is using HTTPS!
Of course this solution is only for demo and testing purposes, in a real world scenario you would already have your certificates in place and everything should indeed work out-of-the-box.