Running Local R Scripts in Power BI

One of the coolest features of Power BI is that I integrates very well with other tools and also offers a lot of interfaces which can be used to extend this capabilities even further. One of those is the R Integration which allows you to run R code from within Power BI. R scripts can either be used as a data source or for visualizing your data. In this post I will focus on the data source component and show how you can use a locally stored R script and execute it directly in Power BI. Compared to the native approach where you need to embed the R code in the Power BI file, this has several advantages:

  • Develop R script in familiar external tool like RStudio
  • Integration with Source Control
  • Leverage Power BI for publishing and visualizing results

Out of the box Power BI only supplies one function to call R scripts as a data source which is R.Execute(text). Usually, when you use the wizard, it simply passes your R script as a hardcoded value to this function. Knowing the power of Power BI and its scripting language M for data integration made me think – “Hey, as R scripts are just text files and Power BI can read text files, I could also dynamically read any R script and execute it!”

Well, turns out to be true! So I created a little M function where I pass in the file-path of an existing R script and which returns a table of data frames which are created during the execution of the script. Those can then be used like any other data sets/tables within Power BI:
Power_BI_R_DataSource_dynamic_local_script

And here is the corresponding M code for the Power Query function:
(Thanks also to Imke Feldmann for simplifying my original code to the readable one below)

  1. let
  2.     LoadLocalRScript = (file_path as text) as table =>
  3. let
  4.     Source = Csv.Document(File.Contents(file_path),[Delimiter=#(lf), Columns=1, Encoding=1252, QuoteStyle=QuoteStyle.None]),
  5.     RScript =  Text.Combine(Source[Column1], "#(lf)"),
  6.     output = R.Execute(RScript)
  7. in
  8.     output
  9. in
  10.     LoadLocalRScript

First we read the R script like any other regular CSV file but we use line-feed (“#(lf)”) as delimiter. So we get a table with one column and one row for each line of our original R script.
Then we use Text.Combine() on our column to transform the single lines back into one long text resembling our original R script. This text can the be passed to the R.Execute() function to return the list of R data frames created during the execution of the script.

And that’s it! Any further steps are similar to using any regular R script which is embedded in Power BI so it is up to you on how you proceed from here. Just one thing you need to keep in mind is that changing the local R script might break the Power BI load if you changed or deleted any data frames which are referenced in Power BI later on.

One issues that I came across during my tests is that this approach does not work with scheduled refreshes in the Power BI Web Service via the Personal Gateway. The first reason for this is that it is currently not possible to use scheduled refresh if custom functions are involved. Even if you can work around this issue pretty easily by using the code from above directly in Power Query I still ran into issues with different privacy levels for the location of the R script and the R.Execute() function. But I will investigate into those issues and update this blog post accordingly (see UPDATE below).
For the future I hope that is fixed by Microsoft and Power BI allows you to execute remote scripts natively – but until then, this approach worked quite well for me.

UPDATE:
To make the refresh via the Personal Gateway work you have to enable “FastCombine”. How to do this is described in more detail here: Turn on FastCombine for Personal Gateway.

In case you are interested in more details on this approach, I am speaking at TugaIT in Lisbon, Portugal this Friday (20th of May 2016) about “Power BI for the Data Scientist” where I will cover this and lots of other interesting topics about the daily work of a data scientist and how PowerBI can used to ease them.

Downloads:
Power BI Workbook: Load_Local_R_Script_wFunction.pbix
Sample R Script: Sample_R_Script.r
Configure HTTP access to Analysis Services using PowerShell

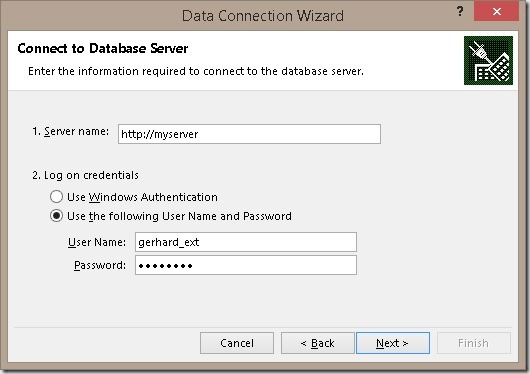
Recently I had to setup an Analysis Services cube and expose it to external users. This is usually done by using Internet Information Server (IIS) and creating a new WebSite which hosts msmdpump.dll. This DLL more or less wraps XMLA commands inside HTTP thus allowing external users to access the cube via HTTP. Besides Windows Authentication this setup also allows Basic Authentication and so external users can simply connect by specifying Username and Password in e.g. Excel when connecting to the cube:
ExcelConnectionDialog

There are already a lot of whitepapers out there which describe how to set things up correctly. Here are just some examples:
– MSDN: http://msdn.microsoft.com/en-us/library/gg492140.aspx
– MSBI Academy (great video!): http://msbiacademy.com/?p=5711 by Rob Kerr

They provide very useful information and you should be familiar with the general setup before proceeding here or using the final PowerShell script.

The PowerShell script basically performs the following steps:

  1. Create a local folder as base for your WebSite in IIS
  2. Copy SSAS ISAPI files (incl. msmdpump.dll) to the folder
  3. Create and Configure an IIS AppPool
  4. Create and Configure a IIS WebSite
  5. Add and enable an ISAPI entry for msmdpump.dll
  6. Configure Authentication
  7. Configure Default Document
  8. Update connection information to SSAS server

I tested it successfully with a clean installation of IIS 8.0 (using applicationhost.config.clean.install). In case you already have other WebSites running you may still consider doing the steps manually or adopting the script if necessary. The script is written not to overwrite any existing Folders, WebSites, etc. but you never know.

So here is my final script:

  1. #Import Modules
  2. Import-Module WebAdministration
  3.  
  4. # change these settings
  5. $iisSiteName = "OLAP"
  6. $iisPort = "8000"
  7. $olapServerName = "server\instance"
  8.  
  9. # optionally also change these settings
  10. $isapiFiles = "c:\Program Files\Microsoft SQL Server\MSAS11.MSSQLSERVER\OLAP\bin\isapi\*"
  11. $iisAbsolutePath = "C:\inetpub\wwwroot\" + $iisSiteName
  12. $iisAppPoolName = $iisSiteName + "_AppPool"
  13. $iisAppPoolUser = "" #default is ApplicationPoolIdentity
  14. $iisAppPoolPassword = ""
  15. $iisAuthAnonymousEnabled = $false
  16. $iisAuthWindowsEnabled = $true
  17. $iisAuthBasicEnabled = $true
  18. $olapSessionTimeout = "3600" #default
  19. $olapConnectionPoolSize = "100" #default
  20.  
  21. if(!(Test-Path $iisAbsolutePath -pathType container))
  22. {
  23.     #Creating Directory
  24.     mkdir $iisAbsolutePath  | Out-Null
  25.  
  26.     #Copying Files
  27.     Write-Host -NoNewline "Copying ISAPI files to IIS Folder … "
  28.     Copy -Path $isapiFiles -Destination $iisAbsolutePath -Recurse
  29.     Write-Host " Done!" -ForegroundColor Green
  30. }
  31. else
  32. {
  33.     Write-Host "Path $iisAbsolutePath already exists! Please delete manually if you want to proceed!" -ForegroundColor Red
  34.     Exit
  35. }
  36.  
  37. #Check if AppPool already exists
  38. if(!(Test-Path $("IIS:\\AppPools\" + $iisAppPoolName) -pathType container))
  39. {
  40.     #Creating AppPool
  41.     Write-Host -NoNewline "Creating ApplicationPool $iisAppPoolName if it does not exist yet … "
  42.     $appPool = New-WebAppPool -Name $iisAppPoolName
  43.     $appPool.managedRuntimeVersion = "v2.0"
  44.     $appPool.managedPipelineMode = "Classic"
  45.  
  46.     $appPool.processModel.identityType = 4 #0=LocalSystem, 1=LocalService, 2=NetworkService, 3=SpecificUser, 4=ApplicationPoolIdentity
  47.     #For details see http://www.iis.net/configreference/system.applicationhost/applicationpools/add/processmodel
  48.  
  49.     if ($iisAppPoolUser -ne "" -AND $iisAppPoolPassword -ne "") {
  50.         Write-Host
  51.         Write-Host "Setting AppPool Identity to $iisAppPoolUser"
  52.         $appPool.processmodel.identityType = 3
  53.         $appPool.processmodel.username = $iisAppPoolUser
  54.         $appPool.processmodel.password = $iisAppPoolPassword
  55.     }
  56.     $appPool | Set-Item
  57.     Write-Host " Done!" -ForegroundColor Green
  58. }
  59. else
  60. {
  61.     Write-Host "AppPool $iisAppPoolName already exists! Please delete manually if you want to proceed!" -ForegroundColor Red
  62.     Exit
  63. }
  64.  
  65. #Check if WebSite already exists
  66. $iisSite = Get-Website $iisSiteName
  67. if ($iisSite -eq $null)
  68. {
  69.     #Creating WebSite
  70.     Write-Host -NoNewline "Creating WebSite $iisSiteName if it does not exist yet … "
  71.     $iisSite = New-WebSite -Name $iisSiteName -PhysicalPath $iisAbsolutePath -ApplicationPool $iisAppPoolName -Port $iisPort
  72.     Write-Host " Done!" -ForegroundColor Green
  73. }
  74. else
  75. {
  76.     Write-Host "WebSite $iisSiteName already exists! Please delete manually if you want to proceed!" -ForegroundColor Red
  77.     Exit
  78. }
  79.  
  80. #Ensuring ISAPI CGI Restriction entry exists for msmdpump.dll
  81. if ((Get-WebConfiguration "/system.webServer/security/isapiCgiRestriction/add[@path='$iisAbsolutePath\msmdpump.dll']") -eq $null)
  82. {
  83.     Write-Host -NoNewline "Adding ISAPI CGI Restriction for $iisAbsolutePath\msmdpump.dll … "
  84.     Add-WebConfiguration "/system.webServer/security/isapiCgiRestriction" -PSPath:IIS:\\  -Value @{path="$iisAbsolutePath\msmdpump.dll"}
  85.     Write-Host " Done!" -ForegroundColor Green
  86. }
  87. #Enabling ISAPI CGI Restriction for msmdpump.dll
  88. Write-Host -NoNewline "Updating existing ISAPI CGI Restriction … "
  89. Set-WebConfiguration "/system.webServer/security/isapiCgiRestriction/add[@path='$iisAbsolutePath\msmdpump.dll']/@allowed" -PSPath:IIS:\\ -Value "True"
  90. Set-WebConfiguration "/system.webServer/security/isapiCgiRestriction/add[@path='$iisAbsolutePath\msmdpump.dll']/@description" -PSPath:IIS:\\ -Value "msmdpump.dll for SSAS"
  91. Write-Host " Done!" -ForegroundColor Green
  92.  
  93.  
  94. #Adding ISAPI Handler to WebSite
  95. Write-Host -NoNewline "Adding ISAPI Handler … "
  96. Add-WebConfiguration /system.webServer/handlers -PSPath $iisSite.PSPath -Value @{name="msmdpump"; path="*.dll"; verb="*"; modules="IsapiModule"; scriptProcessor="$iisAbsolutePath\msmdpump.dll"; resourceType="File"; preCondition="bitness64"}
  97. Write-Host " Done!" -ForegroundColor Green
  98.  
  99. #enable Windows and Basic Authentication
  100. Write-Host -NoNewline "Setting Authentication Providers … "
  101. #need to Unlock sections first
  102. Set-WebConfiguration /system.webServer/security/authentication/anonymousAuthentication  MACHINE/WEBROOT/APPHOST -Metadata overrideMode -Value Allow
  103. Set-WebConfiguration /system.webServer/security/authentication/windowsAuthentication  MACHINE/WEBROOT/APPHOST -Metadata overrideMode -Value Allow
  104. Set-WebConfiguration /system.webServer/security/authentication/basicAuthentication  MACHINE/WEBROOT/APPHOST -Metadata overrideMode -Value Allow
  105.  
  106. Set-WebConfiguration /system.webServer/security/authentication/anonymousAuthentication -PSPath $iisSite.PSPath -Value @{enabled=$iisAuthAnonymousEnabled}
  107. Set-WebConfiguration /system.webServer/security/authentication/windowsAuthentication -PSPath $iisSite.PSPath -Value @{enabled=$iisAuthWindowsEnabled}
  108. Set-WebConfiguration /system.webServer/security/authentication/basicAuthentication -PSPath $iisSite.PSPath -Value @{enabled=$iisAuthBasicEnabled}
  109. Write-Host " Done!" -ForegroundColor Green
  110.  
  111. #Adding Default Document
  112. Write-Host -NoNewline "Adding Default Document msmdpump.dll … "
  113. Add-WebConfiguration /system.webServer/defaultDocument/files -PSPath $iisSite.PSPath -atIndex 0 -Value @{value="msmdpump.dll"}
  114. Write-Host " Done!" -ForegroundColor Green
  115.  
  116. #Updating OLAP Server Settings
  117. Write-Host -NoNewline "Updating OLAP Server Settings … "
  118. [xml]$msmdpump = Get-Content "$iisAbsolutePath\msmdpump.ini"
  119. $msmdpump.ConfigurationSettings.ServerName = $olapServerName
  120. $msmdpump.ConfigurationSettings.SessionTimeout = $olapSessionTimeout
  121. $msmdpump.ConfigurationSettings.ConnectionPoolSize = $olapConnectionPoolSize
  122. $msmdpump.Save("$iisAbsolutePath\msmdpump.ini")
  123. Write-Host " Done!" -ForegroundColor Green
  124.  
  125. Write-Host "Everything done! "
  126. Write-Host "The SSAS server can now be accessed via http://$env:computername`:$iisPort"


The script can also be downloaded here.

The process of setting up HTTP connectivity is the same for Analysis Services Multidimensional and Tabular so the script works for both scenarios, just change the server name accordingly.