Using Custom Libraries in Microsoft Fabric Data Engineering

When working with Spark or data engineering in general in Microsoft Fabric, you will sooner or later come to the point where you need to reuse some of the code that you have already written in another notebook. Best practice is to put these code pieces into a central place from where it can be referenced and reused. This way you can make sure all notebooks always use the very same code and it is also easy to develop, update and test the common functions.

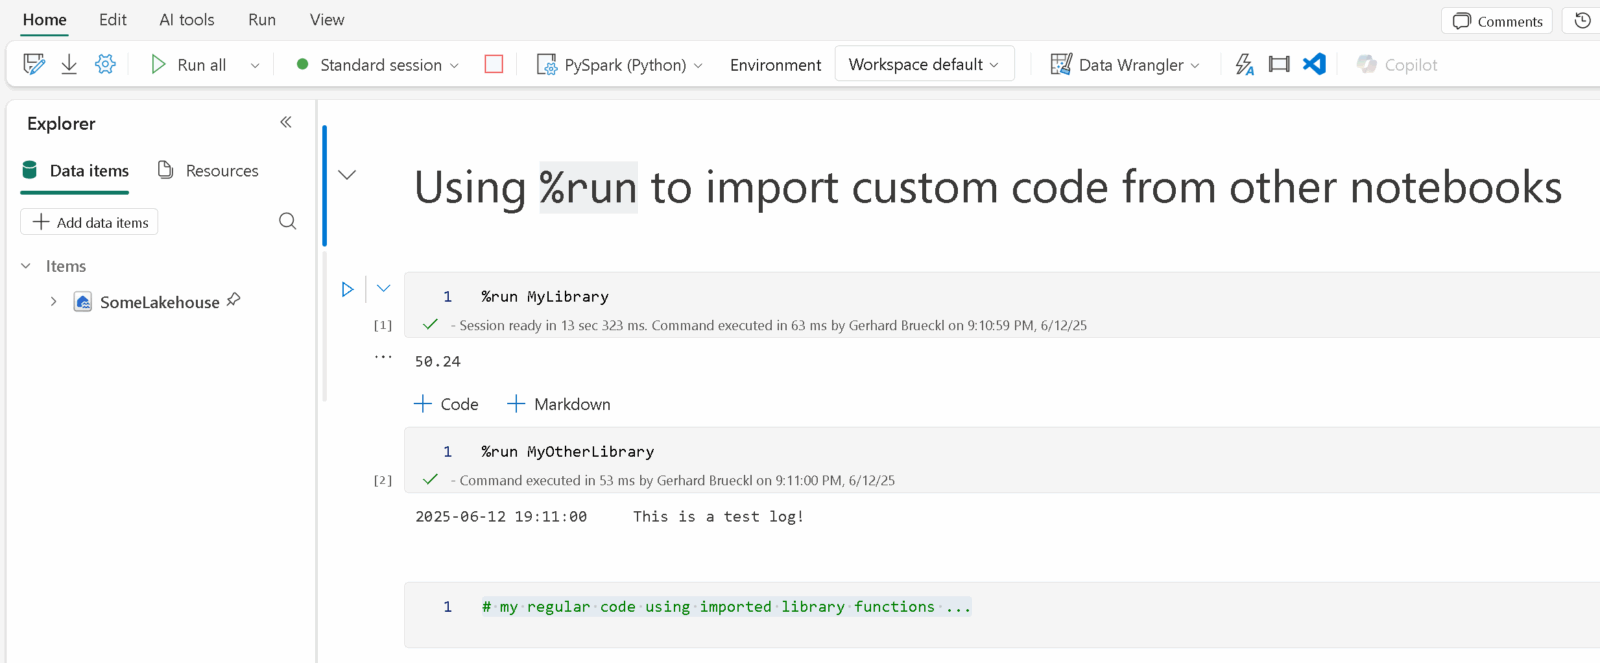
The first thing you would usually end up putting the common code in a dedicated notebook – lets call it MyLibrary and have a %run MyLibrary at the beginning of the referencing notebooks. This will basically execute the code from your utils notebook before the following cells. For simple scenarios this is usually fine but it can get quite messy when you start nesting those calls to %run and if the referenced notebooks get very long. Also, at some point you will realize that the performance suffers with the amount of code you import this way.

However, the nice thing about this approach is that you can develop your utils/library side-by-side with your notebooks and you do not need any external tools to manage your library which, especially for data engineers with little software engineering background, is a big plus as they do not need to learn any new tools.

Over time your library will grow and you will look for a “more professional” way to manage your library. That`s where python libraries, packaging and in the end Fabric Environments come into play. Now you are entering the world of software engineering which you may not be very familiar with. While this provides a lot of benefits, its also introduced a lot more complexity and a different way of working – usually outside of Fabric. A .whl file is built outside of fabric and uploaded and attached to an Environment in Fabric. Your notebooks then reference this Environment and inherit all settings from there instead of the Starter Pool.

As you can imagine, this also has some drawbacks which you should be aware of before going down this path:

  • You need to attach your notebooks to an environment
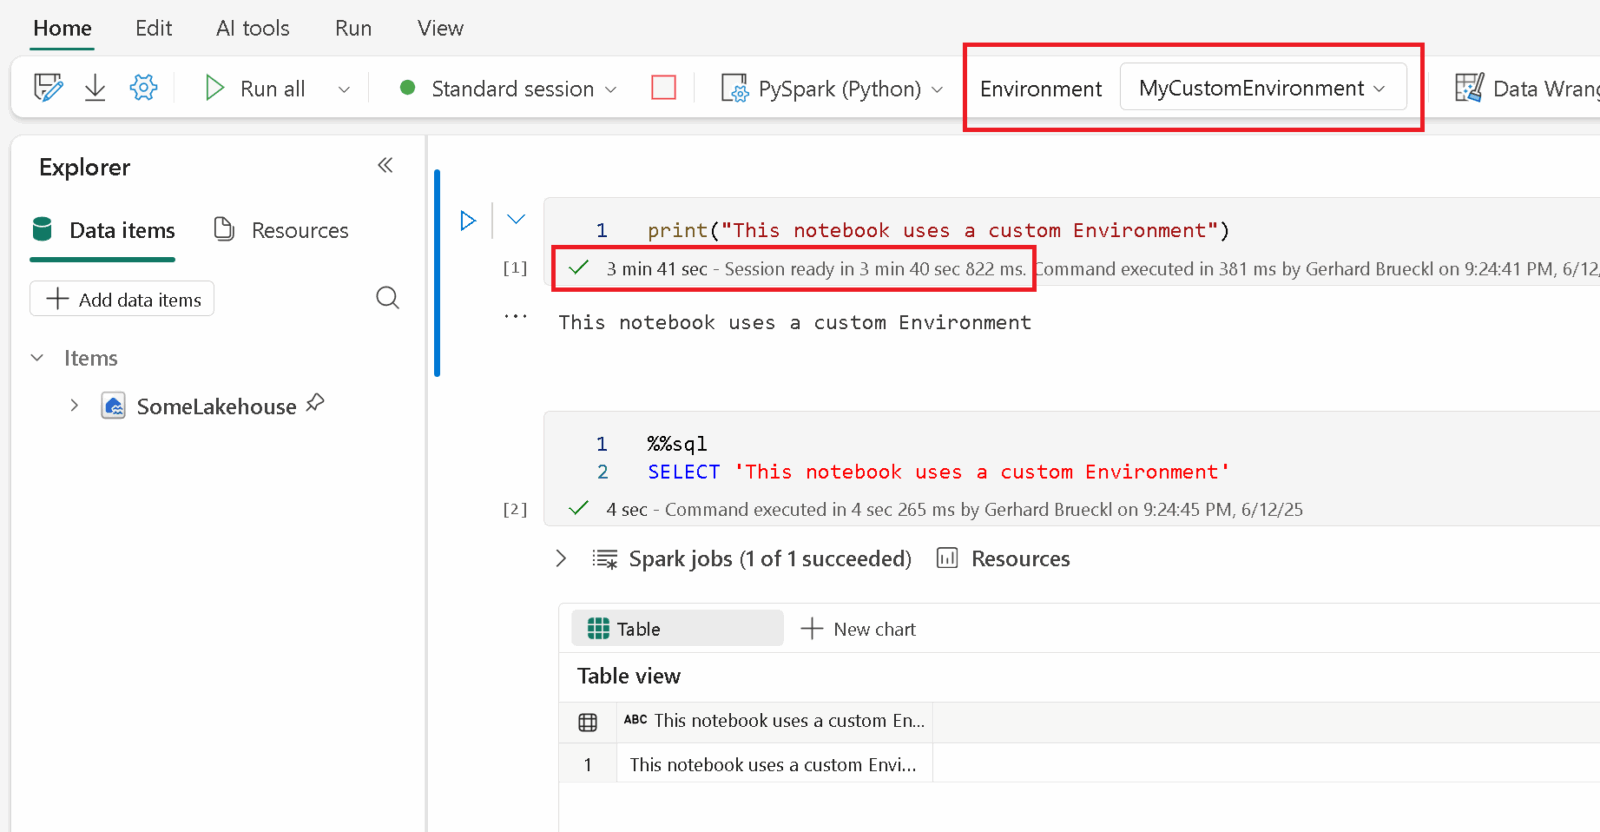
  • notebooks attached to a custom environment will suffer from a longer cluster startup
  • whenever you change code in your library, you need to build it, publish it, attach it to your environment and restart the kernel of the notebook that consumes it

This will significantly increase the development time for your regular notebooks, especially if you are still constantly changing or extending the library. Updating an existing environment just took about 15 minutes(!) + the increased cluster startup time. All in all not really great if your library is still in an early stage and changes frequently.

SparkContext to the rescue!

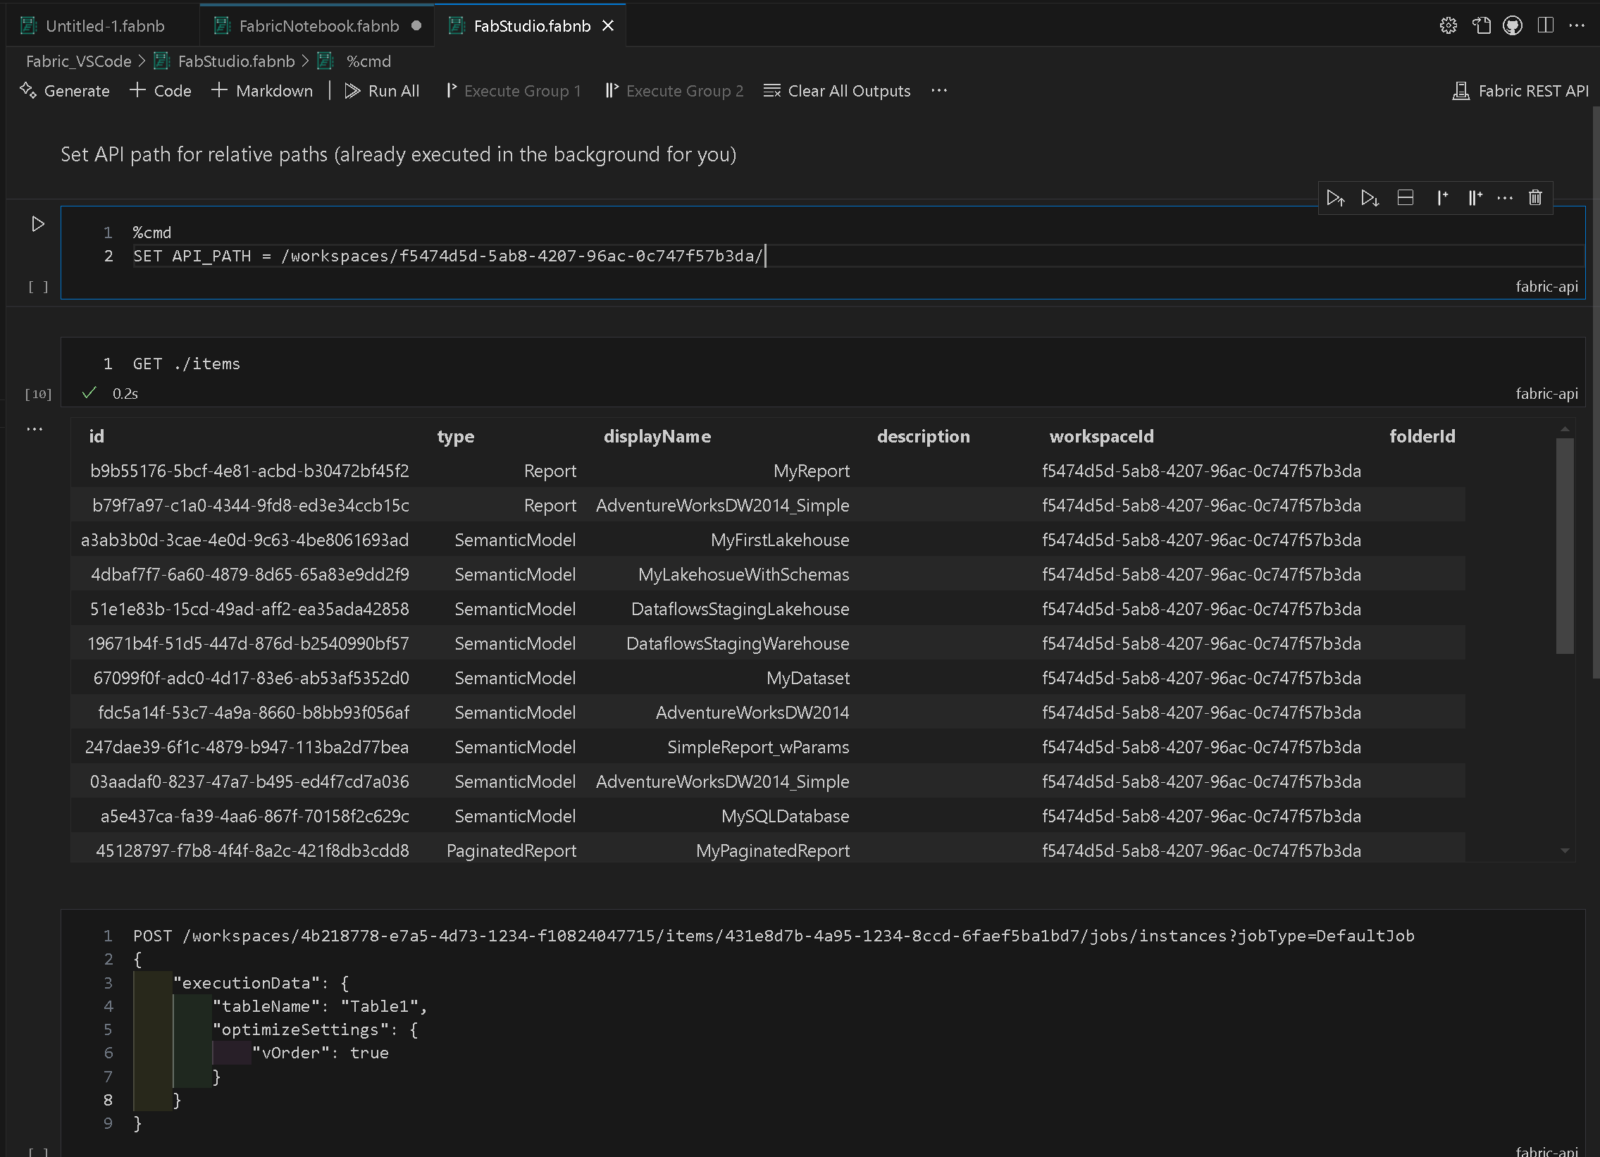
Fortunately, there is another way too which is not specific to Microsoft Fabric but a feature of Spark in general: SparkContext.addPyFile()

This function allows you to inject custom Python/PySpark code into your current Spark context. The code file – a .py or .zip file – can reside anywhere as long as it is accessible from the Spark cluster. The typical file storage within Microsoft Fabric would be the /Files section of a lakehouse which can be used in any notebook.

Now here is what we want to achieve:

  • develop notebooks and library code side-by-side within Microsoft Fabric
  • no use of external tools (offline or online)
  • quick iteration cycles when developing the library
  • avoid Environments due to longer cluster startup times
  • updates to the library should not require any further changes in existing notebooks

To accomplish this, I have created a generic notebook which I call LibraryManager. It allows you to define a set of notebooks which should be used and bundled into a library. The LibraryManager uses the Fabric REST API to download those notebooks as .py files into a lakehouse, compresses them into a .zip file and generates another notebook (load_LibraryManager) that then imports this .zip file using sc.addPyFile(). The notebooks that need to use your library can then simply use %run load_LibraryManager to import all the common code defined in your library. If the library evolves, the new functions will be available in all notebooks immediately without any further todos.

To make changes to the code in the library, I can now simply open the respective notebook in Fabric, and change the code as necessary. Then manually I run the LibraryManager notebook which only takes a couple of seconds to finish. Last but not least I restart the kernel of the referencing notebook and run it again which will load the most recent version of the library that I just updated. All-in-all this takes about 10 seconds and I do not need to leave Fabric.

Another nice aspect of this is that your library is now also part of your git repository and you always have a consistent state of notebooks and libraries and no dependency hell. The only thing you need to do is to run the LibraryManager notebook after each new deployment to make sure the library in the Lakehouse is up-to-date.

Now some people will argue that this is not professional and a library should have unit and integration tests and some proper versioning and release cycles and so on and so forth. And yes, you are right, for enterprise scale projects, that’s definitely the way to go! But if you only need a way to manage and share common code used in your data pipelines, this can still be a very good alternative with a low entry point and providing rapid development cycles and iterations not blocking you in any way and giving you a lot of flexibility.

Let me know what you think in the comments!

The LibraryManager notebook and a small sample of this can be found in my public github repository Fabric.Toolbox

Release of Fabric Studio v1.0

I am very proud to announce the first public release of Fabric Studio v1.0 – a VSCode extension that allows you to manage and develop your Fabric workspace(s). Similar to Power BI Studio, it seamlessly integrates into VSCode for increased productivity for professional developers and admins alike.

It includes a lot of different features of which the most notable are probably these:

  • a generic workspace browser supporting all Fabric item types and their most common API actions
  • a custom file system provider allowing you to modify Fabric items as if they were local
  • a dedicated deployment pipeline manager
  • an integration of the Fabric Git into VSCode source control
  • a VSCode Fabric notebook to run arbitrary API calls

Workspace Browser

The workspace browser gives you an overview of all items that currently exist in your workspaces. This includes all items that currently exist and automatically extends to new items that might get added in the future. For selected items specific entries in the context menu were added e.g. Copy SQL ConnectionString, Run Notebook, …

There is also a common set of actions that exist for every item like opening the selected item directly in the Fabric Service via your browser or copy its ID or Name.

At the top you will find icons that allow you to filter the list of workspaces, refresh the current item, edit the items (e.g. semantic models, pipelines, … see below) or open a notebook that allows you to run arbitrary calls against the Fabric REST API.

Edit Fabric Items from VSCode

Using the context menu in the Workspace Browser you can select Edit Items which will open the definition of the selected item in your VSCode Solution Explorer as a new folder. You can either do this on the workspace level, a specific item type folder (Pipelines, Notebooks, …) or on an individual item. As of now, not all items are supported – here is a list of items that are supported as of now:

  • Semantic Models using TMDL (.tmdl)
  • Reports using PBIR (.json)
  • Data Pipelines using JSON (.json)
  • Notebooks using Python (.py) or Jupyter Notebooks (.ipynb)
  • Spark Job Definitions using JSON (.json)
  • Mirrored Databases using JSON (.json)

This feature is implemented using VSCode Custom File System providers which makes it behave as if it were a local file system. This means you can also copy&paste or drag&drop between Fabric and your local file system – in both directions! The use-cases are unlimited here:

  • easily copy a semantic model or report from one workspace to another
  • upload the report of a local PBI Project (.pbip) to Fabric without having to also publish and overwrite the dataset
  • do bulk-edits on your notebooks or pipelines

Once you are done with your changes, you can use “Publish to Fabric” to upload them back to Fabric and make the new version available to your users.

Deployment Pipelines

Selectively deploy individual items or whole item types (multi-select!)into the next stage directly from VSCode.

Fabric Git Integration

If your Fabric workspace is linked to GIT, you can now mange it from VSCode as if it were a local repository. Stage/Unstage/Discard changes or pull the latest changes from the underlying GIT repository.

Fabric API Notebooks

As Fabric Studio is solely based on the REST APIs provided by Fabric, I also wanted to offer a way to make running arbitrary API calls as easy as possible. The main problem when it comes to REST APIs is always authentication. As the API is already authenticated in the background, we can use the same mechanisms to also run any other API calls as well. Notebooks in VSCode offer an intuitive way to to do this. Another reason for this generic way of doing API calls is that not all endpoints will be covered by the UI so it just made sense to offer this option as well.

There would be a lot more features worth being mentioned here but instead I will create short demo videos and publish them via my social media channels (Bluesky, X/Twitter, LinkedIn). So to stay up-to-date with the most recent developments, make sure to also follow me there!

The last thing I want to mention is that the whole project is 100% open source and can be used under the MIT license. The repository is currently hosted in my GitHub account: https://github.com/gbrueckl/FabricStudio. If you are interested in the project and maybe want to contribute to it, please reach out to me!

If you like Fabric Studio but are working mainly with Power BI, make sure to also check out Power BI Studio – another extension developed by me, specifically tailored towards Power BI developers and admins!

Visualizing Spark Execution Plans

I recently found myself in a situation where I had to optimize a Spark query. Coming from a SQL world originally I knew how valuable a visual representation of an execution plan can be when it comes to performance tuning. Soon I realized that there is no easy-to-use tool or snippet which would allow me to do that. Though, there are tools like DataFlint, the ubiquitous Spark monitoring UI or the Spark explain() function but they are either hard to use or hard to get up running especially as I was looking for something that works in both of my two favorite Spark engines being Databricks and Microsoft Fabric.

During my research I found these two excellent blog posts (1, 2) by Semyon Sinchenko who was already dealing with Spark execution plans and how to extract valuable information from them. I took a lot of inspiration and ideas from there to build my show_plan function.

In the end I wanted to achieve three goals:

  1. and easy to use function that can be used with any Spark Dataframe (including SparkSQL)
  2. a lightweight setup that works with all Spark engines
  3. an interactive, visual representation of the execution plan (still working on the interactive part)

Installation as of now is via sc.addPyFile from my GitHub repository Fabric.Toolbox. For now thats fine I think and if the function gets more popular I will probably create a PIP package for it.

sc.addPyFile("https://raw.githubusercontent.com/gbrueckl/Fabric.Toolbox/main/DataEngineering/Library/VisualizeExecutionPlan.py")
from VisualizeExecutionPlan import show_plan

Next would be the definition of your Spark dataframe. As mentioned above, you can use any Spark dataframe regardless of how you created it (PySpark, SQL, …). For simplicity and transparency I used a SQL query in my example:

my_df = spark.sql("""
SELECT fs.*, dc.CurrencyName, ds.StoreName
FROM contoso.factsales_part fs
INNER JOIN contoso.dimcurrency dc
    ON fs.CurrencyKey = dc.CurrencyKey
LEFT JOIN contoso.dimstore ds
    ON fs.StoreKey = ds.StoreKey
WHERE fs.DateKey >= to_timestamp('2008-06-13', 'yyyy-MM-dd')
""")

display(my_df)

You can now simply pass the variable that represents your dataframe into the show_plan function:

show_plan(my_df)

As you can see, the function is very easy to install and use, its basically just 3 lines of code to give you a visual representation of your execution plan!

For Databricks, the code is slightly different to missing preinstalled libraries and limited capabilities of display() function. First we need to install graphviz using %sh and %pip. This is also partially documented in the official Databricks documentation.

%sh
sudo apt-get install -y python3-dev graphviz libgraphviz-dev pkg-config

Instead of pygraphviz as described in the docs, we install the regular graphviz package:

%pip install graphviz

Adding the library and creating the test dataframe is the same as in Fabric.

sc.addPyFile("https://raw.githubusercontent.com/gbrueckl/Fabric.Toolbox/main/DataEngineering/Library/VisualizeExecutionPlan.py")
from VisualizeExecutionPlan import *
my_df = spark.sql("""
SELECT fs.*, dc.CurrencyName, ds.StoreName
FROM contoso.factsales_part fs
INNER JOIN contoso.dimcurrency dc
    ON fs.CurrencyKey = dc.CurrencyKey
LEFT JOIN contoso.dimstore ds
    ON fs.StoreKey = ds.StoreKey
WHERE fs.DateKey >= to_timestamp('2008-06-13', 'yyyy-MM-dd')
""")

display(my_df)

Finally we need to pass the displayHTML function as a second parameter to the show_plan function:

show_plan(my_df, displayHTML)

Information for the final output is take from the physical execution plan and is enriched with data from the optimized logical execution plan which for example contains the estimated sizes. Things like the type of join (e.g. BroadcastHasJoin) is taken from the physical plan.

It is worth mentioning that the sizes are based on the table statistics and become unreliable after joins are involved. However, I think they still play in import role in performance tuning so it made sense to me to also include them in the visual representation of the plan.

There is still a lot of room for improvements like installation via PIP, interactive visualization, highlighting of important things like partition filters, etc. and I could not yet test all potential scenarios (I mainly used Delta Lake tables for my tests). So I would really appreciate any feedback to make the show_plan function more robust and user friendly. Feedback is best provided via the underlying GitHub repository Fabric.Toolbox.

Announcing the MS Fabric Users Slack Channel

Are you a Microsoft Fabric user looking to supercharge your collaboration and networking? I am excited to announce the new Slack channel MS Fabric Users which I just created, tailor-made for people who want to engage with a dynamic and supportive community around Microsoft Fabric. With this channel, I want to create a space that’s built for speed, ease, and connectivity.

Why Did I Choose Slack For Communication:

I am already using different Slack channels for other technologies I use on my daily basis (Delta Lake, Databricks Users, VSCode Development, …) and when it comes to interactive collaboration, I think Slack is much more efficient in getting answers to your immediate questions than traditional forums etc. Here are some other reasons why I think that’s the case:

1. Real-Time Communication: 

Slack’s instant messaging platform means you can get answers to your questions and feedback on your projects without waiting for forum replies. Connect with peers in seconds, not minutes or hours.

2. Better Organization with Channels:

Create and participate in topic-specific channels that keep discussions focused and relevant. Whether you’re interested in theming, components, or best practices, channels make it easy to find and partake in conversations that matter to you.

3. Enhanced Collaboration:

With Slack, collaboration is not just about talking – it’s about doing. Share code snippets, files, and resources effortlessly with the drag-and-drop interface. Pair that with integrations like GitHub and Trello, and you’ve got a powerful toolkit right at your fingertips.

4. Accessibility On-the-Go:

Stay connected with the community wherever you are. The Slack mobile app provides a seamless experience, ensuring you never miss out on important discussions no matter where you work from.

5. Advanced Search Capabilities:

Slack’s powerful search function makes it easy to find relevant conversations, shared files, and announcements. No more sifting through pages of forum posts to find the information you need.

Join the Fabric Slack Community:

I believe community is key to learning and growing as a developer. By using Slack, you can enhance the way you connect, engage, and support each other as Microsoft Fabric users.

To get started, join the Slack channel today! Simply visit MS Fabric Users to sign up and dive into the conversations happening right now!

Using VARCHAR() in Microsoft Fabric Lakehouses and SQL Endpoints

Defining data types and knowing the schema of your data has always been a crucial factor for performant data platforms, especially when it comes to string datatypes which can potentially consume a lot of space and memory. For Lakehouses in general (not only Fabric Lakehouses), there is usually only one data type for text data which is a generic STRING of an arbitrary length. In terms of Apache Spark, this is StringType(). While this applies to Spark dataframes, this is not entirely true for Spark tables – here is what the docs say:

  • String type
    • StringType: Represents character string values.
    • VarcharType(length): A variant of StringType which has a length limitation. Data writing will fail if the input string exceeds the length limitation. Note: this type can only be used in table schema, not functions/operators.
    • CharType(length): A variant of VarcharType(length) which is fixed length. Reading column of type CharType(n) always returns string values of length n. Char type column comparison will pad the short one to the longer length.

As stated, there are multiple ways to define a text column and while you cannot use VarcharType/CharType in your Spark dataframe, you can still use it to define the output tables of your lakehouse. Inspired by this blog post by Kyle Hale, I was running some similar tests on Microsoft Fabric.

In general I can say that the results are basically the same as the ones that Kyle got. This was kind of expected as in both cases Spark and Delta Lake was used to run the tests. However, for me it was also interesting to see what impact this data type change had on other components of the Fabric ecosystem, particularly the SQL Endpoint associated with my Lakehouse. Here is the very simple Spark code I used for testing. I am writing a dataframe with an IntegerType() and a StringType() to a new table which will create this table in the lakehouse for you:

schema = T.StructType([
    T.StructField("charLength", T.IntegerType()), 
    T.StructField("value_max_len_10", T.StringType())
])

df = spark.createDataFrame([[(10),('abcdefghij')]], schema)

df.write.mode("append").saveAsTable("datatypes_default")

If you have a look at the table created in your Lakehouse via the SQL Endpoint using e.g. SQL Server Management Studio or Azure Data Studio, you will realize that text column is associated with a datatype VARCHAR(8000). For most columns, this is utterly oversized and can have a huge impact on performance as the size of the columns is used by optimizer to built an efficient execution plan.

Lets see what happens if we write the very same dataframe into an already existing table that was created using VARCHAR(10) instead:

%%sql
CREATE TABLE datatypes_typed (
    charLength INT,
    value_max_len_10 VARCHAR(10)
)
# writing the same dataframe as before but now to the pre-defined table
df.write.mode("append").saveAsTable("datatypes_typed")

Checking the SQL Endpoint again you will see that the data type of the column in the new table is now VARCHAR(40) – quite a big improvement over VARCHAR(8000) !

The reason why it is VARCHAR(40) and not VARCHAR(10) is described in this excellent post from Greg Low and I have to admit, reading it completely changed the way I look at string datatypes in SQL Server!

I have to admit that I do not yet know why it is VARCHAR(40) and not VARCHAR(10) but for the time being I am already happy with those results. I also tried other lengths but it seems to always show 4 times the defined length in the lakehouse table. Once I find out more about this, I will update the blog post!