Doing relative-time Slicers properly in Power BI

A very common requirement for a Power BI report that I stumble across at almost all of my customers is to automatically show data for the current day/month/year when a report is opened. At first sight this seems like a very trivial problem but once you dig into the problem, you will realize that all of the common solutions out there have some disadvantages and only solve the problem partially.

So here is what we want to achieve:

  • Show the Current Month (or Day, or Year)  by default
  • Works [in combination] with all other columns in the date table.
  • A single, easy to use slicer/filter to control the time selection and change from Current Month/Day/Year to any other value
  • Works with built-in time intelligence functions
  • Works with existing DAX measures
  • Works with any datamodel/report

Solutions like Relative Time Filter/Slicer, DAX or relative flags in the date table address only some points of the above list but definitely not all of them which is why I thought we need a better solution to this:

(please use full-screen mode)

We actually created a new table in our data model that is linked to the original date table. The reason why we cannot use the same table here is that the new table does not have unique date values as all dates/rows referring to our current calculations are duplicated. It has to be a many-to-one relationship with cross-filter direction set to both (even though we will only use the new table ‘Calendar_with_current’ to filter the existing table ‘Calendar’):
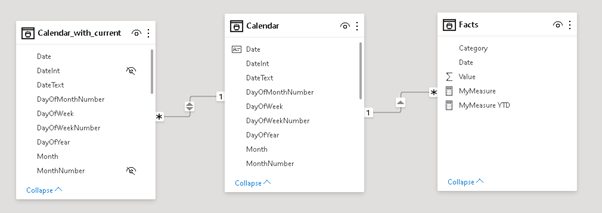
And that’s it basically. You can now exchange the original Calendar table with the new one to get the new “Current” values in your report. If you have time intelligence functions in place, you further need to extend them and add ALL('Calendar_with_current ') as a filter to make them work also with the new table. The old table can also be hidden now if you do not want to confuse the end users. To make a seamless switch you can further rename the tables.

I added an additional column to the table called Type that allows you to select which values you want to show – the original values (e.g. “September”), the values with “Current X” (e.g. “Current Month”), or both.Please see the second page/tab of the embedded report above.

So this raises the question how this new table can be created? To simplify this I have created a Power Query function that takes 3 parameters:

  • The current date table
  • A list of definitions of your current-values
  • The name of the unique date-column in your current date table (parameter 1)
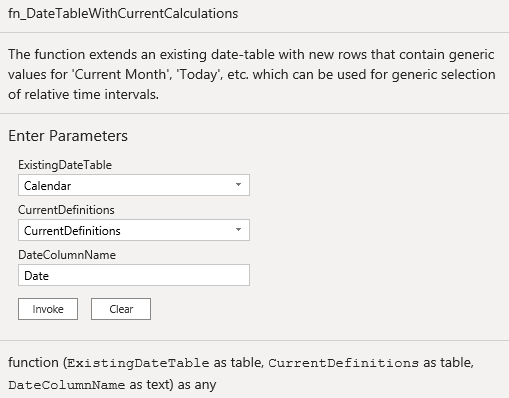
The first and the third parameter should be clear, but what are the “CurrentDefinitions”?

It is basically a table which defines the relative time calculations that you want to extend your existing date table with. Here is an example:
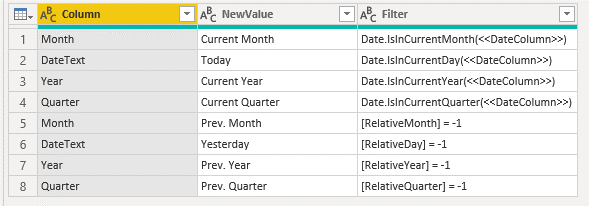
The column Column refers to the column in which you want to create the relative date definition. The column NewValue specifies the value that you want to set for rows that match the third column Filter. The column Filter either takes a static filter expression like [RelativeMonth] = 1 (as in lines 5-8) but can also use existing M-functions and reference the existing Date-column using the placeholder <<DateColumn>> as you can see in lines 1-4.

The table can be maintained using “Enter Data” and can contain any number of rows/definitions!

For most of my scenarios this works pretty well and addresses all major problems highlighted above.

The latest Power Query function can be downloaded from my github repository: fn_DateTableWithCurrentCalculations.pq
Power BI desktop files can be downloaded from here: PBIX PBIT
Fiscal Periods, Tabular Models and Time-Intelligence

I recently had to build a tabular model for a financial application and I would like to share my findings on this topic in this post. Financial applications tend to have “Periods” instead of dates, months, etc. Though, those Periods are usually tied to months – e.g. January = “Period01”, February = “Period02” and so on. In addition to those “monthly periods” there are usually also further periods like “Period13”, “Period14” etc. to store manually booked values that are necessary for closing a fiscal year. To get the years closing value (for a P&L account) you have to add up all periods (Period01 to Period14). In DAX this is usually done by using TOTALYTD() or any similar Time-Intelligence Function.


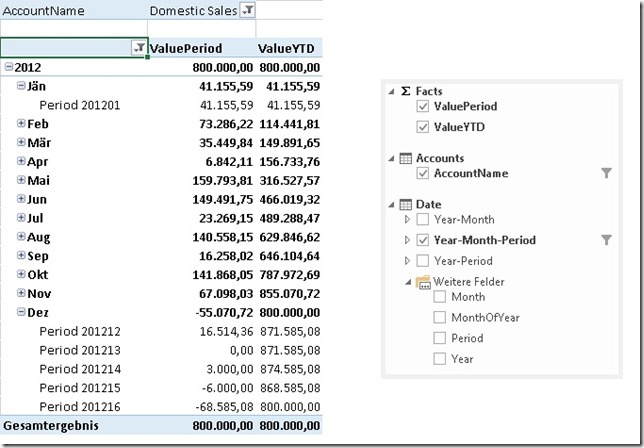
Here is what we want to achieve in the end. The final model should allow the End-user to create a report like this:

DesiredResult

This model allows us to analyze data by Year, by Month and of course also by Period. As you can see also the YTD is calculated correctly using DAX’s built-in Time-Intelligence functions.

However, to make use of Time-Intelligence functions a Date-table is required (more information: Time Intelligence Functions in DAX) but this will be covered later. Lets start off with a basic model without a Date-table.

For testing purposes I created this simple PowerPivot model:

BaseModel 

Sample of table ‘Facts’:

AccountID PeriodID Value
4 201201

41,155.59

2 201201

374,930.01

3 201211

525,545.15

5 201211

140,440.40

1 201212

16,514.36

5 201212

639,998.94

3 201213

-100,000.00

4 201213

20,000.00

5 201214

500,000.00


The first thing we need to do is to add a Date-table. This table should follow these rules:
– granularity=day –> one row for each date
– no gaps between the dates –> a contiguous range of dates
– do not use use the fact-table as your date-table –> always use an independent date-table
– the table must contain a column with the data type “Date” with unique values
– “Mark as Date-table”

A Date-table can be created using several approaches:
– Linked Table
– SQL view/table
– Azure Datamarket (e.g. Boyan Penev’s DateStream)
– …

(Creating an appropriate Date-table is not part of this post – for simplicity i used a Linked Table from my Excel workbook).

I further created calculated columns for Year, Month and MonthOfYear.


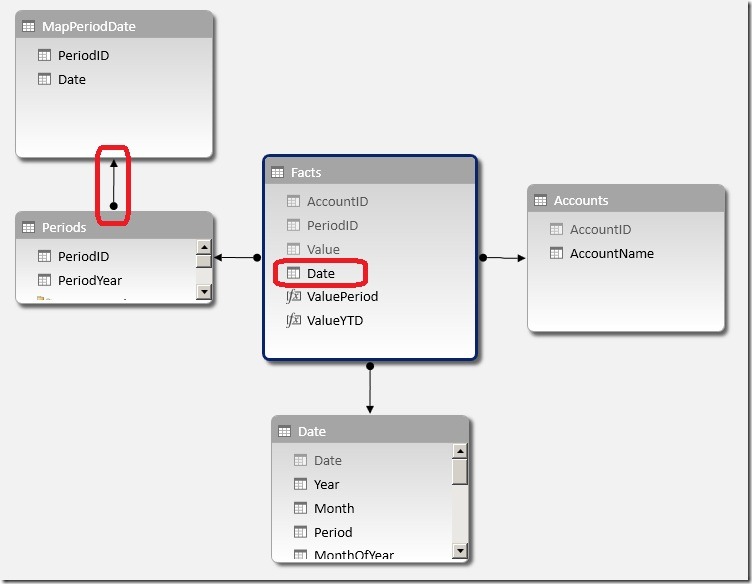
At this point we cannot link this table to our facts. We first have to create some kind of mapping between Periods and “real dates”. I decided to create a separate table for this purpose that links one Period to one Date. (Note: You may also put the whole logic into a calculated column of your fact-table.) This logic is straight forward for periods 1 to 11 which are simply mapped to the last (or first) date in that period. For Periods 12 and later this is a bit more tricky as we have to ensure that these periods are in the right order to be make our Time-Intelligence functions work correctly. So Period12 has to be before Period13, Period13 has to be before Period14, etc.

So I mapped Period16 (my sample has 16 Periods) to the 31st of December – the last date in the year as this is also the last period. Period 15 is mapped to the 30th of December – the second to last date. And so on, ending with Period12 mapped to the 27th of December:

PeriodID Date
201101 01/31/2011
201102 02/28/2011
201111 11/30/2011
201112 12/27/2011
201113 12/28/2011
201114 12/29/2011
201115 12/30/2011
201116 12/31/2011
201201 01/31/2012
201202 02/29/2012

I called the table ‘MapPeriodDate’.

This table is then added to the model and linked to our already existing Period-table (Note: The table could also be linked to the Facts-table directly using PeriodID). This allows us to create a new calculated column in our Facts-table to get the mapping-date for the current Period:

=RELATED(MapPeriodDate[Date])


The new column can now be used to link our Facts-table to our Date-Table:

FinalModel

Please take care in which direction you create the relationship between ‘Periods’ and ‘MapPeriodDate’ as otherwise the RELATED()-function may not work!

Once the Facts-table and the Date-table are connected you may consider hiding the unnecessary tables ‘Periods’ and ‘MapPeriodDate’ as all queries should now use the Date-table. Also the Date-column should be hidden so the lowest level of our Date-table should be [Period].


To get a [Period]-column in our Date-table we have to create some more calculated columns:

[Period_LookUp]
= LOOKUPVALUE(MapPeriodDate[PeriodID], MapPeriodDate[Date], [Date])

this returns the PeriodID if the current date also exists in the MapPeriodDate-table. Note that we only get a value for the last date in a month.


[Period]
= CALCULATE(MIN([Period_LookUp]), DATESBETWEEN('Date'[Date], [Date], BLANK()))

our final [Period]-calculation returns the first populated value of [Period_LookUp] after the current date. The first populated value for dates in January is the 31st which has a value of 201101 – our PeriodID!


The last step is to create our YTD-measures. This is now very easy as we can again use the built-in Time-Intelligence functions with this new Date-table:

ValueYTD:=TOTALYTD(SUM([Value]), 'Date'[Date])

And of course also all other Time-Intelligence functions now work out of the box:

ValuePYTD:=CALCULATE([ValueYTD], DATEADD('Date'[Date], 1, YEAR))


All those calculations work with Years, Months and also Periods and offer the same flexibility that you are used to from the original financial application.


Download Final Model (Office 2013!)